
Inhaltsverzeichnis
Hotel Timetable
The PC CADDIE hotel management - based on our central customer and guest management - is exactly the right thing for your small, fine hotels, manor houses or guest houses. From room reservation, to check-in and check-out, to room bills and door locking systems - with PC CADDIE HOTEL you have a software solution that can be fully integrated into the existing program. Also online: your guests can book or cancel the rooms or access special wellness offers and additional services.
Setting up the Hotel Timetable
PC CADDIE will set up the hotel timetable for you.

- room numbers are shown on the left side.
- the dates are shown on the top line
Legend
The characters on the left side vary - the legend can be found by double-clicking on the word Legend.

Room reservation
Room reservation (single/double room)
Open the booking mask by double-clicking a specific room on the desired day, or by pressing the button New booking in the area overview:

- enter the number of nights (1 night is the default setting);
- enter the number of rooms (1 room is the default setting);
- for reference bookings (e.g., via companies), add reference to the company;
- free text field for individual information;
- choose room category and/or
- choose room number (it is not necessary to give a room number immediately - see the section below);
- select or create the guest;
- select the article (if you want to create new articles, please see Article);
- for double rooms, either enter the second name or click the button 2;
- confirm the booking with OK.
The room reservation could look like this:
Room for Heike Richter, 2 nights 27.07. to 29.07.2017

- the cost for Heike Richter's accomocation is covered by PC CADDIE AG (Reference field);
- the note of acceptance of the invoice is available as information in the free text field;
- the room category is Single room, standard;
- the room number is already set(this is not mandatory);
- the name of the guest is registered;
- the article is not specified……

Select the article for this booking by entering it in the field Main article or via the list button on the right side. If the guest has booked half board and/or green fee, please enter the appropriate check-marks (or price changes).
The reservation for a single room with half board is ready and looks like this:

The reservation for a double room may look like this:

In the Timetable, the booking looks like this:

You can also see the additional information (entered in the free text field) if you click on the booking; this is shown in the pop-up window on the right side.
Room reservation (groups)
For a possible group booking, for example for 11 rooms (1 single and 10 double):

Click on Room to assign the room numbers immediately, if necessary.


- The names of the different guests can now be assigned to the rooms by marking the respective room number on the left…
- and entering the corresponding name on the right.
The group booking is done…..

But the article is still missing…

- Click on Article,
- select the correct accommodation item and press OK. the following window opens:

With the help of the check mark All in the same area this article will be adopted for all rooms listed here. Or just tick the appropriate box for the room you want.
The provisional room reservation
Start the process of creating a provisional booking after pressing the button on the left side:

The following window opens:

Please select the category „provisional, valid until“ and fill-in the date field.
In the Hotel bookings window you can see the provisional booking with the corresponding icon.

The room reservation (individual arrivals/departures)
First of all, make a normal booking over the desired period:
for example: a double room for 2 persons, over 3 nights:

If, for example, Mrs. Petra Member only needs this reservation for the first two nights, click Cancel and delete the corresponding line:

As soon as you confirm with OK, the button individual arrival / departure of single guests of the room becomes active.

And the booking in the hotel timetable looks like this: Heike Richter is the only guest in this room for the last night.

Now another person wants to spend this night (from 22 to 23.09.17) in room E09. The button individual arrival/departure of single guests of the room must be disabled.

Then you can enter the name of the guest, in our example Claudia Member, as the 3rd name in the booking mask, and accordingly activate the deletion via the Cancel button:


Heike Richter and Claudia Member spend the last night in room E09:

The room reservation WITHOUT immediate allocation of the room number
It is customary in the hotel industry to only book room categories, and assign the room numbers to the guests on the day of arrival. This is also possible in PC CADDIE.
The current room situation can be viewed at any time with the help of the area overview. This shows how many rooms are booked or still available and their cathegory. See also section overview of areas.

The reservations without room assignments are also visible in the Hotel Bookings window (Timetable - Hotel Booking).

They are marked in blue and the room number is missing.
The night automatics ensures that every night the rooms are automatically assigned (before the arrival of the guest).
Of course you can manually assign the room numbers at any time. It is also possible to mix bookings with fixed room numbers and category bookings.
Deleted room reservations
Deleted room bookings can be displayed in the Hotel Bookings window using the filter, but they cannot be reactivated.

Different price levels for hotel articles
Find the new menu items Edit price levels and Edit rules of price levels under Articles. Special parameters are necessary, so please contact the PC CADDIE support.
Enter the different price levels defined in your hotel under Edit price levels.

- Press New to create a new price level.
- Edit a price level with Edit.
- Use Delete to delete a price level.
- You can move different price levels up
- or down in the list
Press New to create a new price level.

Please fill-in the field Description with your desired name. PC CADDIE automatically assigns the identifier.
Once all price levels have been defined, they are displayed in an article under Details and the tab Price levels:

Please enter your own prices in the appropriate line for the respective price level.
When is each price valid? Define the answer in the rules. Enter the appropriate rules for the price levels defined in your hotel under Edit rules of price levels.

- Press New to create a new rule.
- Edit a rule with Edit.
- Use Delete to delete a rule.
- You can move different rules up
- or down in the list
Press New to create a new price rule.

- enter the appropriate name for your rule;
- click Select to define your appropriate price level for this rule;
- you can color-code your rule;
- use this checkbox to enable or disable the rule;
- define the corresponding days on which this rule is valid;
- define the validity period for this rule;
- define the time frame on which this rule is valid.
Confirmation for the room reservation
You can also send confirmations for room reservations. The layout for the confirmation can be set in PC CADDIE.
Press Print in the booking mask to print out the confirmation:

click Print again

The possible fields for the hotel confirmations are:
- Confirmation number: •<BREF.>
- Arrival: •<ARRIVAL >
- Departure: •<DEPARTURE >
- Duration: •<STAY > Days
- Nunmer of rooms: •<NROOM >
- Room cathegory: •<ROOM_CATEGORY.>
- Number of guests: •<NGUEST >
- Price per night: •<NPRICE >
- Total price: •<TPRICE >
- Average price per night per person: •<PPRICE >
- Average price per night per room: •<RPRICE >
- Option date for provisional bookings: •<OPTDAT >
- Information field in the print window •<XINFO >
Example:
<LIST_DATE:ALL> <LIST_DATE:DIFF> <LIST_DATE:FIRST> <BOOKINGS: <POS>•<RNUM> •<BCATL >•<GARR >•<GDEP >•<GSTA>•<OCC >•<PERSON »
with list of articles:
<LIST_ARTICLE: •<DAY >•<NAME >²<PRICE > <LIST_ARTICLE:YES> <BOOKINGS: <POS>•<RNUM> •<GARR >•<GDEP >•<GSTA>•<OCC>•<PERSON »
Arrival (Check-in and registration)
The hotel guest arrives and is checked in:

The registration form is also printed at the same time:

Please pay attention to the correct layout:

Printing of all registration forms for all arrivals
The menu item Timetable - Hotel guests opens the following window for all guests / arrivals of the day:

- Clicking this button marks all arrivals (red font).
- Here you can print the relevant registration forms.

Please select your suitable layout for the registration forms and print them out on your printer.
Night automatics
During the night, the items of the guests who have checked-in will be booked into the corresponding accounts, and will then be available for billing in the morning.
If the night automatics cannot make all the bookings for all the rooms (for example, because one guest arrived after 23:00), the process can be started manually via: Timetable, Hotel-Rooms.

In the following window you will find the two options offered by PC CADDIE for the night run:

- Posting the articles of the hotel booking
- Automatic room allocation for arrivals that only have a room category booking, but no room number yet.
The items are booked manually if a guest wants to pay on the day of arrival - see next section.
Immediate payment on the day of arrival
A guest wants to settle his bill on the day of arrival; the items are now booked manually:

PC CADDIE fills-in the fields for the booked articles:

Confirm with OK and then select the appropriate payment method. The invoice will be printed at the same time.

Press OK again to confirm the payment.
Departure / Payment / Check out
The guest wants to pay on the day of departure. Click again on the booking and then on the button Settle.


- Is the correct invoice displayed?
- Are all the individual compenents of the bill correct?
- Press Pay.

Pressing OK means the payment is completed and the invoice is printed at the same time.
Finally, checked out the guest , so that the room can be occupied again. In the booking mask, press the button Check out and then OK, check-out.

Check out: Payment of several rooms
The guests want to pay on the day of departure. In this example, one person pays for several other guests. Click in the booking of the first guest whose bill is payed by someone else, and then on the button Settle.


Change the person to the one who pays and confirm with OK.

The area overview
The area overview gives you a quick overview of the numerical and percentage occupancy of your hotel. You can find the overview via the menu item Timetable and Area overview:

- Total rooms: total number of rooms, of which „out of order“ or „out of service“
- Inventory: inventory of rooms divided into „booked“, „booked on waiting list“ and „provisional“. With the help of a double click on the number next to „booked on waiting list“ on a corresponding date, the corresponding bookings on the waiting list open on that day.
- Reserved total: number of reservations divided into minimum available and maximum available, minimum and maximum percentage occupancy
- Availability depending on the room category
- People in the house: number of people divided into adults, children
- Print the list
- Options for the settings of the area overview - see below -
- opens the window „hotel room“
- opens the window „Hotel booking list“
- opens the window „Hotel guests“
- opens a new hotel booking
- shows the transferred Hotel-Spider bookings
- The availability of the rooms can be blocked or set to zero availability
- opens the „Hotel settings“
The sales are shown in the lower part of the area overview:

- Sales according to the set department
Sales according to the articles
You can choose from the following options:

1 - You can also display a view on a weekly or monthly basis.
2 - Here you set the visibility of the article details
3 - Corresponding product groups for the RevPar calculation
The printout of the area overview looks like this:

New room lists (from 09/19)
There are new room list functions in the Hotel Room window.

All columns can now be sorted by clicking on the corresponding headings such as Room or booking. The corresponding sorting is marked with the blue arrow.
Group bookings of rooms that belong together are shown in the same color.
First of all, click the button in the list that you want to configure (for example, Housekeeping). The button turns green:

Then open the Options and define the information that you want to include on the housekeeping list.
The following window opens:

- Please define what you want to show: arrivals, durations, departures, free rooms.
- Whether the booking reference is displayed or not in the Booking column.
- Only rooms with comments are shown.
- Group comments are comments in the large information field of the booking mask that concern the entire booking. They are displayed in blue font.
- Individual comments are stored with the respective guest and displayed in light blue font.
- Comments with R: only concern the restaurant; with HK: relate to housekeeping.
- Select whether the arrival date, departure date, and the number of nights already spent should also be displayed.
- Select whether the guest names should be displayed.
- Select whether the reference name (company) should be displayed.
Confirm your details with OK and you can now print out your list using Print.
You can customize and print any list such as Arrivals or Departures or Restaurant or Housekeeping.
Information column on the room lists
In the Information column you can see dark blue and light blue information. Dark blue information = information for general hotel bookings. Light blue information = individual information for this guest.
Enter the general information about a hotel booking here:

Enter the individual information of a guest here:

Room list for half board guests
If a hotel guest (or several guests) books a room with half board, there are two options for entering the HB in the hotel booking. Regardless of which variant you choose, the input is always R:HP.
1. The guest (or a group) books one (or more) double rooms and half-board applies to the entire booking - i.e. for several people. To do this, use the text field from the left of the window. As you can see in the example here - half board is calculated for 2 people.

2. the guest (or a group) books one (or more) double rooms and half-board ONLY applies to single persons or room. To do this, use the information field from the booking. As you can see in the example here - half board is calculated for 1 person.

The window Timetable - Hotel guests shows the number of guests on the respective day:

Or use the print function on the right:

The layout of this list looks like this (the format type is important: list):

and the different fields are these:
Nr. • Zimmer •           •Bu.Referenz       • Kontakt •         Anreise •   Abreise    • Aufenthalt
<Z >•<RMNO>• <STAY_STATE> •<BREF    >     •<BLREF         >•   <ARRIVAL>•   <DEPARTURE>•<STAY>
The printout of the list looks like this:

CRM for hotel bookings
If the „Document Management Module“ (CRM) is licensed for your golf course, you can also use this for your hotel reservations, for example for retracing the reservation confirmations.
More about the Document Management Module CRM
You have to set up a category to be able to use the CRM for the hotel reservations; it essentially looks like this: the abbreviation must be PROJHT and the type must be set to PROJECT.

If you now click on CRM when you make a reservation, you will see that each reservation is automatically assigned a project. Reservation confirmations can be stored here and can be traced at any time.
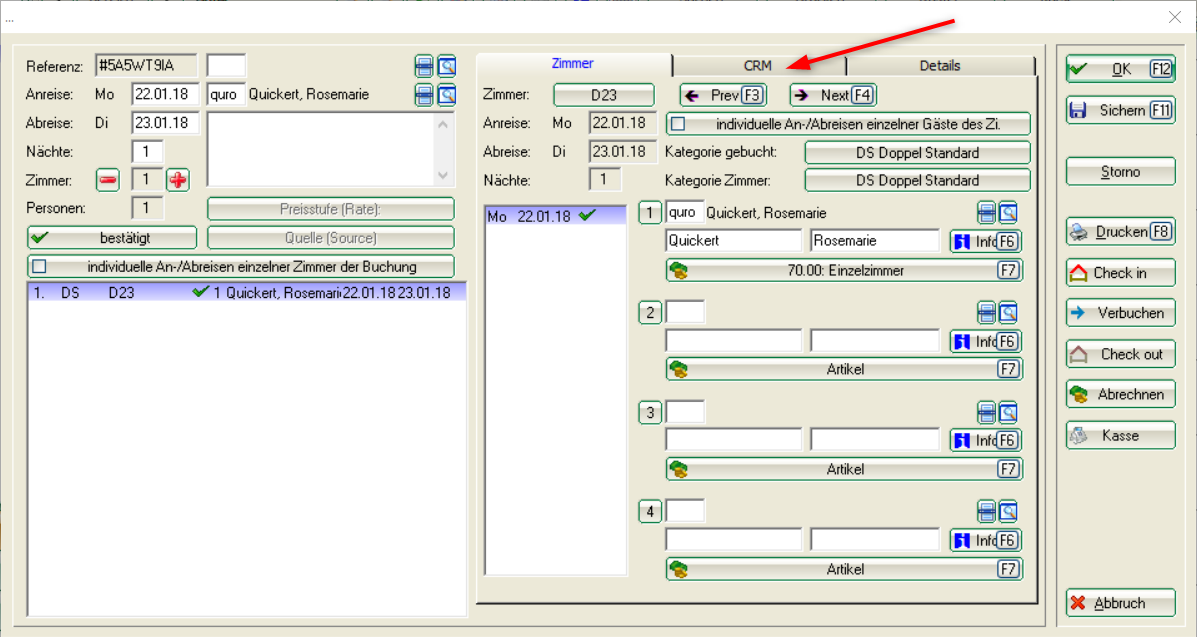
You can save the print-outs under the project. The printouts are automatically assigned the correct project number.

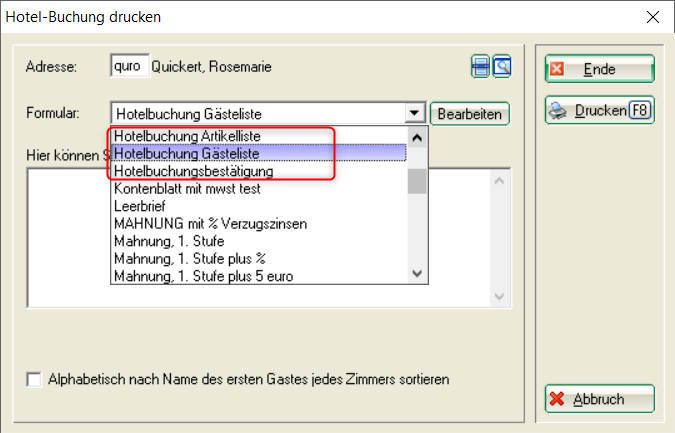
You can select the template after you click Pint (ask our support).
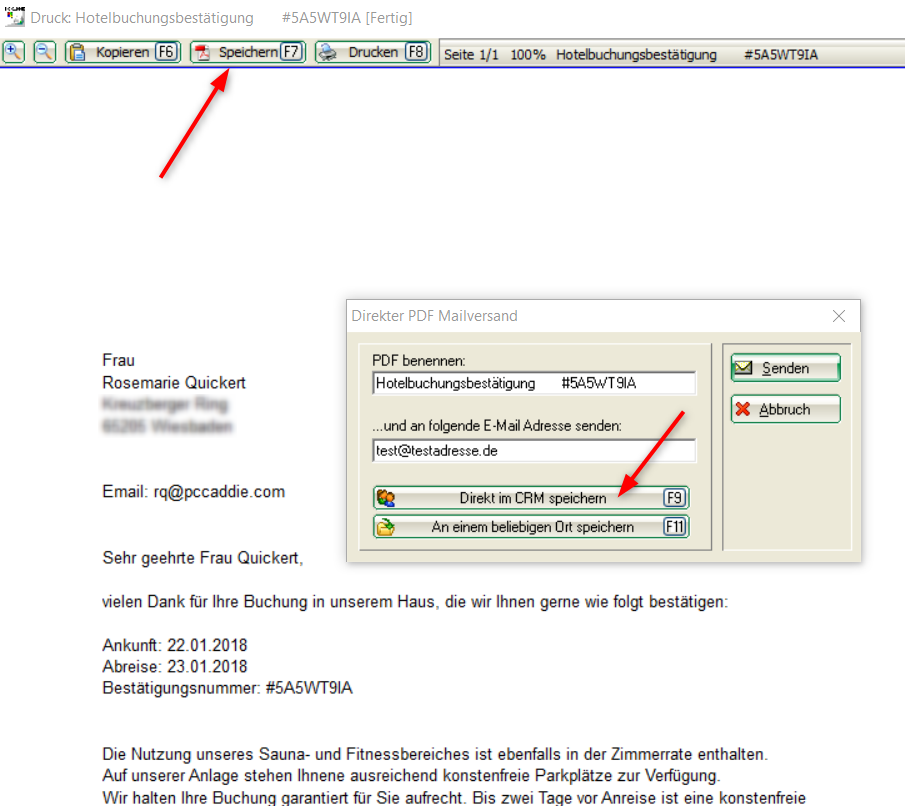
Print as usually on the screen and save in CRM. The right project is automatically determined. The PDF is open for re-use, and can be printed or sent by e-mail. The mail address of the hotel customer is already in the Windows cache and only needs to be inserted into the mailbox with „CTRL + V“.
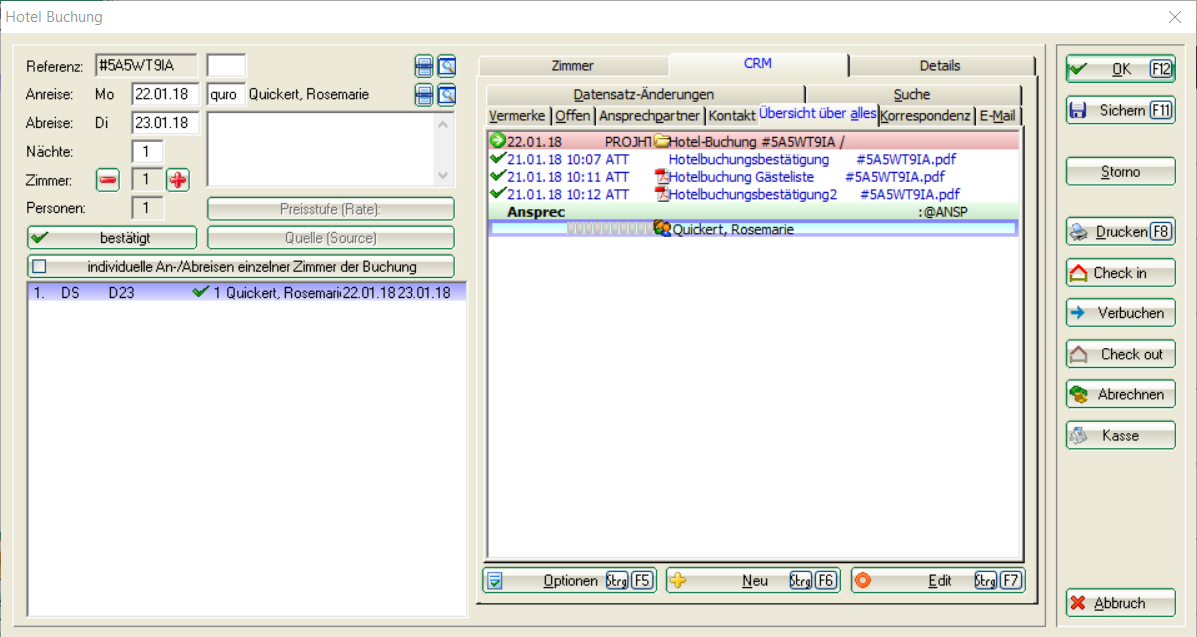
You can see all the stored print-outs and attachments in CRM. Select the line with the desired print-out and open it again with Edit, if necessary.
- Keine Schlagworte vergeben
PC CADDIE AG
Bachtelweg 3
6048 Horw/Luzern
Schweiz
Kontakt
![]() Fon +49 2642 9854110
Fon +49 2642 9854110
Fax +49 2642 9854199
![]() Fon +41 41 5110600
Fon +41 41 5110600
Fax +41 41 5110699
![]() Fon +43 13 55667788
Fon +43 13 55667788
Fax +43 13 55667799
Mail support@pccaddie.com
Web www.pccaddie.com
Support Online-Module
PC CADDIE://online
GmbH & Co. KG
Fon: +49 2642 9854120
Fax: +49 2642 9854169
Mail support@pccaddie-online.de
Web www.pccaddie-online.de
Tägliche Supportzeiten:
April-Oktober
09.00 - 20.00 Uhr
November-März
09.00 - 18.00 Uhr