
Inhaltsverzeichnis
Edit accounts
 The contribution accounts of individuals, families or companies are edited here. You can make the relevant changes or create individual invoices at any time.
You work here in individual accounts. To do this, go to the menu under Turnover/Edit accounts and first select a person:

The account of the selected person will then open:

 Of course you can also use the person mask under Persons/Create, edit, delete… to call up the sales account of the desired person directly.

Further functions

- List of persons is opened.
- The data record of the selected person with detailed information is opened.
- Jump one person to the left or right.
- List of articles (contributions) is opened.
- The selected item in the sales account is displayed
- The selected item can be changed in terms of name, date, amount or VAT.
- Cancellation of an existing invoice or deletion of articles (articles highlighted in yellow)
- Contribution allocation only for the selected person
- Entering the payment
- Print invoices, credit notes, duplicates or summary documents
- Close window
Write invoice individually
Assign
Once you are in the account, you first assign all the desired items to the person. Here you can use the settings of the automatic contribution allocation, if this has already been set up. To do this, click in the person's account on the right on Assignin the person's account on the right, do not need to select anything else (just change the date to which the posting is to be made if necessary) and then confirm again with Assign. PC CADDIE searches for all suitable items for the new member and posts them to the account.
TIP: This is also a good way of checking whether the new member is set up appropriately for the next annual accounts.


Assign manually
If you want to post items individually to the account, click on Select contribution.
Select the appropriate contribution. With Edit and New you can also change or create new articles at this point.

You now have an assigned item in the account with a yellow background:

At this point, the item can still be removed from the account without further ado: Cancellation and then Delete.

You can also change the item description, the price or the item date individually, for example.

The different columns in the sales account mean

- + or - sign : opens or closes an invoice/credit note with the posted items
- Information: Item description
- Date: item date (if the Due date field in the item date is empty, today's date appears)
- Time: in the case of an automatic contribution allocation, the Time field remains empty
- Status: Status of the item
- Net: Net amount
- Gross: Gross amount
- OK: status of the booking (see explanation of the various characters below)
You can then generate the invoice for the assigned items by first clicking on Print first.

The following window opens, please note the 6 steps in the procedure:

- First select the appropriate option. The Advance voucher does not generate an invoice number and is only intended for viewing or checking. Only the Normal receipt generates the invoice. In the first step, you can create the advance document for checking and, in the second step, the normal voucher if everything is set up correctly.
- The posting date determines the date up to which the items that are already in the accounts are invoiced. Here you can exclude items that are in the accounts in preparation for later invoices from the current invoicing. Also with the help of the tick Select line items individually you can select individual items accordingly.
- Summarise families is usually the default setting in PC CADDIE. However, PC CADDIE remembers the last manual setting until the programme is restarted. Here you should bear in mind, especially when making later changes in the family group, that the invoices are cleared or changed first, and then the contact persons of the families are separated. If you do not wish to create invoices for each family, please contact PC CADDIE Support.
- The voucher number is the invoice number and is only defined once at the beginning of the year. We recommend that you choose the following number at the beginning of the year: JAHR00001, as an example for 2020 this would be 202000001. The maximum is 10 digits. PC CADDIE then assigns the numbers consecutively.
- The text template for the invoice should be properly stored. The account data is inserted here using commands. It is advisable to keep the template text as general as possible. We would be happy to create a template with your letterhead and log. However, there is a charge for us to create the template.
- You can now print the invoice. If you use Normal receipt an invoice number is generated, even if you only print on the screen! Duplicate printing is then possible in the next step.
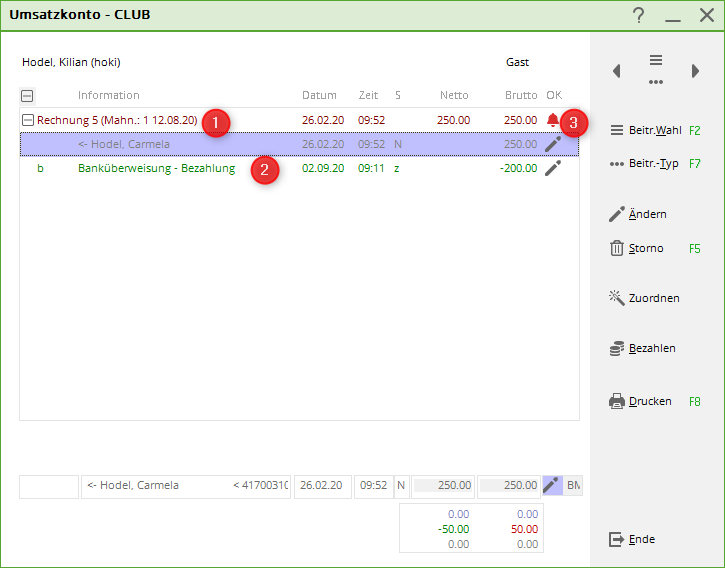
The finished invoice entry in the account looks like this:

The six digits at the bottom right of the account have the following meaning:
- upper line on the left in light blue font: total net of all invoiced items
- top line on the right in light blue: total gross of all invoiced items
- centre line on the left in green: total of all payments
- middle line on the right in green / red font: balance of the account (green = credit, red = debt)
- bottom line on the left in grey font: total net of all items with a yellow background
- Bottom line on the right in grey: Gross total of all items with a yellow background
Double-click on the invoice entry (Mrs Hodel in the example) to go to the original posting. If this has been transferred from another account area (e.g. from the cash register in the sales area), PC CADDIE automatically changes the account area and you can view the original posting in the original.
Post payment
Total identical to invoice
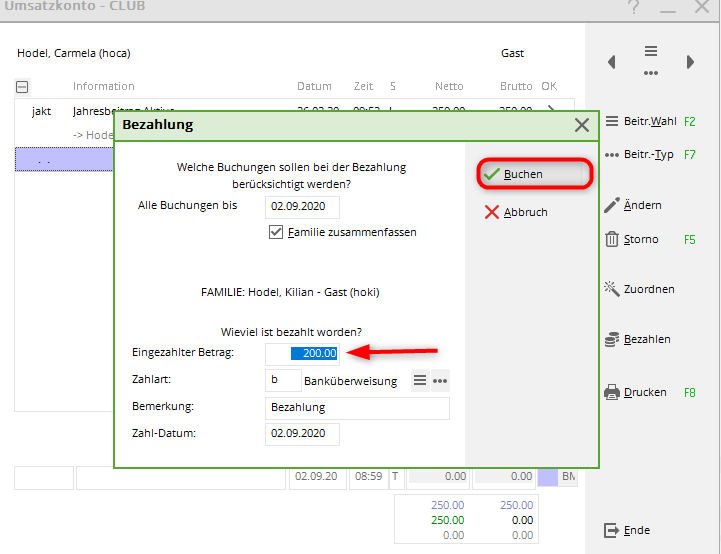
First click on the button Pay.

The following window opens:

- Bookings up to which date should be taken into account? The current date is suggested, but you can also enter a date up to which the open amount should be calculated. With TAB (keyboard), PC CADDIE calculates the respective open amount and automatically displays it in the field Amount paid in field (point 3).
- You have currently selected this person.
- The Amount paid in and calculates the amount according to the settings in point 1. payment method you select appropriately. You can vary this using the item search button. If you are missing a payment method, you can create it: Payment methods for contribution accounts. As comment „ Payment“ is suggested by default. Click on the payment datethat you enter here, the payment will be posted to the account.
- Once you have made your settings, please click on Book. The following window will open:

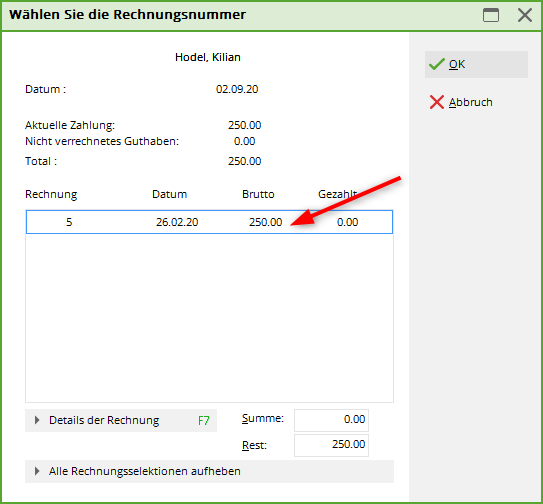
If the payment matches an invoice amount, PC CADDIE automatically selects the matching invoice here that is still outstanding for payment. You could also manually select the invoice to which the payment is to be assigned here (e.g. for instalments).
Then go to Post, to post the payment. The invoice is then ticked off in the account. The payment entry exists and the account is fully balanced in this case.

TIP: Booked payments (only the green entries) can be cancelled at any time. However, we only recommend this if you have booked the payment incorrectly. If the payment was posted a long time ago, you can track the transactions in the account more easily if you select and cancel the paid entry.
Direct debits, for which you have created a SEPA file are cancelled collectively: Deregister direct debit
Split payment
The customer has 2 invoices, there is a transfer that pays more than 1 invoice, but the 2nd invoice is not paid in full.
Select both invoices:
You can choose between „equalise oldest vouchers“ or „distribute evenly“.
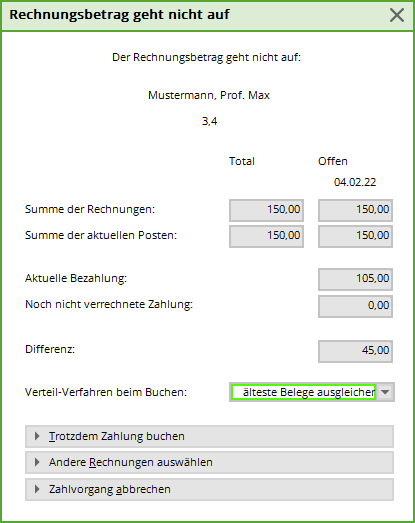
In this case, „Settle oldest receipts“ was selected:
- The older invoice for 1000 euros has been paid in full.
- 2nd invoice is „partially paid“ with 90 euros.
- There remain „squiggles“ for partially paid until ALL sums are totalled.
Cancellation and credit note
Cancel invoice
If you realise that an error has occurred after the invoice has been created, you can cancel the invoice. However, this is only possible on the same day and for the last invoice written.
In the account, click on Storno:

This selection opens:

Then click on Cancel invoice and you will get the yellow entry in your account again, which you can easily cancel with cancellation and Delete entry to remove it.

If you can no longer cancel the invoice, you will receive the following message:

A cancellation and subsequent creation of a credit note must then be carried out, which is described in the next point.
TIP: If you would like to provide proof of the invoice numbers generated, please print a List of outgoing invoices , which also contains 0 amounts.
Cancellation/credit note
To make a cancellation, first go to Cancellation.

Now click here on Cancel invoice completely, so that yellow cancellation entries appear in the account.

A credit note must be created from these cancellation entries, now click on the button Print button in the sales account. The same window opens as for printing invoices.

The credit note text is particularly important here. You can edit the template using the Edit button and save it. Here too, the more general the text is, the better.
Via the Advance document you can check the text, via the Normal voucher to activate the credit note in the account. The credit note is given its own new number so that the accounting department can write off the cancelled invoice number against the credit note.

The account balance of this account is now 0, but the green tick on the right-hand side is missing. These are obtained via a payment posting with the amount zero. So Pay

afterwards Bookso that all entries are completed.

For cancellations and credit notes, please note that changes to family groupings are only may only be made if you previously have cleared the accounts.
Printing a duplicate invoice
To create a duplicate invoice, click in the sales account on Print, select Print duplicate and then Print
Please also note the explanations for Create new duplicate if you need a different invoice address or a different invoice layout!

The desired invoice can now be selected

and click OK to be printed. The invoice copy is printed as the ORIGINAL of the original print.
If you want to print a duplicate with a different address or a corrected invoice layout, tick the checkbox
Create new duplicate.
Explanation of the characters
Yellow entries
These are allocated items that have not yet been invoiced.

In the case of monthly payers, for example, an item could be allocated in advance for the whole year.
Grey arrow
The arrow appears after an invoice has been generated from an assigned yellow item. This lets you know that this invoice is now open.

Direct debit
If you see a sheet with a pen (as a symbol of a direct debit authorisation), you can see that the amount is already included in the SEPA direct debit file. This means that the amount will be collected from the customer as soon as the file is imported into a bank programme.

Pencil
The pencil indicates a partial payment.

Green tick
The green tick shows that a payment has been posted that clears the invoice in full.

Yellow bell
The yellow bell indicates that the 1st reminder level has been reached.

Red bell
The red bell indicates that the 1st reminder has been printed and that reminder level 2 has now been reached.

Yellow star
The yellow star shows that the entry has been exported to the accounting export file.

Blue question mark
The blue question mark indicates that a dunning stop has been set for this invoice.

You can find out how to enter a dunning stop for an invoice here: Dunning stop
General information
TIP Sometimes it can happen that the entries are only displayed partially paid (orange circle), although the account is balanced.
You can then fully clear an account by posting a payment with the amount 0.00. To do this, simply go to the account and click on Pay, in the field Amount paid in must be 0.00. Book You. In the list of invoices, no invoice should be highlighted in blue. If this is the case, please click on the line and the colour will change. Then confirm once again with OK. The account will be calculated and PC CADDIE will tick all entries „green“.

Change of account area
If an invoice has been transferred to another account area, you can double-click on the payment entry to go directly to the other account area and view the relevant posting there.
- Keine Schlagworte vergeben
PC CADDIE AG
Bachtelweg 3
6048 Horw/Luzern
Schweiz
Kontakt
![]() Fon +49 2642 9854110
Fon +49 2642 9854110
Fax +49 2642 9854199
![]() Fon +41 41 5110600
Fon +41 41 5110600
Fax +41 41 5110699
![]() Fon +43 13 55667788
Fon +43 13 55667788
Fax +43 13 55667799
Mail support@pccaddie.com
Web www.pccaddie.com
Support Online-Module
PC CADDIE://online
GmbH & Co. KG
Fon: +49 2642 9854120
Fax: +49 2642 9854169
Mail support@pccaddie-online.de
Web www.pccaddie-online.de
Tägliche Supportzeiten:
April-Oktober
09.00 - 20.00 Uhr
November-März
09.00 - 18.00 Uhr