
Inhaltsverzeichnis
enter new, change, delete
There is a central input function in PC CADDIE for entering, viewing or editing customers. PC CADDIE does not differentiate between members, guests or companies and clubs - all are customers, each of whom can have an address, telephone number, etc. Guests and members can then be easily separated by personal characteristics. The advantage lies in the standardised input and administration for all persons.
In the menu, select Persons/…enter new, delete change or click on the first button of the coloured icon bar:

Select customers

This selection window appears, with which you can easily select customers in PC CADDIE.
Enter search abbreviation
In this search window you can search for anything your heart desires. To select people very quickly, search for: First names, surnames, membership numbers, telephone numbers, invoice numbers, e-mail addresses or enter the search abbreviation.
The search abbreviation always consists of two letters of the surname and two letters of the first name. If you do not know the search abbreviation, simply enter the first three or five letters of the surname. A comma after the three letters you enter means that you will receive all the names in the database that begin with these three letters.
If you confirm with OK, you will jump to the corresponding position in the list. Scroll down or up in the list using the arrow buttons.
Opening two person windows at the same time
You can open and edit two or more person windows simultaneously in PCCADDIE.
- Open the first person data record as usual
- Click on „Contacts“ at the top left
- Press and hold the „shift“ key on the keyboard
- click on „…enter new, change, delete“.
- Release the key
- select/open second person
Important: It does NOT work if you go to the selection list at the top right of the person mask!
Filter

Click on the Filter button and select a filter to display only a specific group of customers. If a filter is set, the funnel symbol on the left edge of the button turns red.

Scroll through the people filter
If you want to browse in the person mask by member number and not by alphabet, please set the following options.

Open filter

Tick the box. You can then scroll backwards with F3 or forwards with F4. You could of course also select the „All members“ person filter here if you want to scroll through the membership numbers of your members.
You can select further sorting options by clicking on the arrow.
The filter function in the person mask is described here.
Further functions

- Confirm the entry, the selected data record is opened.
- Open empty person mask to enter a new customer.
- Customers selected in the list open for further editing. Then click on „Change“ to activate the fields highlighted in grey in locked mode and edit them.
- Delete selected customer (only works as long as nothing has been posted to the account)
- Only works with PC CADDIE.id card system. Opens the person's personal data when the card is inserted.
- Searches for a customer by first name and surname
- Jumps to the next matching data record when a search (4) is entered
The window is closed with Cancel
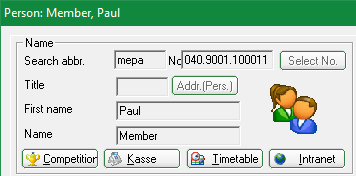
Personal data input window for single person
To create a new person, please click New (F9). It is best to start with a family father or the head of the family. The following input window will then appear:

View and icons of the contact list
All contacts

- Male
- Female
- Female, child
- Regionality
- Covid status checked
- Covid status without check
General functions of the buttons
Here is a brief explanation of the buttons located on the right-hand side of the input window. These buttons are similar and basically have the same function in most dialogues:

- The centre button is used to select people. You can also access this function by pressing (F9). You can scroll forwards with „
 “ or (F3). Scroll back with „
 “ or (F4). The next person listed in the alphabet is always displayed.
 - Use Filter (F12) to select a specific group of people (here too, the funnel turns red when the filter is activated). If such a group is selected, scrolling with the arrows is restricted to this group. For example, you can only scroll through the members.
- Open empty person mask to enter a new customer.
- Edit an already open customer. By clicking, the fields highlighted in grey in locked mode become active and can be edited. The button changes to Save and saves the changes made. PC CADDIE saves automatically and you do not need to click on Save and Change as long as you are editing people.
- Delete selected customer (only works as long as nothing has been posted to the account)
- Copy for Quick creation of family members becomes active as soon as Edit/Change is clicked. Also with key (F6)
- Jump to the person's sales account, also with the Alt + U key.
- Printing master data, green fee cards, etc., also works with the (F8) key.
- Export word processing data (e.g. for serial letters written with Word for Windows or OpenOffice). Further information on this can be found under Create a single letter using a template
- PC CADDIE://online WebSMS to the person concerned sms_an_person.
- Register this person at Register this person online at, synchronise the data or send the password to the member again.
- This button is only visible to those customers who work with the PC CADDIE.id map system. It shows the map information and allows it to be editing.
- This button can block a card for a specific person block. For offline systems, a lock card, an unlock card and an admin card can be created here. Here you can find more information about the PC CADDIE.id card system.
- End finishes the entries and saves them automatically. You can also press the Escape key, in which case you will be asked whether you really want to save. By selecting No here, unwanted entries can be cancelled.


Link to the modules from the person input window

- The button Tournament button shows you which tournaments the person is already registered for: you can use Select tournaments (F4) to register the person directly for a tournament. Enter players, organise start list You can also determine the data range taken into account and remove the selected person from tournaments. You can find further information under Competitions
- With Checkout you can go directly to the cashier area, where you can book for the person in question.
- By clicking the button Timetable button, PC CADDIE searches for all start times that have been booked in the name of this person. These can also be printed out.
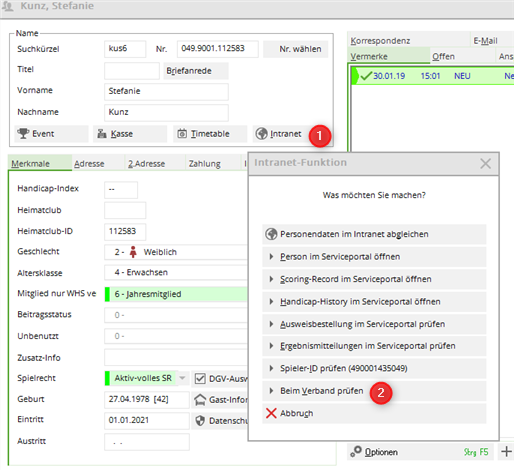
- With the button Intranet button, PC CADDIE compares the entered data with that of the DGV (or Swiss Golf or ÖGV) and updates all details including handicap:
Search abbreviation
You should always set the search abbreviation to New PC CADDIE will then determine a suitable abbreviation itself. PC CADDIE composes the search abbreviation from two letters of the surname and two letters of the first name.
For example: Anita Sonnenschein = soan. This search code is always uniquely determined by PC CADDIE; no person can have the same code as another person. Of course, it can happen that two different people should theoretically have the same licence plate number, in which case the last letter is replaced by a number:
Anna Sonderbar becomes „soa1“ and Anton Sonett becomes „soa2“.
If you then want to select „Anna Sonderbar“ later when dialling and simply enter „soan“, PC CADDIE displays all the people in question in a list. You can then easily select the person you want.
Exception in Germany: Benedikt Schmedding = ßmbe („Sch“ becomes „ß“; in Switzerland and Austria the corresponding abbreviation is smbe).
Number
The number (no.) is also assigned automatically by PC CADDIE. Only the last six digits form the membership number within your club. The first three digits stand for the country (049 = Germany, 041 = Switzerland, 043 = Austria etc.), the next four digits are formed by the DGV, ÖGV or Swiss Golf club number.
This is followed by the 6-digit number. For members, this is the membership number.
Germany only: Changes to the membership number AFTER a card has been ordered will result in these members automatically losing their regionality status on the intranet until a new card has been ordered!
If you would like to automatically assign a separate number range for members, please contact the Pcc Support.
Title, name, form of address and specific gender
Only academic titles such as „Dr“, Prof. etc. belong in the Title field.
„Mr“ or „Mrs“ is defined by the gender and therefore does not need to be entered anywhere.

Information on how to set how academic titles are optionally not printed in tournament lists can be found here.
Only in exceptional cases is it necessary to use the button Letter salutation button to specify a special form of address (for example „Baron“ and „Dear Baron“). You can simply enter your first name and surname in the corresponding fields (first name, surname).

Would you like to always address a member in a letter with Dear Maria, in a letter, you can indicate this in the salutation:

If you have people who define themselves as agender („asexual/genderless“), gender-neutral, neuter or neutrois or do not identify with any gender or do not (want to) have any gender identity at all, then enter this here. In the field of sport, however, the person must be assigned to a gender:

Create member
Person mask
Edit the person mask as described on this page, see above and below.
Create your member with membership characteristics and transfer it to the intranet. Only then will the association know that this person is now a member of your club and can manage the handicap.
Entry date in the future
You can, for example, transfer new members to the association's intranet at the turn of the year a maximum of 45 days before the entry date is reached; nothing will be transferred to the association any earlier.
Furthermore, PC CADDIE has no influence on how the associations process future entries, in particular whether you can already enter a course authorisation, etc.
HCPI new member
Much has changed with the introduction of the WHS (World Handicap System). The handicap is managed completely by the association. Further information on the handicap history can be found ⇒here
Please remember, if you are given an HCP when a new member joins, that you clarify where this HCP comes from, possibly request an HCP master sheet from the new member, or details of when and where the HCP is from.
In PC CADDIE with the WHS, you can no longer enter the HCP in PC CADDIE, which could be sent to the association (DGV), as this is not provided for by the association (Germany).
Determination of the HCPI
A simple definition of the HCPI for a new member is not possible in PC CADDIE or is not transferred to the association (DGV) and therefore has no effect on the handicap (since according to the interface to the association only results can be transferred: Private rounds (RPR), competition results and results from abroad).
If a determination is necessary, please enter it directly in the DGV Service Portal if possible, or send an e-mail to regularien@dgv.golf.de if you have any further questions.
Determinations are necessary if no current HCPI is provided with the query to the association, but the golfer has a handicap, e.g. from another country that is not connected to the intranet, or he was passively registered in the previous club on the cut-off date 22.11.20 (DGV), for example.
New member with PR (course licence) or HCPI 54
Make sure that you have loaded the latest PC CADDIE version via End - Update PC CADDIE!
Always create your member first and transfer it to the INTRANET.
You can then enter the member's handicap with date directly in the DGV portal via „Entry of special rounds and external results in the service portal“, which directly results in HCPI 54.
If you offer competitions for the course handicap, you can organise the competition as usual with your own course, as you will then have a current score for it!
HCPI for new members automatically
If the HCPI is not delivered automatically as described below, even though the new member had a home club in their own country on the WHS introduction date and the HCP was active, please also write to regularien@dgv.golf.de
The association will automatically provide a new HCPI if the golfer at the time of conversion to the WHS (in Germany the cut-off date was 22.11.20) a home club from the same country (i.e. a German home club in Germany) and the handicap the handicap was active (for passive members, the DGV did not have a master sheet history for conversion, this is due to earlier requirements from the DGV specifications for the CVS).
In future, if a membership exists in 2021 and the golfer changes club in 2022, the cut-off date 22.11.20 is no longer applicable, as it is sufficient that the handicap was already kept by the association (in the same country) in the previous year (e.g. 2021).
- You create the member, save it and transfer it to the DGV INTRANET first ! The intranet must first „know“ that the player is now a member with you. The player ID is automatically supplied by the association.
- In the 2nd step you can request the handicap from the association, if it is provided, everything is ok.
With „OK“, the member automatically has an HCPI index.
Second member - Homeclub
Create member as second club
Clubs often have a different price for secondary memberships. But that's not the point here.
This is about the home club/home club in terms of HCPI queries with the respective golf association and ID card orders (this is also important for league teams)
The player is obliged to inform a second club which is his home club!

- The 9001 is the Swiss club of which the member is a secondary member!
- In this case, the club number 35 is the home club (also Switzerland)
The home club is maintained in the same way in other countries.
In Germany, nothing is printed on the ID card for HCPI! The HCPI is only printed on the ID card of the home club!
In Switzerland, a Z (second member) is printed on the ID card for second members instead of HCPI.
This means that it is always recognisable that the card was not issued by the home club.
Secondary member - special features in Switzerland
If all participating clubs in Switzerland clearly maintain the player, the home club is the „upper - no. 1“ club at SwissGolf, the „lower - no. 2“ club is automatically the second club (see following screenshot).
If the maintenance is not clearly set for the clubs involved, a club that is supposed to be the home club may have problems with player verification and ID.

Features
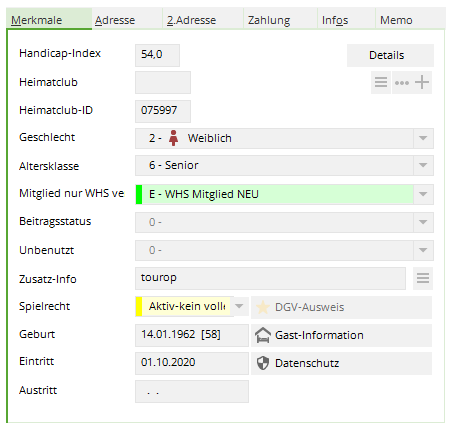
Handicap index (Exact HCP)
Changes as of 23 November 2020 (Germany)
For members, the handicap index (World Handicap System) is filled by checking with the association.
The handicaps are managed and maintained by the association.
The HCPI (Handicap Index for guestswhose home club is also connected to the intranet (Germany, Austria, Switzerland) are queried via an intranet check. Further information on the intranet can be found here: Connecting to the intranet
For other guests, the handicap index is simply entered in the field.
An HCP index for guests can only be entered if a home club is entered for the person. If the home club is not available for selection, it must be created:
Germany, Switzerland and Austria: Import club addresses via intranet
For home club entries for all other countries, create a club manually:
Create a club manually
Freeze HCP (Switzerland only)
Available from PC CADDIE versions 6.6.2022
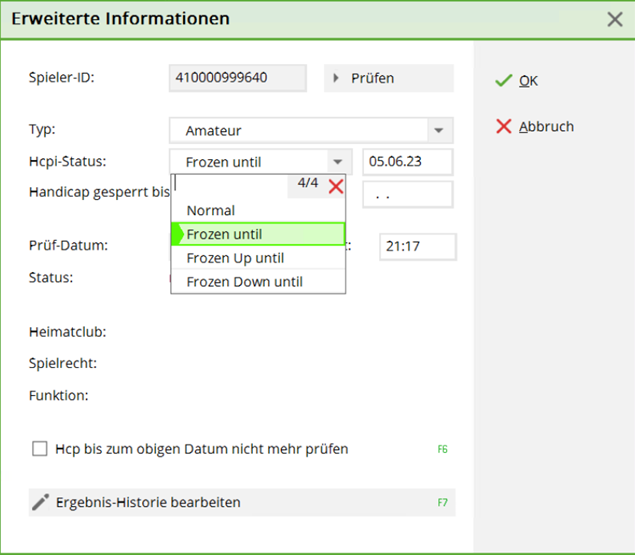
According to WHS, you can freeze the Hcp index (until a certain specified date).
If you select a „frozen status“ and leave the date blank, the date is automatically set to „in one year“.
In principle, the „frozen“ status should freeze the Hcp completely - „frozen up“ should prevent a further increase, „frozen down“ should prevent the Hcp from falling.
For further information on the application and consequences, please contact Swiss Golf, PC CADDIE only transfers the status to Swiss Golf and has no influence on the calculation!
HCPI for "Pro" (Professional)
Pro with or without HCPI
With the „World Handicap System“ PROs can also have an HCPI Handicap Index but there are also PROs without HCPI (choice of PROs).
A pro who is a member of a golf club can only register with the DGV at regularien@dgv.golf.de if he does not want an HCP guide. This will then be set by the DGV. Similarly, only the DGV can reinstate HCPI guidance if a pro has not previously had HCPI guidance set by the DGV.
A pro who is not a member of a golf club automatically does not have an HCP.
Pro„ can be set in PC CADDIE directly in the person:
The default setting for all persons is „Amateur“, a Pro is changed to Pro. The Pro status is then transferred to the DGV as information if the Pro is a member. The DGV needs this information to deactivate the Pro's HCPI management on request. In the event of a future HCPI enquiry for a Pro without HCPI management, the DGV returns a LOCK MESSAGE of the HCPI.
According to the DGV, Pro is only a profession, therefore Pro will no longer appear in the HCPI field and in future on lists (also in tournaments) only after the name (according to DGV - status August 2023). For a Pro with HCPI leadership, the HCPI will of course also appear on the tournament lists.
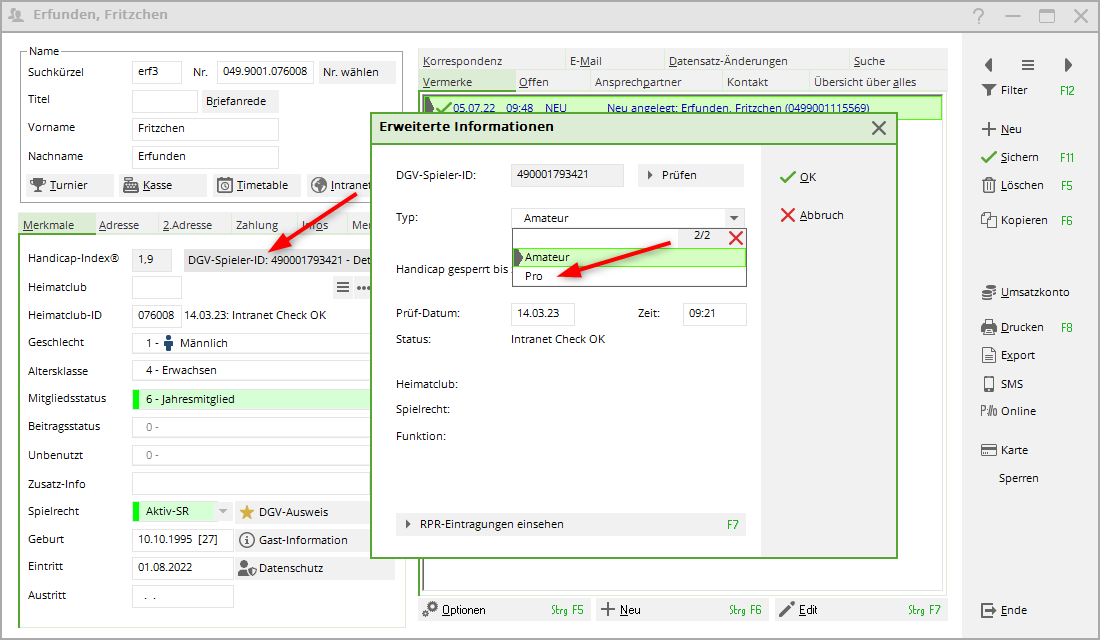
Recommendation: Under „Function in club“, enter that the player is a pro! The pro will then also have Pro on his DGV card and you can also see how many pros are members of your club.
Details (for members)
From 23 November 2020: World Handicap System (WHS):
By clicking on the Details button, you can access the result history of the selected person. In Germany, only RPR rounds are saved here.
In Switzerland, the complete scoring record and handicap history is automatically loaded here when opening.
In Austria, you can see the list of tournament results and entries from HCP queries at the association (. The HCP index is not calculated (this is carried out by the ÖGV).
Details (for guests)
The button behind the handicap index is also for guests and second members Details. By clicking on this button, you can select the option Do not check Hcp until the above date to switch off the check.
If you have a tournament week with daily tournaments, for example, it may be the case that you cannot check the HCPI of foreign players on the intranet (e.g. players with a Spanish home club). If necessary, you can enter that the handicap will no longer be checked until the end of the week. After this time, the activation is automatically cancelled. This function is only required in exceptional cases.

A question mark (unchecked HCPI) will then no longer appear on the start list. This option can be operated very quickly by first pressing (F7) and then (F6) followed by Enter in the Hcp field. You do not need to change the date. If it has passed, PC CADDIE will automatically change it to the next day if this option is activated.
Home club
Select the home club by either entering the club number you already know in the Home club field or simply start typing. It is also sufficient to enter just a few letters - you will immediately receive a suitable selection. For some abbreviations, PC CADDIE will ask you which club is meant exactly.
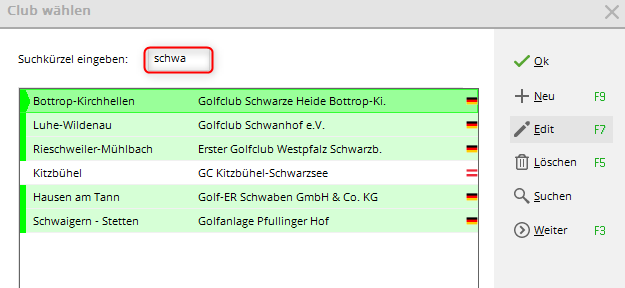
If necessary, simply click on the button, then you can also select the club from a list. You can use the button to edit the selected club directly. You can correct the name or look up the address.
For memberswho have entered another club as their home club (second member, only the home club is allowed to play in the league), enter the home club in this field! If your club is the member's home club, this field can remain „empty“.
You can create a new club either by importing it. To do this, please open via Settings / Connect to intranet to open the following window and click on the button Query club information:
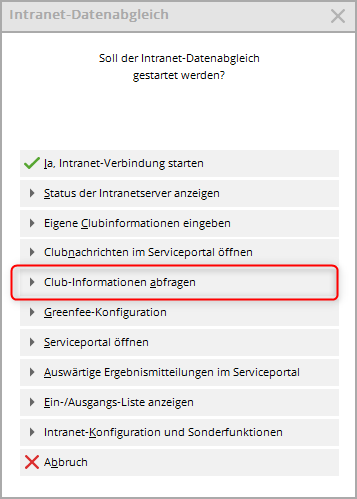

Please confirm with OK and start the intranet synchronisation. PC CADDIE will now load all new club information for you. You can find more information about this here: Query club information
Another way to enter new clubs is via Settings/Clubs+Places. Via the button New button to create a new club. Further information on creating clubs and courts can be found here: Clubs and squares
Player club on lists
For players who are members of several clubs, there is an option to display the desired club on lists, e.g. for team tournaments (interclub). club is displayed. Even if the player has another club as their home club.
With the introduction of the WHS (World Handicap System), guest player queries will only receive a response if the player's home club is entered in the person (queries for second clubs are not possible).
In the PC CADDIE person mask, the home club should also be entered as usual for home club as usual. Click on the + sign to enter another club manually (The intranet query „check“ for a second club is not possible with WHS. The association does not provide any data for a second club. However, you do not need the membership number of the second club for the print function)


Tick the box Print this club in lists if, for example, a player with this club should appear on the start list although he has another club as his home club (e.g. interclub tournaments, team tournaments). If this option is active, the plus sign in the person mask is shown in bold:

ID in the home club
The ID is loaded into the person mask via the intranet check and automatically transferred. This identification number, together with the club number, can be used to identify the player in order to check the handicap on the intranet. The association ID is essential for handicap management by the association.
Personal characteristics
You can use the following identifiers to categorise the person precisely. By clicking on the button, you can scroll down a list with all selection points. The identifiers that can be selected here can be categorised using the Settings/Programme settings/Characteristics of contacts function to customise them to your specific requirements. Please read the following Description.
Gender
Data records that are labelled with male/female are considered persons for PC CADDIE. If you want to include a hotel, a company or a club in the address file, add the corresponding characteristic to this data record. A person (owner, manager, etc.) can then be linked to this company via the family summary.

By clicking on the button with the arrow pointing downwards, you can scroll down the list with all selection points and then select the desired „Gender“.

You can also easily specify the selection by entering the number in front of the name on the keyboard. However, this is only possible if the Gender button is activated. For example, click button 2 to select „female“.
If you have selected options 3-8 (company, club, supplier), the person mask will change automatically. These selection options do not refer to individual persons. We will go into this topic in more detail in a later chapter.
Age group
The age group is linked to the date of birth and adjusts automatically as soon as the age limit defined in the settings is exceeded.
The age group should not be adjusted as it is also necessary for the tournament organisation on the intranet. If, for example, you charge for a special article in your club, an article only for members up to the age of 16, you can alternatively adjust the age group in the contribution status.
PC CADDIE usually provides you with the following options for age groups:
- 1 - Child up to 12 years
- 2 - Youth up to 18 years
- 3 - Junior up to 21 years
- 4 - Adult (for women up to 49 years, for men up to 34 years)
- 5 - Young senior (only for men aged 35 to 54)
- 6 - Seniors (women aged 50 and over, men aged 55 and over)
Membership status
Select the appropriate membership here.
The selection options for the membership status can also be defined under Settings/Programme settings/Personal characteristics. As each club has a different status, it may be necessary to change the predefined options.
Membership status
The membership fee status is very important for invoicing membership fees. It can be used, for example, to define different age groups and price categories for juniors.
Information on customising the personal characteristics of gender, age group, membership and status can be found under Settings/Programme settings/Personal characteristics
Additional information
You can largely configure the fields in this window yourself: Further information on additional information can be found here: Additional information
Playing rights
Further information on the playing rights can be found here:
DGV card (or Swiss Golf card)

for the admission of a new member
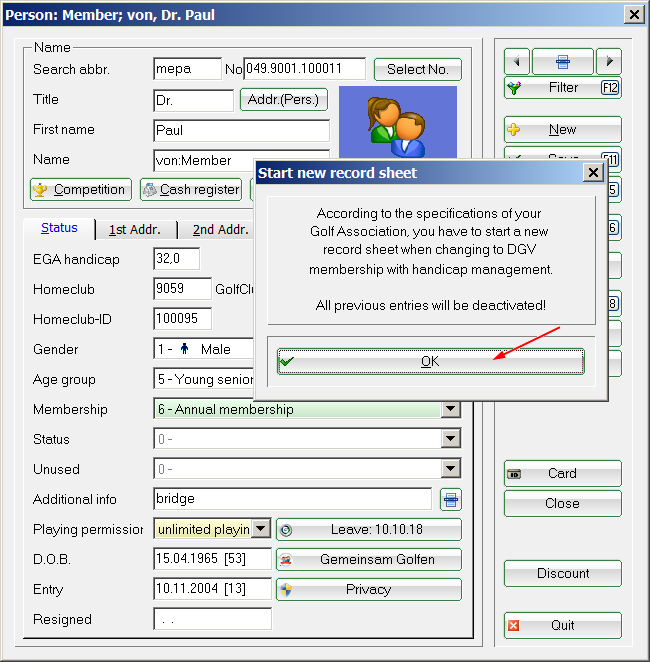
In the personal masks of members (all those highlighted in green), you will find the button for the DGV card or the Swiss Golf card:
As soon as you save the changes in the personal mask of the new member, the following window pops up:

If desired, you can enter details of the admission fee here. The item will then be posted directly to your account (pay attention to the account area!).
Tick the box for Book badge order and Obtain player ID automatically are automatically ticked if the right to play with a badge is stored. Leave them as they are and confirm with OK.
For existing members
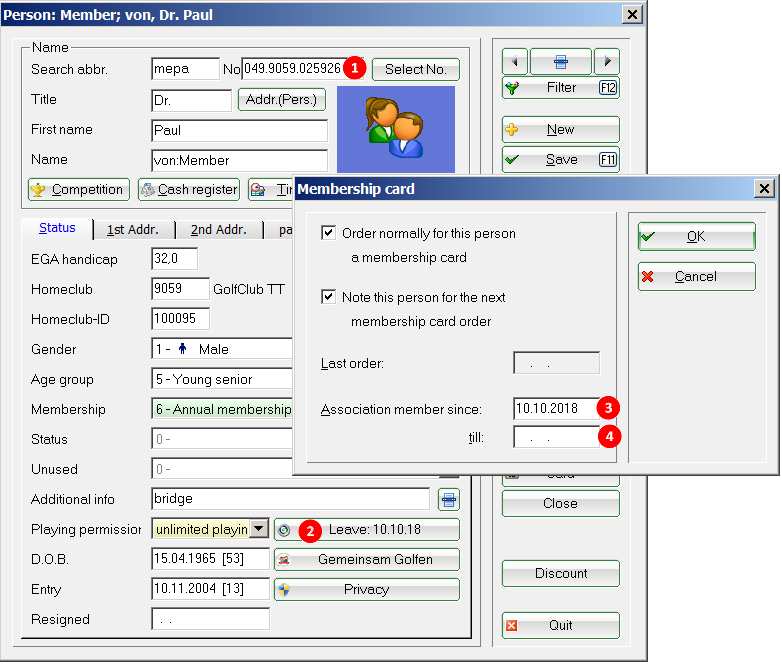
Click on the DGV card or Swiss Golf card button to open this window:

- With this tick you determine whether a member receives a card or not. The tick is set by default; you should only remove it if, for example, the member is a second member and already has a badge or explicitly does not want one.
- If you tick this box, the member will be issued with a new membership card the next time they order one (new members during the year or members who have lost their membership card). If this box is ticked, this is indicated by an asterisk on the button (as shown in the image above). The option is automatically deactivated after the card order form has been sent to the DGV / Swiss Golf.
- Here you can see when the last card was ordered for this member.
- If you remove the golf membership feature for a member (without editing the resignation date in the person), the resignation is automatically filled in at the association. You will first receive a message that this is happening.
Birth
Here you have the option of entering the date of birth. When you enter a date of birth, the age category is automatically adjusted. This field is mandatory for members.
 The date of birth of guests is automatically loaded into the system via the intranet check.
Entry
The date on which you entered the person in PC CADDIE normally appears under Entry. You can of course also change the date manually by clicking in the field with the mouse and entering the desired date (format: dd.mm.yy or ddmmyy or just dd if it concerns the current month).
Leaving date club and association
In the Resignation field, you can enter the resignation date in the same way as the entry date for members who wish to leave the club. Do not remove the membership and contribution statuses in the case of a resignation, as these may still be needed for filtering purposes. After entering the date and confirming with Save (F11), the following dialogue opens:

Remove from family composition Select this option if, for example, a married couple has separated or one partner leaves the club. This family no longer exists. If, for example, a child leaves, it remains in the family, so remove the tick. You can even assign a new contact person to the member who has left. To do this, select the person's abbreviation. If you leave the field empty, no contact person will be selected.
Remove direct debit authorisations ensures that you can no longer create SEPA direct debits with PC CADDIE for this person.
You can also select a reason for the cancellation.
Using the letter identifier, e.g. V for „Deceased“, you can filter by the reason for leaving in the person filter for lists.

Activate the desired options and exit the dialogue with OK or the Enter button.
If a member is deceased and you have also selected the reason „Deceased“, the person is sorted to the end of your list of persons (after Z) and is marked with a dash above the gender symbol.

If you have selected „Deceased“ by mistake, you can change the reason for leaving by double-clicking on „Deceased“.

If members resign at the end of the year in September, you can enter the resignation date as soon as you find out the resignation date. PC CADDIE will recognise the member as a member until 31.12. and as a guest from 01.01. onwards.
Send the data directly to the association via the intranet.

The dispatch of the deletion data record is confirmed as follows:

Resignation - association only
If you only want to change the membership characteristic of a member to a characteristic that only makes you a member of your club, e.g. „Bridge club“ or „Tennis club“ or „6 hole short course“, the known resignation date is not filled in. The date field „Association member until…“ is automatically filled in. is automatically filled in. You will find this field when you click on the button DGV card or Swiss Golf card button.

As soon as you change the feature to a feature that is not a member of the DGV and is uploaded to the intranet, the following warning appears:

Confirm with OK, the date is filled automatically.

The button that would otherwise DGV card or e.g. Swiss Golf card is changed and now shows resignation is displayed. If you double-click on it, you will see that the date field is filled.

This date field is transferred to the intranet for the departure. This field is also filled automatically if you enter the leaving date manually in the person mask as usual.
TIP: It is unnecessary to enter „duplicates“ here. You only have the option of differentiating between a withdrawal from the golf association (intranet) and a withdrawal from your local organisation. You could also use this, for example, if you manage limited partnership shares. A limited partner could be provided with a personal characteristic that says „limited partner only“ without reporting to the intranet.
Address
As soon as you click with the mouse on the Address option in the person mask or you press the Page down button, the lower half of the input mask switches to the next tab Address tab:

In addition to the Contact person and Family status fields, we come to the enter the other family members.
Street, postcode and city should be clear. Please note that PC CADDIE automatically saves the city and area code for each postcode and, if necessary, jumps directly to the telephone field after entering the postcode. You should therefore always separate the area code and telephone number with a slash “/„. International country codes are preceded by a hyphen (“-„), for example: 0241/402869, +0041- 441/7654321. If you want to save business telephone or fax numbers, you should do this under 2. address.
Under Settings/Programme settings/General settings you have the option of formatting all telephone numbers in a standardised scheme. in a standardised scheme.
Function in the Club
Under Club function, you should enter the function that should appear on the DGV card. This field is used to order the card (e.g. President).
Country code in the postcode
When entering a postcode with country code, the query appears automatically:

If you require special country designations, you can now enter these yourself.

If you leave the field empty, the country will be printed according to the text in the combo box at the top.
You can also select “(Special)„ and enter everything yourself for countries that are not in the list.
Distance information
In order to display the distances (as the crow flies) between your club and the postal address of a member or guest, it is necessary to load the geodata in PC CADDIE via the Internet. A detailed description of how to load the address coordinates can be found here: Load geodata
Show distances
To display the distance a member lives from your club, please click on the icon  icon behind the location in the person mask:

The member's address, reference address and coordinates are then displayed in the following window. The field „Distance“ field shows you the distance in kilometres (as the crow flies).

Show address on map
So that you can then recognise exactly where your destination address is, you can display it on a map.
Click on the „Address coordinates“ button at the bottom of the window:

and a map via OpenStreetMap will open in which you can recognise the target area:

Further information on printing lists of people with distance information can be found here.
2nd address
Now let's take a look at the second address. Again, click down the image or click on 2nd address:

Most of the information is self-explanatory. The following is important: Tick „Also print“ if the content of the field Occupation/Department field should also be printed in an address. If Letter address is not ticked, this field content will also be included in the first address. You can also use this field for notes such as „Personal“ etc.
Tick Letter address if the mail is to be sent to this 2nd address. Otherwise the mail will be sent to the first address by default. Tick Invoice address if the invoice is to be sent to this 2nd address.
Use the tab 2nd address tab to enter the business address or holiday address of a member.
Address exchange
If the 2nd address becomes the 1st address and vice versa, proceed as follows:
Open the person for whom the addresses are to be swapped.
Hold down the Shift key and click on the blue globe to the right of the location.
This process swaps the addresses but not the telephone numbers and e-mail addresses.


It does not matter whether you carry out this process in the column of the 1st address or the 2nd address. Please note that PC Caddie cannot change it correctly if a PO box or a company/department is entered in the 2nd address.
If you also hold down the Ctrl key, telephone numbers and e-mail addresses will also be swapped.

IMPORTANT: Change the tick for billing address and letter address in the 2nd address tab accordingly!
Bank/Payment

Click on the SEPA/Details button to enter all details.
Create a mandate ID by clicking on Create new mandate and enter a signature date:

It is important that the signature date is filled in. This is a prerequisite for creating SEPA direct debit files.
can be created.
Enter the account details under the Bank details tab.
You should leave the Account holder field unchanged (empty) if the person being processed is also the account holder. Otherwise, you can enter the actual account holder here. It is best to start the entry with the bank code/BIC (Bank Identifier Code). PC CADDIE automatically jumps to this field. If you jump to the next field with Tab, the bank sort code is checked. If it is known and the bank has been found, you are taken directly to the field Account number/IBAN (International Bank Account Number), otherwise the bank name is queried.
When entering the IBAN, the validity of the check digits is automatically checked so that the slightly longer account details are also valid. It is completely sufficient to enter the IBAN instead of the usual bank details. This procedure is ideal for foreign account details in particular.
Confirm the details with „OK“.

You can also choose between direct debit authorisation and direct debit order and note this directly with the respective person. The direct debit order provides a high level of security for the payee, as they know after a few days at the latest that the payment will remain with them and cannot be debited back within the 6-week period due to an objection. Of course, this choice must comply with your contracts with the bank and your customers. With the direct debit authorisation, you can choose whether a direct debit authorisation exists for all account areas or only for certain ones.
The payment method can also be varied as part of this. Differentiate between four options: „Monthly“, „Quarterly“, „Half-yearly“ and „Annual payment“. This selection can be taken into account when allocating contributions. If nothing is entered, the annual payment is automatically stored. When printing lists of persons, there is also the field <ZAHLWEISE>so that you can also print a list of the persons for whom which payment method is set.
If you use the module Invoice dispatch by mail module and use it, you can select the dispatch tick the box as PDF to this e-mail address: and in the line e-mail line, enter the e-mail address to which the invoice should then be sent by e-mail. This e-mail address can be added to the e-mail addresses in the tabs Address and 2. address and is used exclusively for sending invoices by e-mail.
The first time you activate the e-mail by invoice, the general enquiry is displayed.
Or can be called up at any time under: Settings - Programme settings - General settings - Sales tab

This wizard helps you to copy the e-mail addresses correctly into the Payment tab.
The e-mail addresses are selected as follows:
1st e-mail filled - 2nd e-mail empty > 1st e-mail goes to invoice by e-mail
1st e-mail filled but with ! in front - 2nd e-mail empty → dispatch by post - invoice by e-mail remains empty
1st email empty - 2nd email filled → 2nd email goes to invoice by mail
1st e-mail empty - 2nd e-mail filled but with ! before → dispatch by post - invoice by e-mail remains empty
Exclamation mark (!) remains and continues to apply only for the newsletter dispatch (Supermailer)
If the member's invoices are paid by credit card, simply enter the required details under Credit card, cardholder, card number, valid until and Verification Code and Verification Code.
SEPA / Details
Via the button SEPA / Details button takes you to the SEPA direct debit mandate. In the following dialogue, you also have the option of entering special bank details for the current account area only.
Info
To the explanation of the Additional personal fields here: Additional fields of the contacts
Memo

Enter additional information about the person here. As soon as something has been entered in the memo, the Memo tab is coloured red. With a certain layout, the memo field can also be printed out.
The Memo field is the predecessor function of the CRM\DMS module in PC CADDIE.
Save
Once you have entered all the details, please click Save. 
The following dialogue will appear if you have just created a member:

After clicking on Save, this window appears in which PC CADDIE directly suggests the next consecutive member number. You can already specify an admission fee here and then exit the window by clicking OK.
After clicking on OK this window appears in which PC CADDIE has directly drawn the person ID:

Enter additional family members
We will now look at how additional family members can be entered. To do this, click on the New button and enter the first name of the family member (e.g. the wife). If the surname is different from the husband's, you should also enter the surname. If it is the same as the husband's, you do not need to enter it again. You can then click on Copy (F6) or press the F6 key:

You will be asked who you want to copy the information from. The person who was last edited is selected here, in our case the husband. As this is already correct, simply confirm with OK or press the Enter key. If you want to copy from another person, enter the abbreviation or search for the appropriate person in the selection list. The information such as surname, status and address will now be copied directly from the spouse. The exact status, gender, handicap or date of birth and also the mobile phone number must of course be checked individually.
Family status

Enter an individual or the corresponding company under Contact person.
Next, the family status should be determined. This not only provides an overview, but also lets the system know whether it should address two people as Mr and Mrs or as a family (e.g. father and daughter). It can also be used in tournaments to recognise who is family. The family status is of particular importance „Write to 4-Extra“. A family member with this status is written to in addition to the family on circulars and address labels. However, contribution invoices are only ever issued once for the entire family. The exact opposite is the case with the status „5-separate invoice“ status status. The members are written to together, but receive separate invoices. invoices. This is important for couples with separate accounts. With the status „6-All separate“ each letter and invoice is created separately for each person.
In the event of family break-ups (e.g. due to a divorce or a grandchild changing clubs), always ensure that the financial accounts are separated first and only then the family summary is removed, otherwise the sales accounts cannot be properly adjusted.
Enter second member
To enter a second member, open the menu item Persons/…enter new, change, delete and then select the desired person from the list:

Select the Intranet button if the home club is not your club.
PC CADDIE searches for the appropriate data for the person concerned via Swiss Golf or DGV or ÖGV.

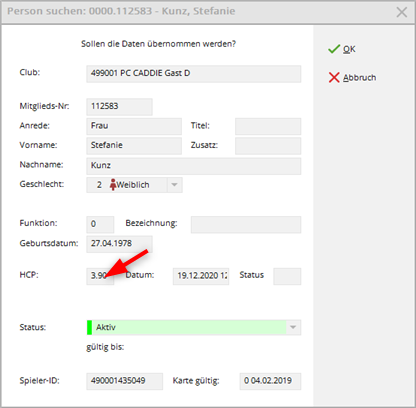
Confirm with OK. PC CADDIE writes the member number directly into the person mask. Important: Make sure that the club responsible for the handicap management of the person in question is entered in the Home club field. In order for this person to be recognised as a club member in PC CADDIE, you must activate a suitable member feature under the member status.
Entering companies and clubs
Click on New (F9) to open a new person mask. Now select under Gender select an option between 3 and 8. In our example, we decide in favour of „3 - Company, male address“. The input mask switches automatically:

Now enter the company name. It is also particularly important to use the contact person function for company memberships. For all players of a company, enter the company as the contact person. This will give you a quick overview of how many and which players from this company are playing. Annual subscriptions and other revenues are managed individually for each player and listed in the invoice to the company. You can also enter the department/position if required. All other input options are identical to those for individuals.
TIP: For example, if you enter „Hotel:Sonnenschein“ the hotel will appear under the search abbreviation „son…“ and not under the search abbreviation „hotel“.
In another example, we decide in favour of „5 - Club, Ansp. Männl.“ . You can now fill in the club data with the address, telephone number and e-mail address particularly quickly by clicking on the Copy button. Type in the desired club number. PC CADDIE then enters the club name and address data automatically. You can now enter a contact person's name.


Copy personal data from a signature
Personal data can also be easily copied from a signature (from a website or from an email) into the PC CADDIE personal mask. To do this, the imprint or signature must be selected and copied with the right mouse button:

Then open a new person in PC CADDIE and transfer the copied data with the key combination Ctrl + Shift + v:


The following dialogue opens:

The copied data is on the left. To make the overview easier, the data already copied into the mask on the right is highlighted in green. In our example, the country is missing. To add or correct information, double-click on the line on the right, correct the entry and confirm with OK.

If an entry has not been assigned at all, click on the corresponding line on the left, select the destination of the entry on the right and add the information accordingly using the „Assign“ button. Incorrectly assigned details can be deleted directly by double-clicking on the right.

As soon as all details have been entered completely, you can confirm the transfer of the data by clicking OK. All lines that are activated with a tick will be transferred to PC CADDIE. If you do not want to transfer an entry, remove the corresponding tick by clicking on it. In PC CADDIE, you then only need to enter the gender of the person and save the person.

Intranet
members
When clicking on the Intranet button, the following dialogue appears for members: The necessary information is automatically synchronised with the intranet. You have the following options:
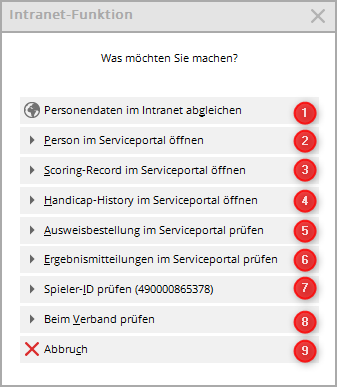
- synchronise the member data after a change in the person so that the data in the service portal (intranet) is always up to date (works automatically, can also be triggered manually).
- Here you can check whether the data stored in the service portal is correct. In the service portal, you can also set your member to be displayed anonymously on the intranet (the name no longer appears on the intranet start and results lists).
- View the member's scoring record.
- View the member's handicap history here (master sheet)
- Here you can check when and whether the last handicap order was made.
- If necessary, check your member's external results in the service portal.
- Make sure that the correct player ID is stored (this is normally done automatically).
- For members, you can retrieve the HCP index from the association here.
- Click Cancel to close the window without taking any action.
Guests - Guest players
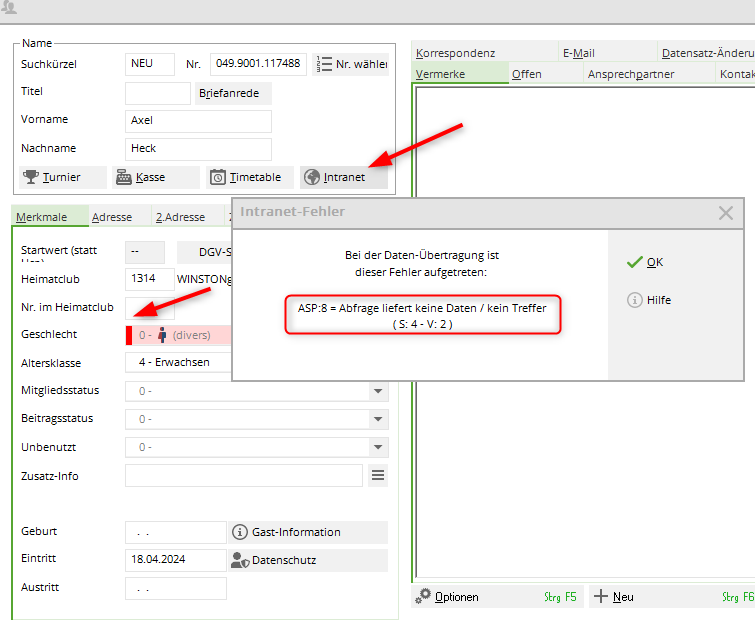
If you accept a new guest, since 2024 the DGV server also requires the gender to be entered in order to provide a response.
If you do not enter a gender, the DGV will send the response „ASP 8“! ASP 8 always means that no answer will be delivered from the DGV intranet for the query that was made!
As soon as you enter the gender, the enquiry will work. PC CADDIE has no influence on this. Settings with which data a response is delivered are set on the DGV server.
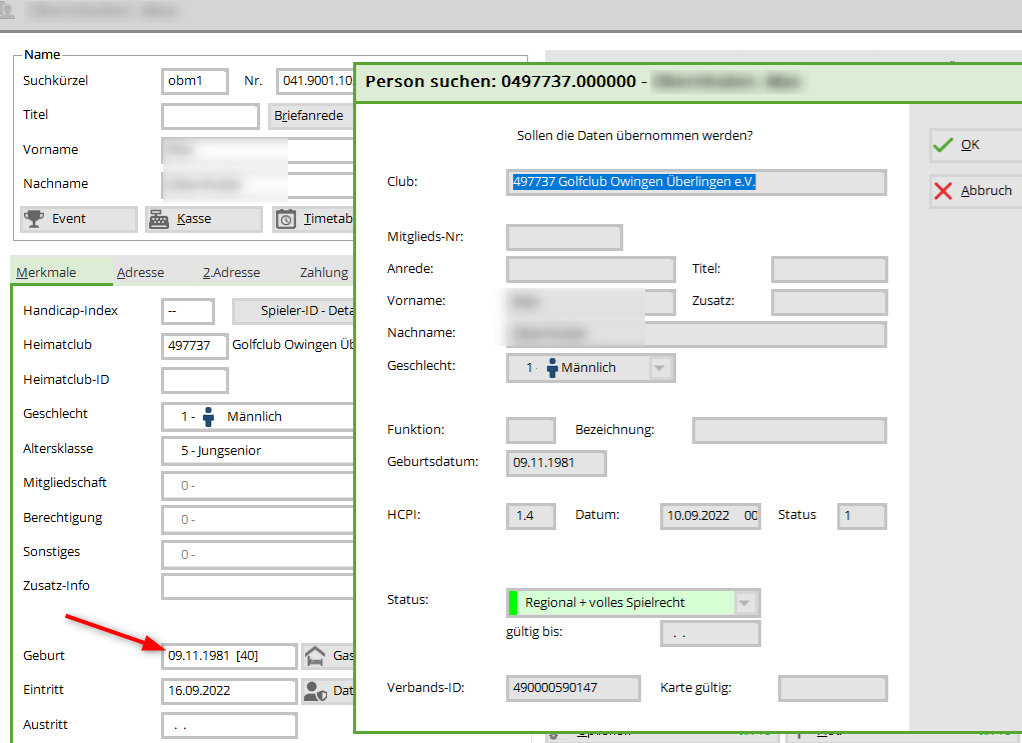
As soon as the query returns a response (after entering the gender), you will receive the following dialogue:
Always confirm the transfer of the data with OK.
If you exit the window with Cancel because the details do not match the person you are looking for, a confirmation prompt will appear:
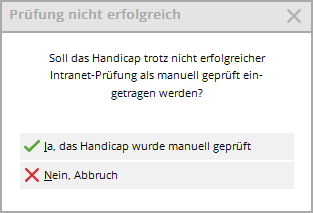
If you are sure that the handicap is correct, you can select the first option.

If you are not sure, please click on No, cancel.

If guests cannot be found on the intranet, the following error message appears:

Guest player home club in different countries
If a guest has a home club from Germany, Switzerland or Austria and the club list (club information) is also loaded and up-to-date via the intranet, then players with these home clubs can also be checked.
Please also note that you can only check players from abroad if you have already entered their date of birth (the IGI - International Interface - requires this).
e.g. query from a Swiss club, player from Germany. You will only receive an answer if you already know the date of birth:
Players with home clubs in Hungary, Bulgaria, Luxembourg and Liechtenstein can also be checked on the intranet with regard to handicap and date of birth. The procedure is the same as for all guests.
However, it is necessary to enter the correct original club number in the person's course data record. original club number is stored in the course record. Please refer to „Clubs and pitches“.
Link to the club numbers: Clubs Luxembourg, Bulgaria, Hungary
Match people via Golf.at

When clicking on the GOLF.AT button, the „Search person“ window automatically appears for guests (see point 2).
The following dialogue opens for your members:


- synchronise the member data after a change in the person so that the data on Golf.at is always up to date.
- Here you can check whether the data stored on Golf.at is correct. For secondary members, name and Hcp changes are transferred to your PC CADDIE.
- The login details for the myGolf area of www.golf.at are displayed here. The password must be entered by your member when logging in for the first time. This is no longer visible in PC CADDIE
- You can exit the synchronisation without making any changes by clicking the Cancel button.
to 1. synchronise personal data in Golf.at

- The data is immediately sent to Golf.at.
- You can synchronise the data later via the FTP butler if you are editing several people at once.
to 2. load player data from Golf.at

Here you can synchronise the data of persons via Golf.at. You immediately receive the Hcp, the home club and the date of birth.
to 3. display login data from Golf.at

The ÖGV ID, card number and user name are displayed. The password is set by the member themselves via the myGolf area at www.golf.at. If no data is visible to you, use the button „Retrieve data from Golf.at“(2). You can send the data directly to your member by e-mail (if an e-mail address is stored)(1).
to 4. cancellation
You can use this button to close the window without taking any action.
Multiclub - Two club numbers
A „multiclub installation“ is a PC CADDIE installation that manages 2 club numbers in 1 database, i.e. that both PC CADDIEs can be started on 1 computer, which is necessary due to the intranet configuration alone, but that all persons have access in both installations. However, members should always be edited in the version in which they are also members - or in which they are to be added as new members.
We would like to explain a few special features here:
Overview of persons
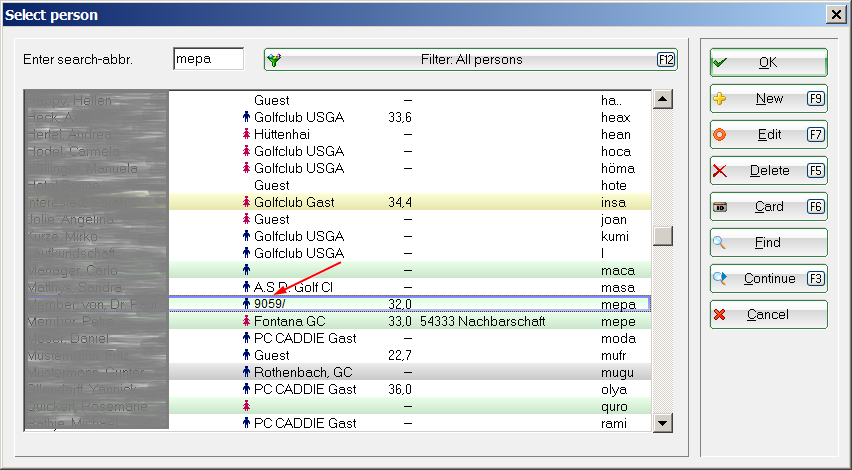
We are in PC CADDIE with the club number 9001, this is our main version. All guests from both installations as well as the members of club number 9001 are managed in the system with the number 9001.
Only 1 person is displayed here with the club number 9059, this is an indication for you that this is a member of club number 9059, our 2nd PC CADDIE installation.
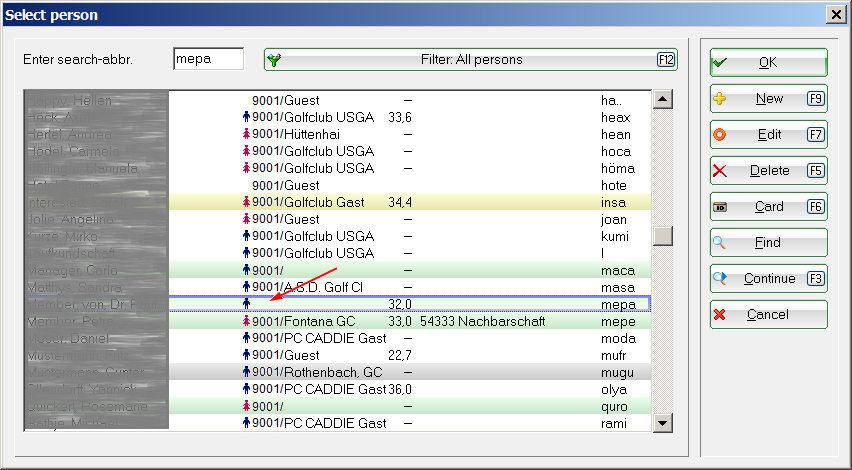
The following image shows you the view in PC CADDIE with the club number 9059, where all persons except our member in version 9059 are labelled with 9001 as the number.
Club change within Multiclub
Our sample CLUBS have the club numbers 9001 and 9056
- Please note: If you want to determine membership figures for the past, you should only enter a leaving date and create a completely new member in the 2nd club. In this case, the master data sheet must also be loaded from the intranet, as if the two clubs were, for example, 100 km apart.
- If you change the existing member, as described below, you should definitely save the member statistics continuously, e.g. as a PDF. This also has the advantage that you can count and save the current member characteristics.
Leaving Club 9001
If you want to save the current membership statistics as a PDF and do not want to have duplicate personal data records:
Work in the version in which the person is currently a member.
If a member leaves Club 9001, process the departure in Club 9001.
Remove the membership status for the member. This is different from „normal resignation“ where you only enter the resignation date.
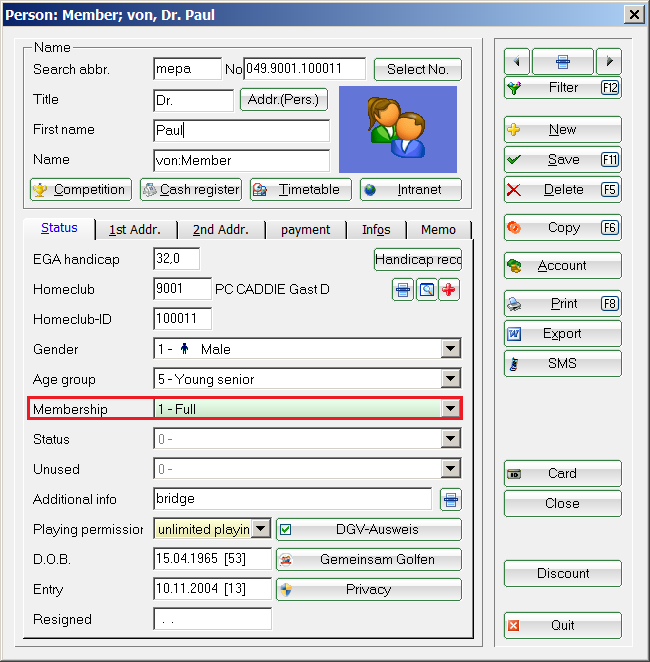
So that the intranet is automatically informed that the member has left this club, PC CADDIE automatically sets the leaving date when saving, as usual, so that the person now looks like this:

Start intranet synchronisation
After entering your withdrawal, please first start the INTRANETABGLEICH to send the withdrawal to the association!
If the intranet communication server is active, this will be done automatically!
Entry to Club 9059
To join Club 9059 (after leaving Club 9001), switch to the PC CADDIE installation 9059 and open the person there. To join this club, give the member the new appropriate membership status and remove the leaving date again.
PC CADDIE then automatically changes the club number in the person. This is essential so that it is recognised in connection with the membership status that the person is a member of Club 9059.
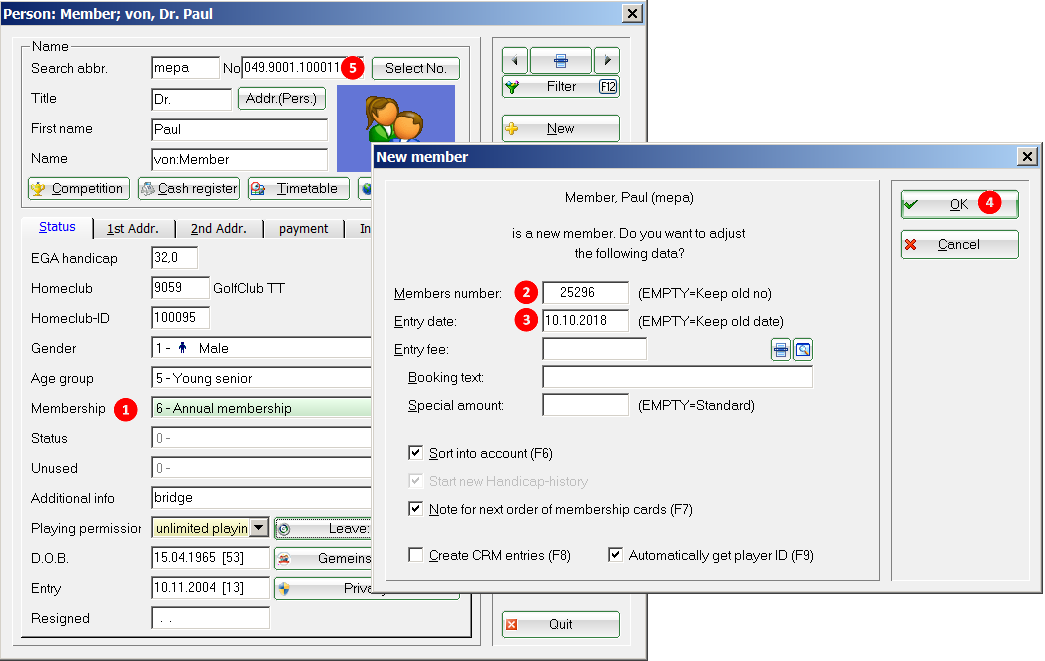
- First enter the membership characteristic
- when you save, the window opens with the suggestion of a new membership number for CLUB 9059!
- If you want to keep the master data sheet that you had in CLUB 9001, it is important that you enter the old entry date, in our example 2.6.14
- Then confirm with „OK“
- only then will the club number be changed, as you will see shortly.
First you will see the note with the master data sheet. If you have left the entry date from CLUB 9001, the master data sheet will be retained from the old entry date.
As soon as you confirm, PC CADDIE retrieves the player ID from the intranet and changes the membership number for Club 9059.
- Do you see? The club number has now been changed!
- The leaving date still needs to be removed
- You can adjust the entry date at the association (for club 9059)
- Important: Delete the leaving date!
Data record changes by members
When a customer changes their data in the online login under „My profile“,

he also has the option of sending these to the clubs. In addition to the home club (in first place), the system also suggests all the clubs in which the player last made a booking. By clicking on the options listed above or the individual clubs, the customer decides for himself to whom he wishes to transfer his changes.

As soon as the customer saves the selection, the selected clubs receive a corresponding e-mail

and an entry in the person's CRM:


Click on the entry to open the following window. The items with a change are automatically ticked.

The employee in the club now decides which changes are to be applied (tick is set) and which options are not to be applied (remove tick) and confirms the selection with Apply. If no changes are to be made in the person mask, the window can be closed with Ignore to close the window.
After confirming both options (i.e. either accept or ignore), the entry is considered edited, is ticked off in green and remains saved in the person mask.
- Keine Schlagworte vergeben
PC CADDIE AG
Bachtelweg 3
6048 Horw/Luzern
Schweiz
Kontakt
![]() Fon +49 2642 9854110
Fon +49 2642 9854110
Fax +49 2642 9854199
![]() Fon +41 41 5110600
Fon +41 41 5110600
Fax +41 41 5110699
![]() Fon +43 13 55667788
Fon +43 13 55667788
Fax +43 13 55667799
Mail support@pccaddie.com
Web www.pccaddie.com
Support Online-Module
PC CADDIE://online
GmbH & Co. KG
Fon: +49 2642 9854120
Fax: +49 2642 9854169
Mail support@pccaddie-online.de
Web www.pccaddie-online.de
Tägliche Supportzeiten:
April-Oktober
09.00 - 20.00 Uhr
November-März
09.00 - 18.00 Uhr