Inhaltsverzeichnis
Inventory
This function is used with the merchandise management module.
The inventory procedure essentially differs depending on whether you take the inventory manually, i.e. whether you manually note the number of items counted per article on a list, or whether you work with the help of an inventory scanner.
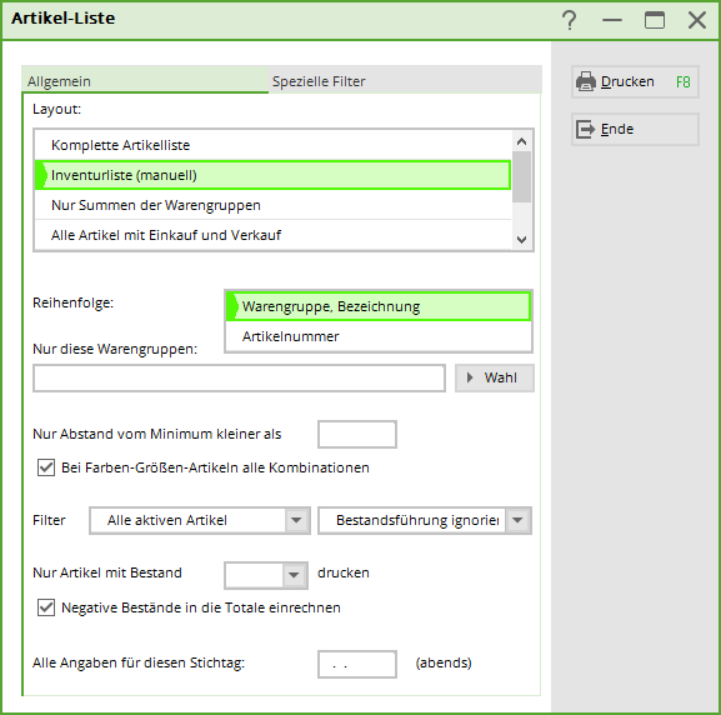
For manual stocktaking, first print out the inventory via Articles/Print…/Article list to print out the „Inventory list (manual)“:
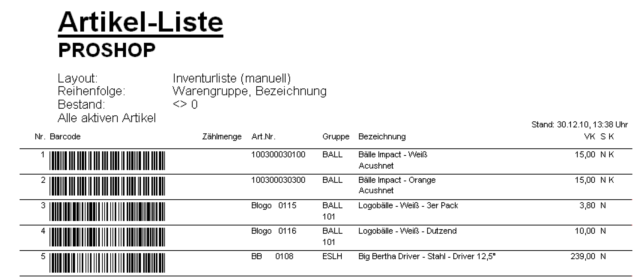
If required, you can set different options here (specific product groups, sequence), preferably just select „All active items“ with a stock of „<> 0“. Diese Liste enthält eine Spalte „Zählmenge“ zum Eintragen des Bestandes:
Inventurablauf
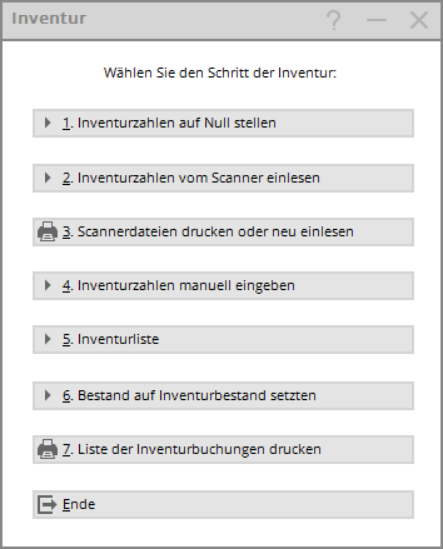
Um nun den Vorgang der Inventur in PC CADDIE zu starten, wählen Sie im Hauptmenü Artikel/Inventur:
Die einzelnen Schritte der Inventur sind in diesem Eingabefenster leicht zu ersehen.
Für die manuelle Inventur sind die Schritte 1, 4, 5, 6, 7 wichtig, bei der Inventur mit Scanner arbeiten Sie über die Punkte 1, 2, 3, 5, 6, 7.
1. Inventurzahlen auf Null stellen
Vor jeder Inventur müssen die Inventurzahlen auf Null gestellt werden. Dies ist in jedem Fall für die manuelle Inventur sowie für die Inventur mit Scanner notwendig. Klicken Sie dazu den Button 1. Inventurzahlen auf Null stellen.
Dieser Schritt dient dazu, dass die neuen Inventurzahlen nicht mit den alten, gespeicherten Zahlen der letzten Inventur vermischt werden.
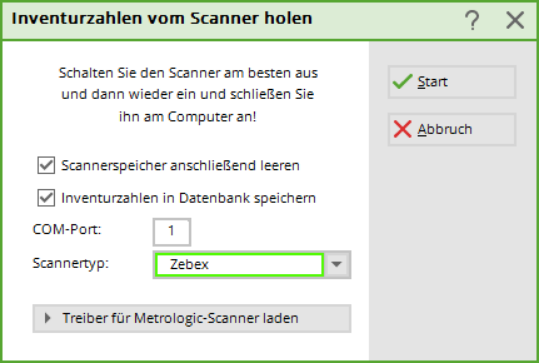
2. Inventurzahlen vom Scanner einlesen
In Terminalserverumgebungen oder in anderen komplexeren Fällen kann man hier auch unter dem Menüpunkt „Scannertyp“ eine lokal erzeugte Datei einlesen, indem man das Drop_Down_Menü auf „Metrologic Scannerdatei stellt“ und dann die Datei über den Windows-Explorer auswählt.
Bitte Kapitel unten lesen.
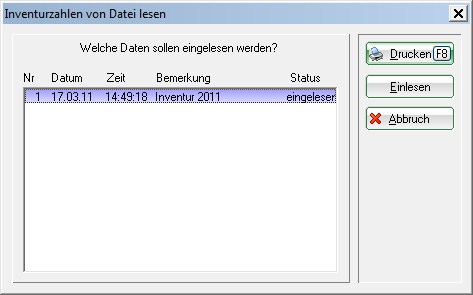
3. Scannerdateien drucken oder neu einlesen
Diese beiden Funktionen (Punkt 2 + 3) sind lediglich für die Inventur mit Scanner von Bedeutung. Sie scannen beispielsweise die Ware eines Regals ein und lesen diese Daten danach vom Scanner in PC CADDIE ein. Die Beschreibung hierzu finden Sie weiter unten (je nachdem, welchen Inventurscanner Sie verwenden).
4. Inventurzahlen manuell eingeben
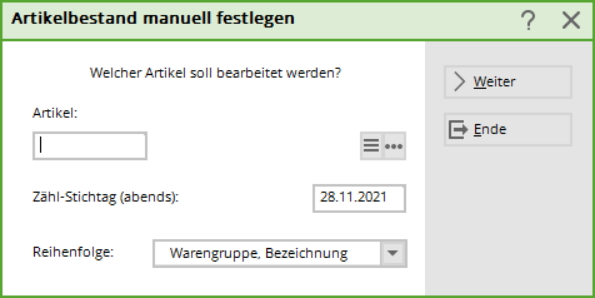
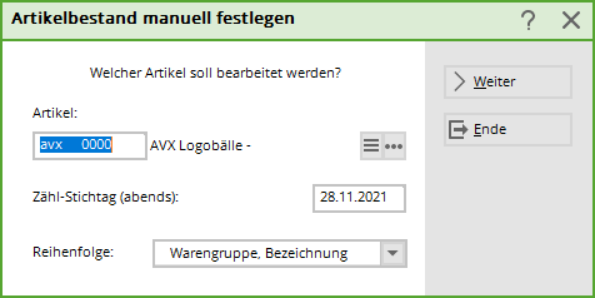
Diese Funktion ist hauptsächlich für die manuelle Inventur gedacht. Zählen Sie die Artikel gemäß der vorher gedruckten Artikelliste und tragen dann unter „Zählmenge“ die gezählte Anzahl je Artikel in die Liste ein. Danach geben Sie diese gezählten Bestände mit Hilfe von Inventurzahlen manuell eingeben in PC CADDIE ein:
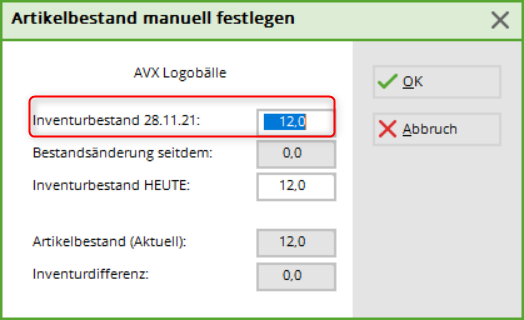
Sie wählen hier Ihren ersten Artikel unter Eingabe des Suchkürzels oder mit Hilfe der Listenfunktion (F2), klicken Weiter und erhalten folgendes Fenster:
Den gezählten Bestand dieses Artikels tragen Sie in das erste Feld ein, eine eventuelle Differenz wird Ihnen sofort bei „Inventurdifferenz“ angezeigt. Nach OK und Weiter wird Ihnen der nächste Artikel angezeigt. Falls in der Eingabe ein Fehler passiert, können Sie jederzeit diese Artikel erneut aufrufen und die Eingabe korrigieren.
Falls Sie über einen Barcode-Scanner an der Kasse verfügen, haben Sie an dieser Stelle auch die Möglichkeit, den gedruckten Barcode auf der Artikelliste einzuscannen. Ansonsten wählen Sie nacheinander die Artikel manuell aus.
Sobald Sie alle Inventurzahlen eingegeben haben, können Sie das Fenster mit Ende verlassen.
5. Inventurliste
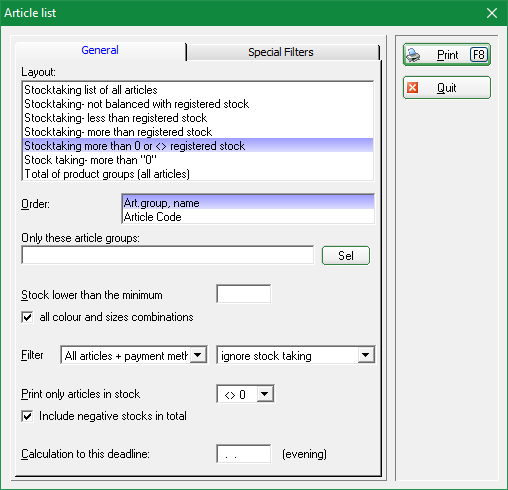
Mit dieser Funktion drucken Sie verschiedene Auswertungs- und Kontroll-Listen zum Überprüfen der Differenzen aus. Es öffnet sich folgendes Fenster:
Die Liste der Differenzen ist bereits voreingestellt: „Inventur größer 0 oder <> Book“
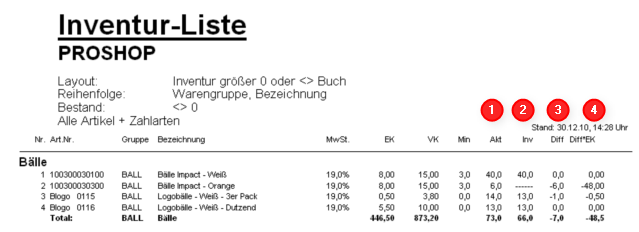
The relevant columns are labelled 1 to 4.
- Current stock in PC CADDIE
- Stock according to counted inventory
- Difference between current stock and counted stock
- Difference between both stocks with the value of the purchase price
With End you can exit the function.
It may be necessary to make further changes to the inventory levels of various items after checking the differences. You can do this at any time via point 4 Enter inventory figures manually at any time. Only when you are sure that the differences shown are correct should you continue with point 6.
6. set stock to inventory level
This final step is the completion of the inventory. With this function, you change the complete item stock of your Proshop to the new, counted and entered inventory stock. If, for whatever reason, you want to delete the inventory figures you have entered and do not want to transfer them to the official Proshop stock, start again with point 1. set the inventory figures to zero.
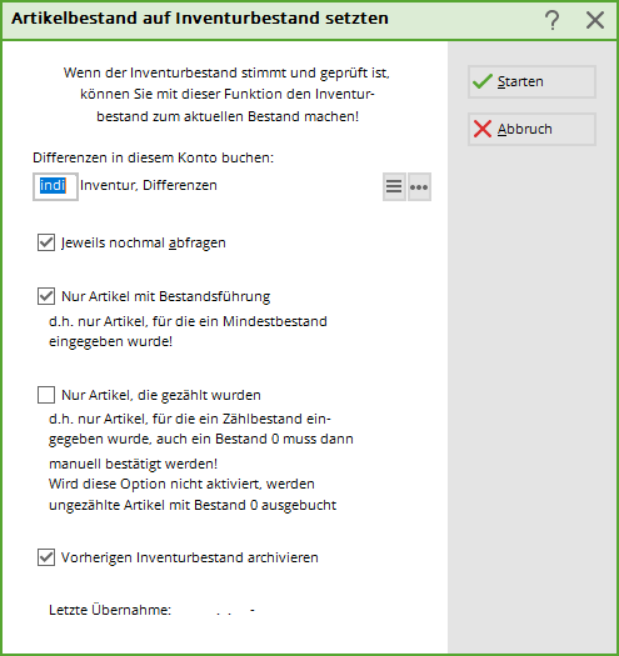
Proceed as follows to transfer the inventory stock: In order to post possible differences, please first create a new inventory under Persons/…enter new, change, delete create a new person, e.g. called „Inventory, differences“ with an „i“ as the search indicator. Then click on point 6 of the inventory Set stock to inventory level.
The newly created inventory „person“ is automatically selected so that the inventory differences are posted to their sales account. The other options can be activated or deactivated depending on the items for which you now want to change the stock figure to the counted quantity. The automatic proposal corresponds to the usual procedure. Please read the selection options carefully and contact PC CADDIE Support if you have any queries. Activate the required options and then confirm with Start.
7. print list of inventory entries
Finally, you can print out the correction entries if you wish. The stocktaking is now complete. The item stocks have been automatically set to the counted quantity. To check or verify the new opening stock, you can go to Articles/Print…/Article list to print various item lists.

Use of inventory laser scanner PDL-20
Before you import the scanned files, please note that all inventory figures must first be set to zero, see chapter 1. setting inventory figures to zero.
Switching on the laser scanner
Please charge the scanner in the charging cradle or the battery in the rear charging drawer, preferably overnight. Then switch on the inventory scanner using the PWR button (red button at the bottom). Please make sure that REC appears in the top right-hand corner of the screen. If this is not the case, please press the M2 button twice.
Scanning the sales items
To scan, please aim at the barcode and press the orange button. It may be useful to delete the scanner memory before scanning. This will ensure that no old data falsifies the falsify the current inventory.
You either have to scan once per item (if you have five packs of balls, they have to be scanned five times), but you can also enter a factor. There are two ways to do this: 1) First enter the factor (in our example the number 5), then type the dot (in the number block under the 2) and confirm with Enter. You can now scan the barcode. 2) Or scan the barcode first, then enter a dot followed by the number and finally confirm with Enter.

However, you can also use negative factors (e.g. -5) to correct the counted stock. When typing, you can always use the arrow keys to move to the character to be deleted and then press the F4 key to start the deletion process. Press the CLR key to delete the entire number entry. If a character is to be overwritten, use the arrow keys to move to the desired character and then enter the new character. The old character will be overwritten immediately.
Inventory scanner Datalogic Memor X3
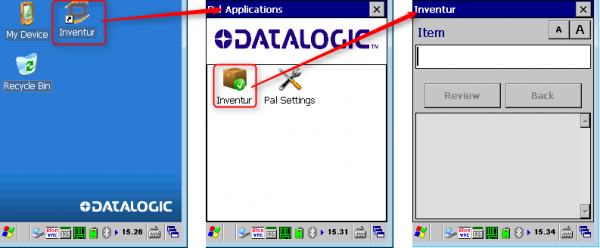
Start inventory programme
Via button
To start the inventory programme, press the F1 key.
Via Desktop
- Double-click on Inventory
- Press on Inventory
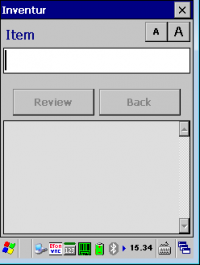
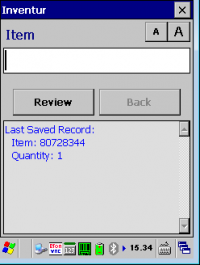
Scan article
- Scan item barcode using the orange scan button
- Enter quantity (1 is defined as standard)
- Confirm with the ENT button
- Check
- Scan next item

You can also work here with the factor (e.g. 5) with 5. + scan article or scan article + .5. see above.
Overview / Delete data
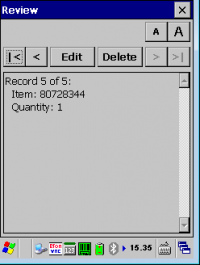
Via the button Review button, you can review items that have already been scanned.
The X button takes you back to the main dialogue.
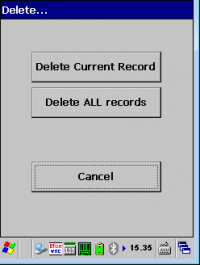
Under Delete you can delete the currently displayed item or clear the entire memory of the device.
Post-processing the inventory file
By pressing the F6 key once, you can scroll through the scanned numbers again (using the arrow keys). From the position you are currently at, e.g. Rec. 100, press the F1 key to jump directly to Rec. 90.
Pressing the F2 key would automatically take you to Rec. 110. To change a data record, press F3. To delete a data record, press F4. If you want to reach a specific position, press F5 and enter the record number. number of the data record. If in doubt, you can also switch off and on again briefly - the data will be retained in any case (but confirm the factors with ENTER first!!).
Importing inventory figures from the scanner into PC CADDIE
In PC CADDIE, use the menu to select Article/Inventory/2. Import inventory figures from scanner
PDL-20
To read the data in PC CADDIE, place the reader in the charging cradle 
On the correct COM port selection. With Start the count quantity is read into PC CADDIE.
Datalogic Memor X3

- Place the inventory scanner in the charging cradle
- The PAL Communicator software copies the data from the reader to the computer
- After successful copying, the following message is displayed:
- COM port can be ignored.
- In PC CADDIE, set the scanner type to Memor X3 (PAL) set.
- Start
Check import
After transferring the data to the computer, you should check whether everything has been transferred (for example, check the inventory level of the last scanned item).
If individual items cannot be imported, they must be processed manually, see chapter Entering inventory figures manually. You can also make any corrections to stock levels manually instead of scanning them again.
Emptying the scanner memory
Press the M1 button and then use the right arrow button to go to „2. Task Utility“. Confirm with Enter. Now select the option „3. Delete Data“ with the right arrow key and confirm again with Enter. Use the M2 button to switch to „Y“ and press Enter.
You can scan the items and empty the memory after approximately 200-300 items. You never know if something might happen to the scanner in between…
3. print or reload scanner files (only if required) This menu item is only required if something has gone wrong during the course of the day when importing via the scanner. In this case, the inventory figures must be completely reset to zero (see section 1. setting inventory figures to zero) and the file created during the physical inventory must be read in again.
After importing the inventory figures, you can finalise your inventory with points 5, 6, 7 (as with the manual inventory). Please read the corresponding chapters above.
Inventory scanner ZEBRA TC21
The On/Off button is located at the top right. The scan button is located on the right-hand side.
Installation is done by PC CADDIE for you. We can connect directly to the scanner. After Installation you can start scanning.
Using the Metrologic Optimus inventory laser scanner
Before you import the scanned files, please note that all inventory figures must first be set to zero, see chapter 1. setting inventory figures to zero.
Switching on the laser scanner
Please charge the scanner in the charging cradle, preferably overnight. Plug the charging cradle into the appropriate computer port (USB or serial) and the power connection.
Scanning the sales items
Switch on the inventory scanner with the red button (bottom right). To scan, aim at the barcode and press the orange button.
It may be useful to delete the scanner memory before scanning to ensure that no old data falsifies the inventory (see last section).
You will find the following options on the scanner display when starting up:
Programme start - Functions: Press the number 1.
You now have two options:
1. a field = Press the number 1. scan the barcode. The system always The scanned item is always counted once. Here you can also enter the factor first, e.g. 5, then type the dot (in the number block above the 3) and then scan the barcode.
2. with number = Press the number 2. Here you can scan the barcode, then type in the number of the item present and confirm with Enter.

When typing, you can delete backwards by pressing the BS key. If you press the down arrow key and then the BS key, the entire entry is deleted.
Post-processing the inventory file
By pressing ESC, then 2 (Functions) and again 2 (Change data), you can scroll through the scanned numbers again (using the arrow keys).
To change a data record, press F8. To delete a data record, press F9. If in doubt, you can also switch off and on again briefly - the data will be retained in any case (but confirm factors with ENTER beforehand!!).
Importing inventory figures from the scanner into PC CADDIE
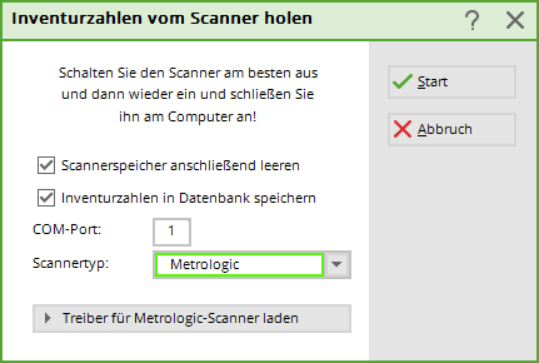
Switch on the inventory scanner with the red button (bottom right). In PC CADDIE, select Articles/ Inventory/2. Import inventory figures from scanner. Start the driver installation via the button Load driver for Metrologic scanner.
Your computer should then have recognised the inventory scanner in the control panel. If this is not the case, please install the driver directly via the Control Panel. To do this, go to your main directory PC CADDIE. There in the Tools and Metrologic folder. Open the Data Read file with a double click.
Enter „Metrologic.txt“ under File name. Make sure that „Cradle-IR“ is selected for the interface and that the correct COM port is displayed. Exit the programme with „Cancel“. If you do not know the COM port, please proceed as follows:
Settings, Macros, enter „dev“ (without inverted commas) and confirm with OK to confirm. Click on the „Ports (COM and LPT)“ menu item. The COM port is shown after the individual connections.
As soon as the driver is loaded, you can start reading the data into PC CADDIE. To do this, place the reader in the charging cradle 
After transferring the data to the computer, you should check whether everything has been transferred (check the inventory level for the last item scanned).
You can then delete the data from the scanner (see next chapter).

If individual items cannot be scanned, they must be reprocessed manually, see chapter Entering inventory figures manually. You can also correct any stock corrections manually instead of scanning them again.
Emptying the scanner memory
After reading in the data, you will find the following options on the display of the inventory scanner the options: Delete data: All data, Last data. Press the desired number (normally 1). When you are prompted „Secure“, please press 1 again to confirm „Yes“.
You can scan the items and empty the memory after approx. 100 items. (You never know if something might happen to the scanner in between…)
3. print or re-read the scanner files (only if required). This menu item is only required if something has gone wrong during the course of the day when importing via the scanner. In this case, the inventory figures must be completely reset to zero (see section 1. setting inventory figures to zero) and the file created during the physical inventory must be read in again.
After importing the inventory figures, you can finalise your inventory with points 5, 6, 7 (as with the manual inventory). Please read the corresponding chapters above.
- Keine Schlagworte vergeben

