Inhaltsverzeichnis
Catering cash register: create, edit, delete
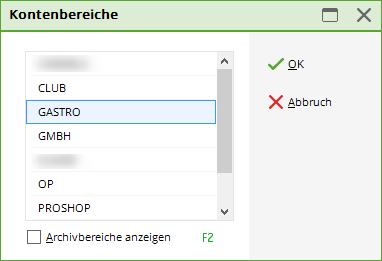
To work in the catering cash register, you must first select the relevant account area, e.g. GASTRO, for example.
To do this, press the yellow button in the icon bar
or select in the menu Select sales/account area menu, select the appropriate area.
Default settings
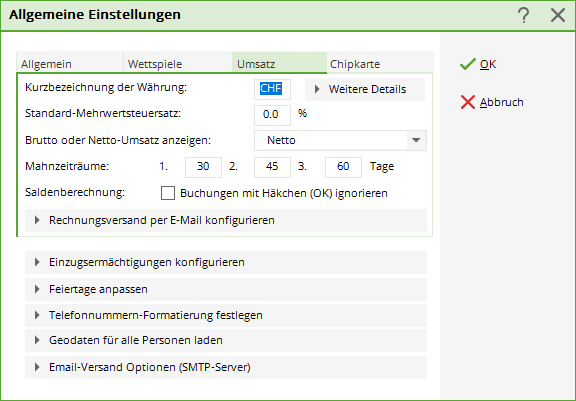
Before you enter the articles, please check under the menu item Settings/Programme settings/General settings, in the „Turnover“ tab and whether the correct percentage rate has been entered in the „Standard VAT rate“ input field:
If this is the case, confirm with OK. Otherwise, change the entry and also confirm with OK. If you have items with, for example, 7% VAT, you can change this individually in the item definition. PC CADDIE remembers this percentage rate for all subsequent items and only changes it back to e.g. 19% as soon as you set this rate again for another item.
Enter article
To enter the articles, use the menu item Sales/contribution types/articles/…create, edit, delete.
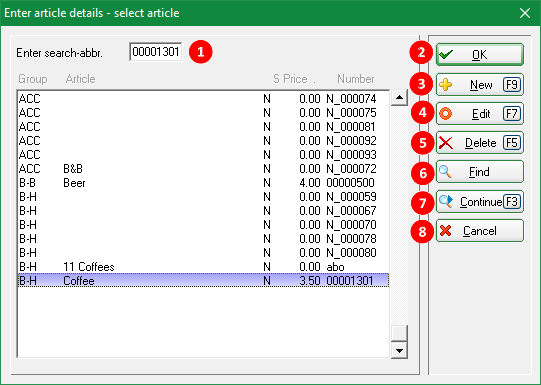
The following window shows you the item overview:
- Enter parts of the description or article number as search abbreviations. The list is reduced to the item(s) containing your entry.
- With OK to open the selected item for viewing.
- Create an article here New (F9) here.
- Select an article and click on Edit (F7) to edit it.
- Delete (F5) to delete an article.
Delete You can only delete an item if it is not posted in the current account area. If you want to delete items from older years, you can only do this as part of an archiving at the end of the year.
- Here you can search by name part or product group Search. The item selection jumps to the first item that matches the search criterion.
- With Next (F3), the article list is searched further downwards; the search criteria entered under Search previously entered search criterion.
- Cancel closes the window.
Article
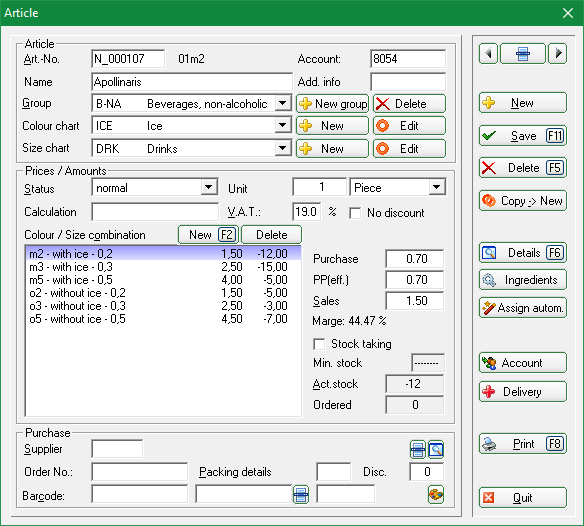
Article no.
The article number can have a maximum of eight digits and consist of numbers and/or letters. Please do not use umlauts or special characters. If you want to generate barcodes for label printing with PC CADDIE, you must never use upper or lower case letters. never letters. Conversion to barcodes only takes place for eight-digit combinations of letters and/or numbers (e.g. SNACK001, DESS0001, 66660001). Article numbers are usually assigned schematically. For example, they begin with the first letters of the product group or a previously defined combination of numbers. To create an article of the same product group, it is very practical to work with the * or +. This assigns the next free article number: SNACK*, or SNACK+.
FNA account
In this field, you can enter the number of the accounting account to which the item should ultimately be assigned. This is necessary for the transfer of sales to an accounting interface (additional module: accounting export).
Description
Determine a suitable name for the article. However, this should be a short and unique item name. Long names may not fit completely on the receipt for the kitchen or counter. In the article list, the product groups are sorted alphabetically and the articles within the product group are sorted alphabetically.
Identifier
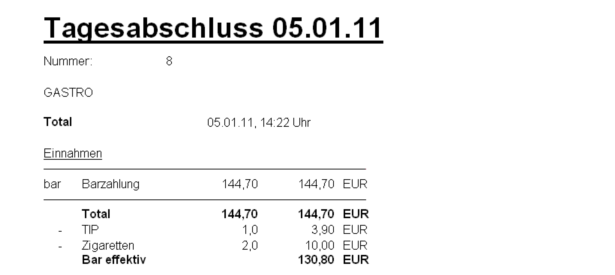
Here you enter individual identifiers that provide you with information, for example, on a label printout or in the article type. In the catering industry, the identifier is mainly used for items that are to be used as displays, e.g. cigarette money or tips. For this purpose, „DISPLAY“ (without inverted commas) is entered in the identifier field. Follow the link als_tip_trinkgeld_verbuchen . The item is then posted in the cash register as normal and the text appears on the receipt when paying. On the daily statement, these articles are listed separately under cash sales and deducted from the „Effective cash“ amount.
If you use the PCCADDIE cash book in the catering industry, the expenses are not deducted there; they must be posted manually. We will be happy to enter a special parameter for you so that they are deducted automatically. In addition, the identifier must have the suffix „KABU“, in our example „AUSLAGE_KABU“.
You can also enter „ARTDET“ in the article ID to see booking details in the daily closing. This means that the bookings for the relevant article are listed individually in the daily closing (in the article statistics). This can be useful, for example, if the accounting department wants to see which voucher numbers have been sold or redeemed on the basis of the daily closing.
The identifier „PAYMENT“ allows a ball card payment to appear as a payment method in the daily closing in the catering trade.
Group
The product group to which the article is to be assigned is selected or created here. This entry should be carefully considered, as various statistics can be generated for individual articles or merchandise groups. The total daily sales of the various product groups are listed in the cash balance. Some examples of possible product groups are
- G-A = Beverages, non-alcoholic
- G-B = Beverages, beers
- S-VK = Food, cold starters
- S-H = Food, main courses
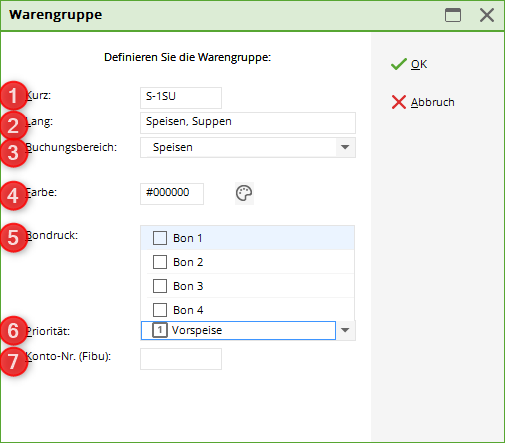
To create a new group, click on the button New group
- Enter the short code for your product group (maximum 8 characters).
- Enter the name of your product group.
- Select the booking area for your statistics, see also Edit booking areas .
- Here you can select a colour for your product group so that the assigned articles are easier to recognise in lists.
- Select the receipt print, see also Cash register.
- If required, set a receipt priority, see also Set receipt priorities.
- You can also assign a FNA number to a product group. This then automatically applies to all assigned items. If a contained article is to be given a different number, you can set this in the article itself. The number stored in the article has priority. This entry is only relevant in connection with the additional module Export accounting data .

Colour scheme and size scheme
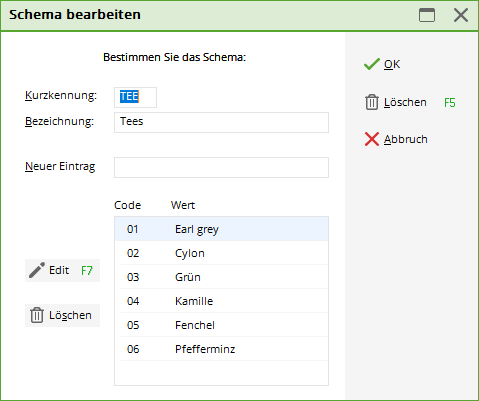
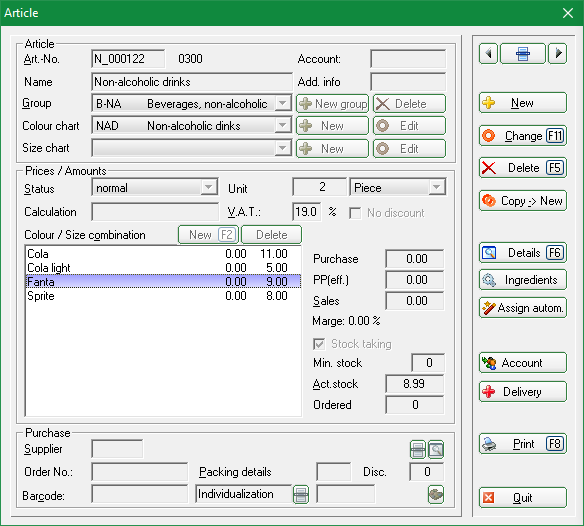
By selecting a colour and/or size scheme, you have the option of creating sub-items. If you only want one main item, you do not need to select a scheme. The terms „colour“ and „size“ come from the proshop checkout; in the catering industry, instead of colours, you create, for example, side dishes, additives (with and without ice cubes) or types of tea or beer. In the size scheme, you can define cooking levels, drink sizes or grammes, for example. Here you can select individual colour and size schemes for the articles or create new ones. Select an existing colour or size scheme from the list and change it as required with Edit
For example, add a new size here in the „New entry“ line and confirm with OK. With Edit (F7) you can edit selected colours/sizes, change the identifier or meaning. With the left Delete - button you can delete individual colours/sizes, with the right Delete (F5) button to delete the entire scheme.

To create a new scheme, click on the button Neu: First determine a short identifier and then enter a suitable designation and then enter a suitable name. In the field New entry field, create the desired colours/sizes one after the other.
Prices/quantities
Status
PC CADDIE provides you with the following selection options:
| Normal | This status stands for the usual single article. |
|---|---|
| Text query | It applies, for example, to an article „employee plate“ with a fixed price, but without a specific description. The „description“ is queried when the article is selected. |
| Totals query | This query is very practical for articles without a fixed price, e.g. a general article „Flower decoration“. A price query is made when the item is selected. |
| Small (no label) | No label is printed, but a small item list with the corresponding barcodes can be output for the cash register (ideal for small items such as pitch forks, balls, etc. - less commonly used in the catering industry). |
| Bagtag printing | A configured bag tag is printed out directly when an item is selected, e.g. for green fees, range fees, trolleys etc. |
| Voucher sale | Status of the item selected for a voucher sale. (see Voucher administration ) |
| Voucher redemption | Status of the item selected when redeeming a voucher. (see Voucher administration ) |
| Cash book | Status for special cash book items (see Cash book ). |
| Discount | An article with this status and a „sales price“ of 10.00 adds a surcharge of 10% to the total of all previously booked articles (e.g. percentage surcharge for credit card payments). |
| Reduction total | An article with this status and a „Sales price“ of 10.00 books a discount article of 10% on the total to be paid, i.e. on the sum of ALL previously booked articles. |
| Reduction last article | An article with this status and a „sales price“ of 10.00 books a discount article of 10% on the last article booked in the checkout. |
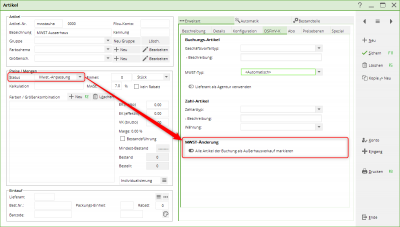
| VAT adjustment | You set this status e.g. for the item „Out of house sale“ or „VAT reduced“. If this item is booked in the cash register, you will be asked whether the VAT for the selected customer should only be changed from 19% to 7% for the previously booked item or for all open items. The various VAT rates are listed on the receipt. Under Items/create new, edit, delete… you can create this. This could look like this: 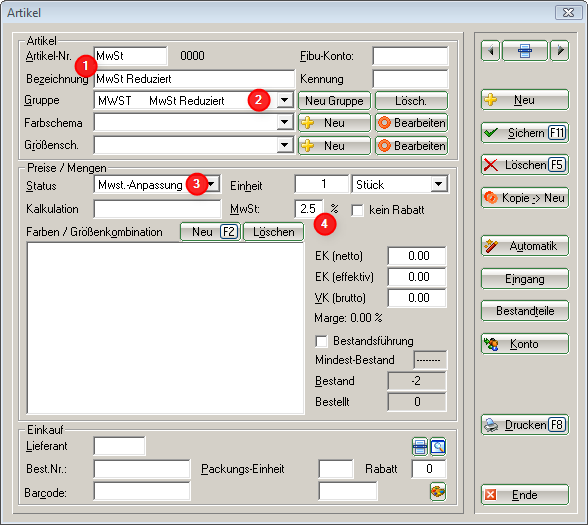 → Give the article the description, (1) that you want. → Create a new group (2) for the item. →  Select the status „VAT adjustment“ status (3). Select the status „VAT adjustment“ status (3). → Finally, enter the desired reduced VAT rate (4). (As of 10/2011: for Switzerland: 2.5 %, for Germany: 7 %) |
| Hidden | This status is only used for special articles and is normally created by the PC CADDIE support team. |
| Payment method | For all payment methods, such as cash, credit card, EC card, cheque or similar. These are then also listed separately in the daily closing. |
| Inactive | For all items that are no longer sold or that may be added to the stock again later (seasonal items such as pumpkin soup). You can print out sales statistics at any time. Inactive items can be moved to the corresponding archive area when archiving so that they are deleted from the current area. |
| Serial number management | For articles with serial numbers. |
Unit
The unit describes the sales unit. PC CADDIE provides the following:
- Piece
- Subscription
- Pack
- metre
- litres
- Kilogramme
- Pair
- Set
- Dozen
- hour
- bottle
- Barrel
Calculation
The corresponding sales / purchase prices are entered in the catering. The Calculation line can be left blank. The formula to be entered in the calculation is always derived from the entered net purchase price.
If you would like to use the automatic calculation, simply enter the following in the field calculation field, enter the digits 1, 2 or 3 and confirm with Tab.
The following formulae are stored:
- 1 = VK=EK*(1+?%)
- 2 = VK=EK+?
- 3 = VK=EK/?%
The question marks must then be replaced with a number.
The VK (gross) is then calculated automatically.
MwSt:
A value that differs from the standard VAT rate can be entered here. For example, for so-called out-of-home sales.
The tick No discount is activated as required - e.g. for items with a low profit margin. Or for the „employee plate“, which is already adjusted in price. These are not taken into account when discounting the sale.
The purchase price and sales price are calculated according to the calculation entered. The effective purchase price is the purchase price plus packaging and/or postage less any discounts granted on the list price.
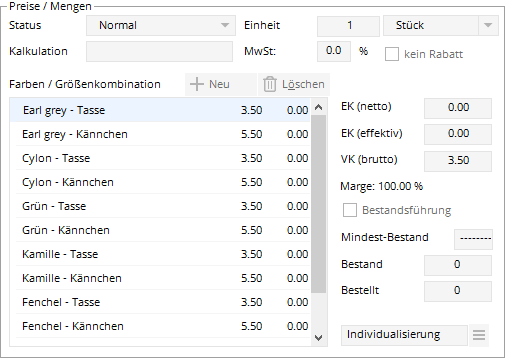
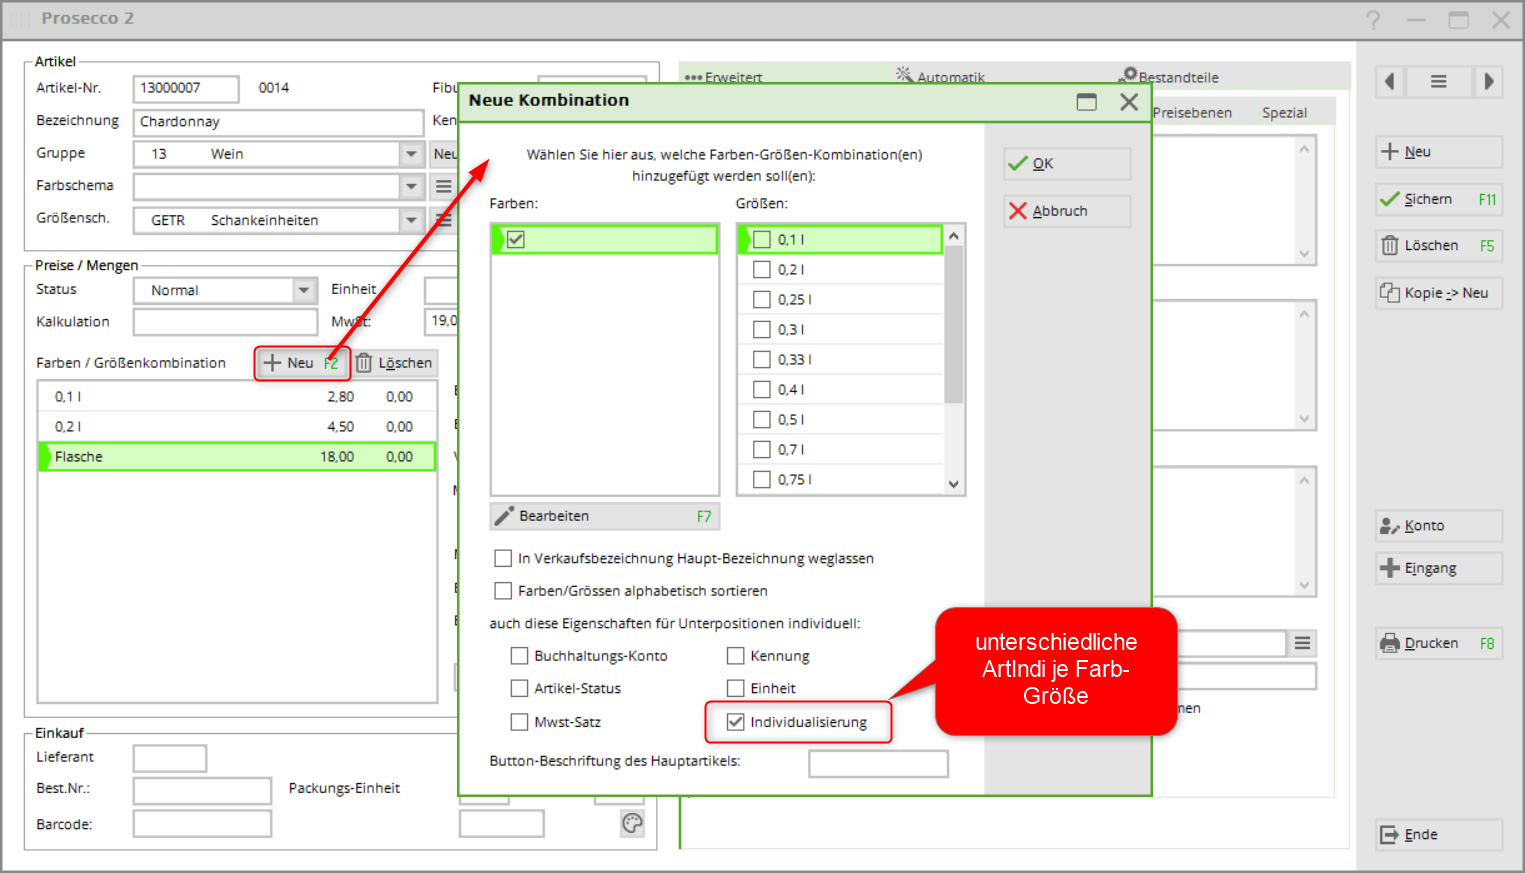
Colour/size combination
You create sub-items by selecting colour and size combinations.
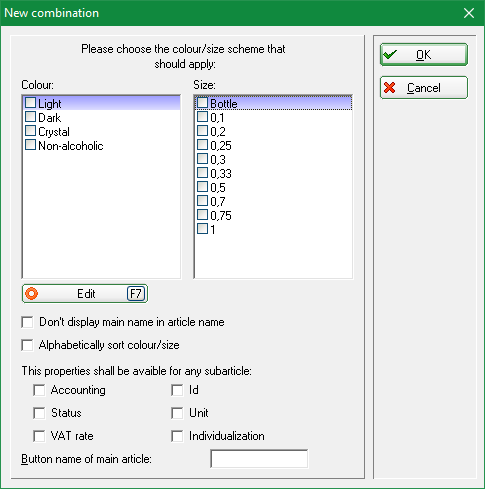
With New or F2 you get the schemes selected above:
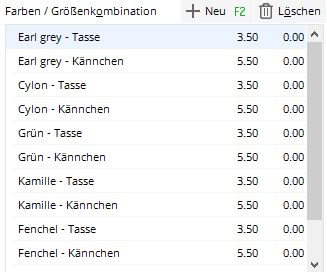
and by ticking the box you will receive the corresponding combinations as sub-items. With the help of the „Accounting account“, „Identifier“, „Item status“, „Unit“, „VAT rate“ and „Individualisation“ checkboxes, the sub-items can be set individually in relation to these properties in the main item.
With Delete you have the option of deleting individual sub-items. However, this is only possible if this sub-item has not yet been posted (goods receipt or sale).
Inventory management
If the Inventory management checkbox is ticked, the fields below are automatically activated.
Mindestbestand: If the numerical value entered here is reached, you will receive a warning when this item is sold. If you do not want minimum stock management, „—-“ remains.
Bestand: You enter the opening stock using the receipt button. Further receipts are entered via the menu Item, Inbox menu at any time.
Bestellt: This is purely an information entry. This does not correspond to the number of items that are printed in an order list.
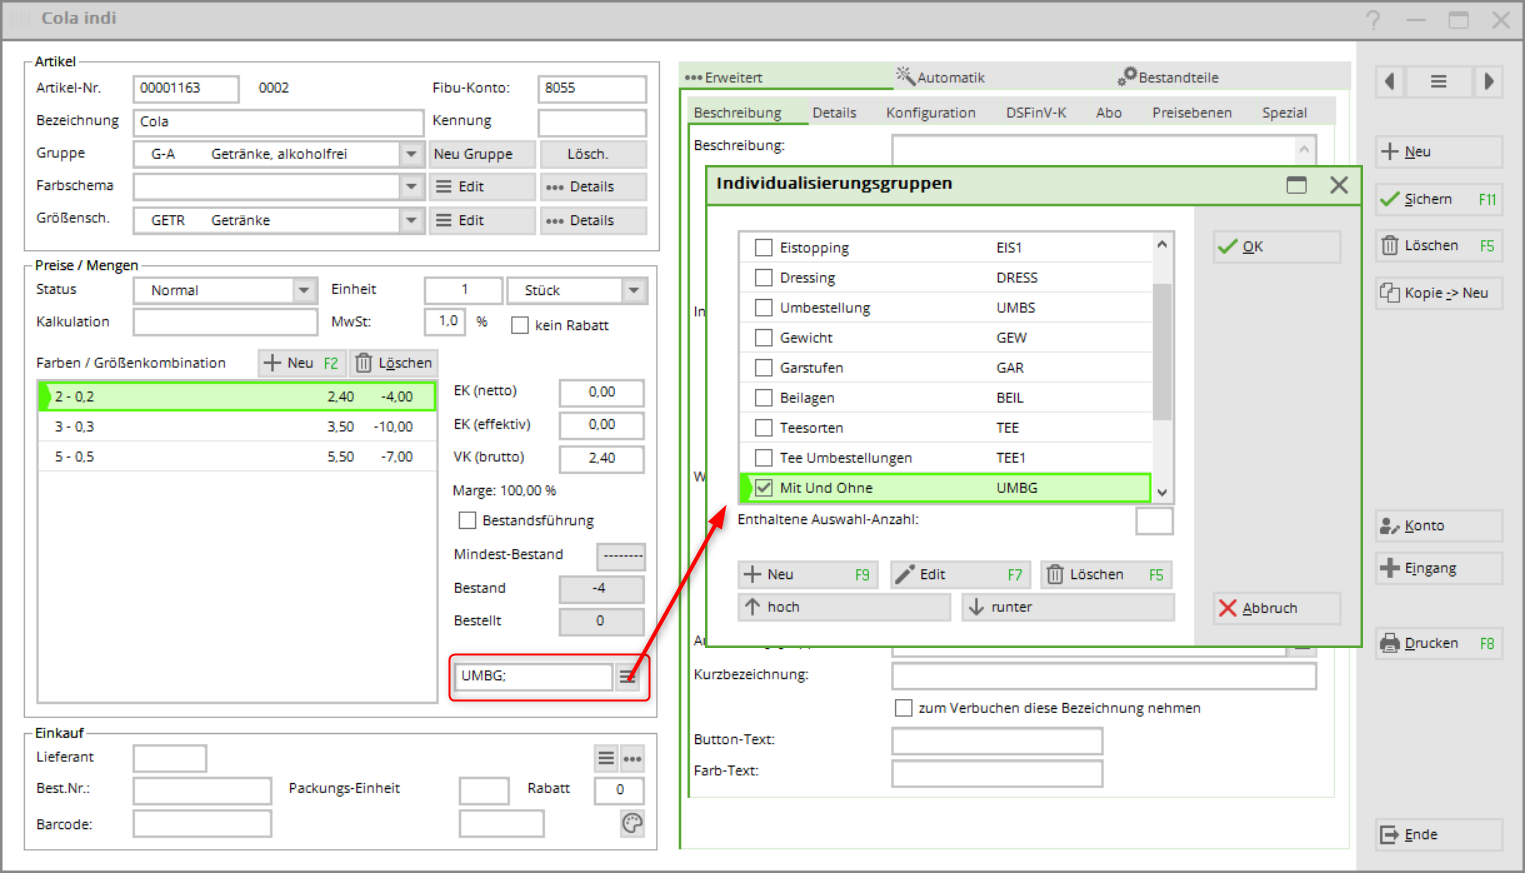
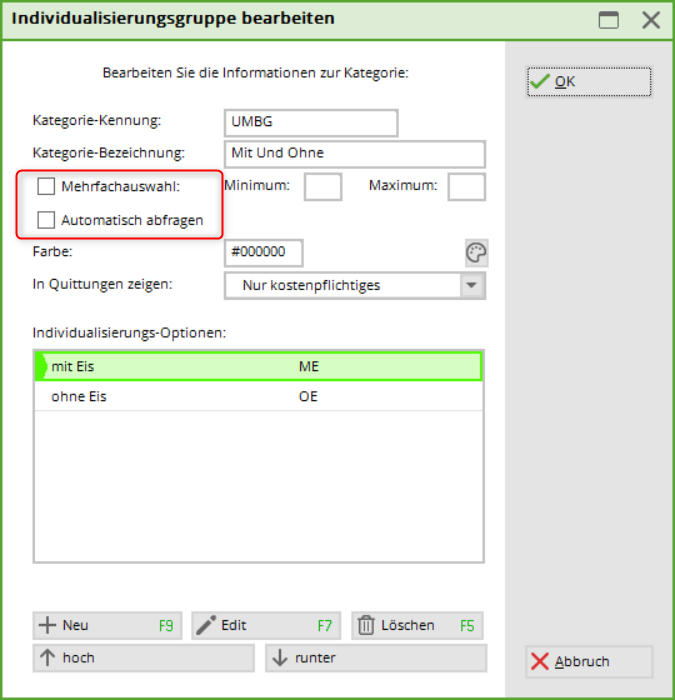
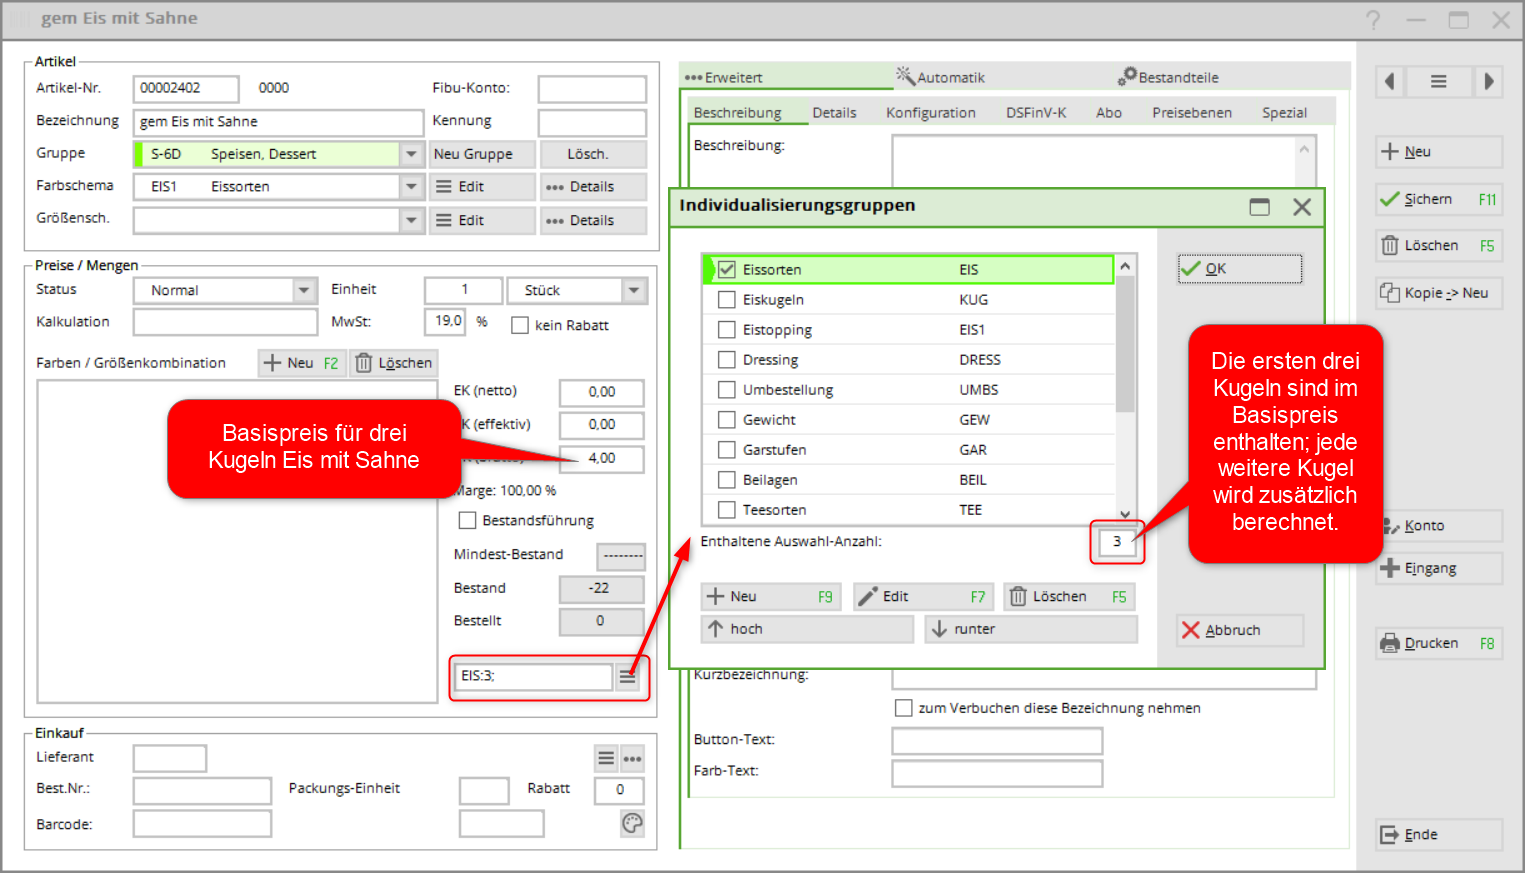
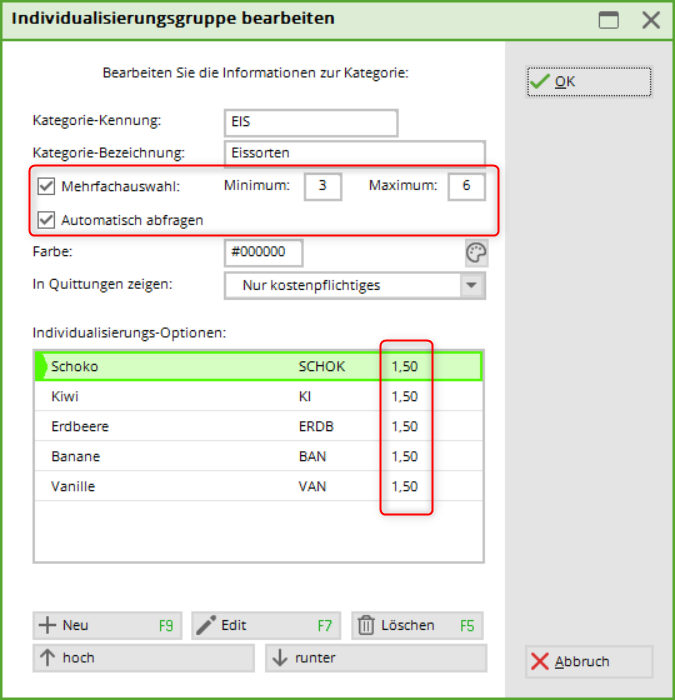
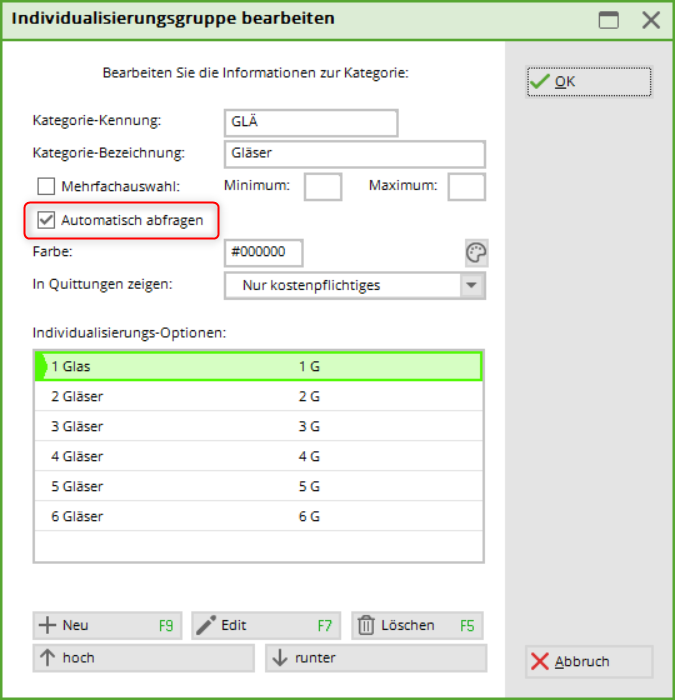
(Article) Individualisation
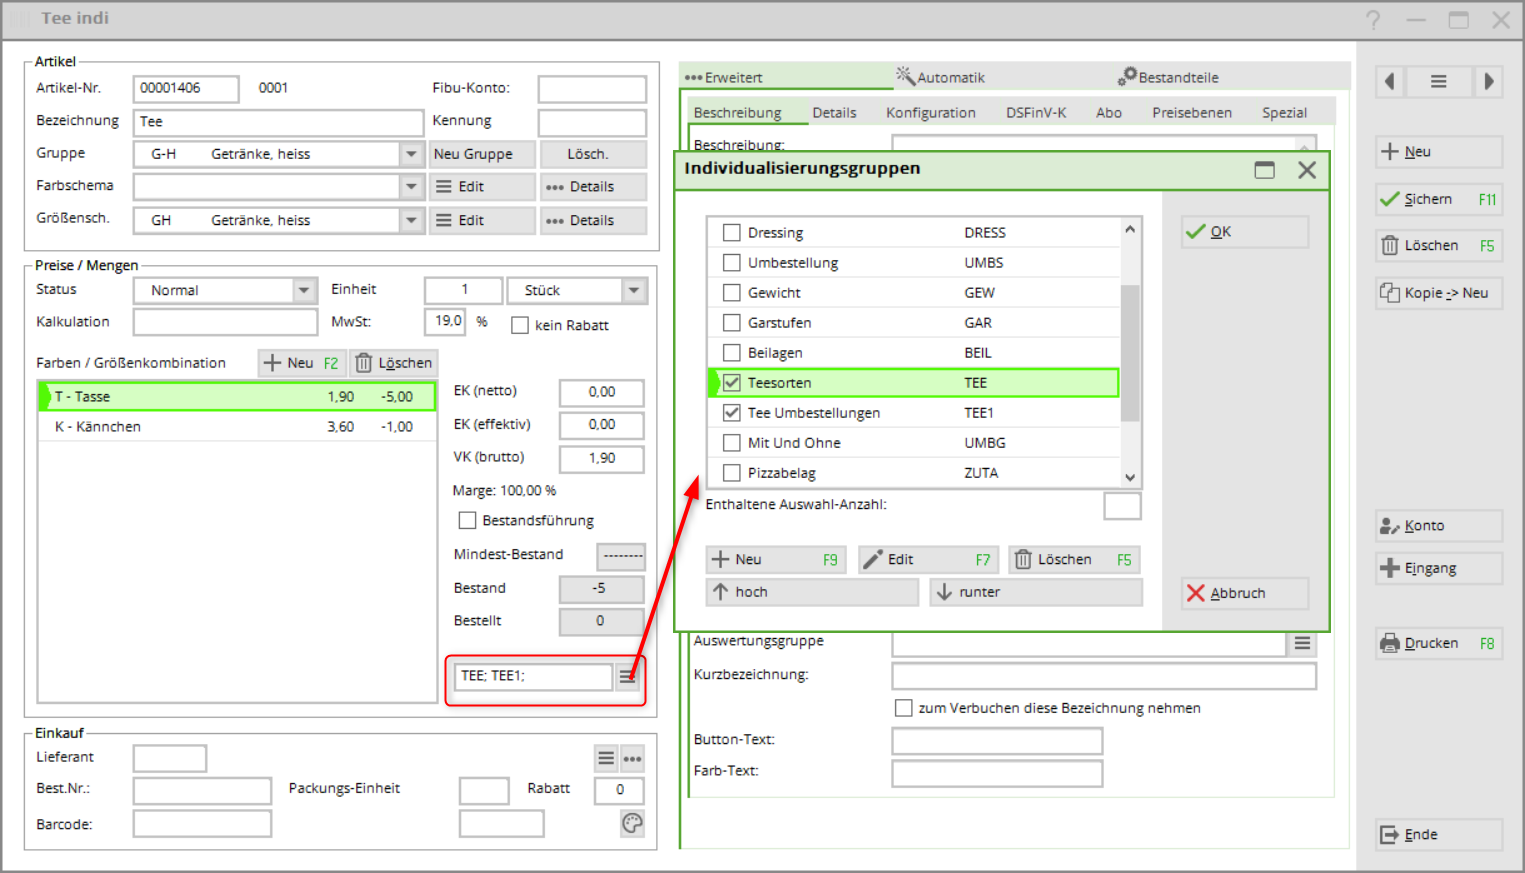
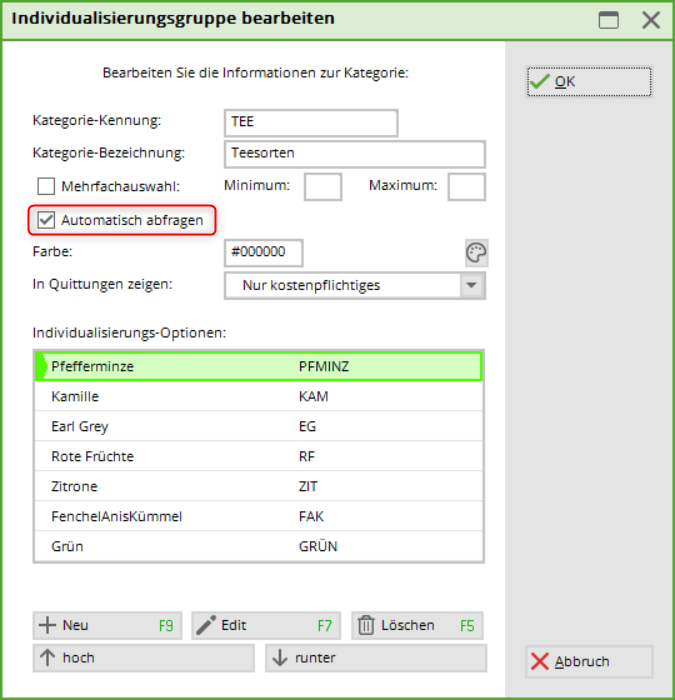
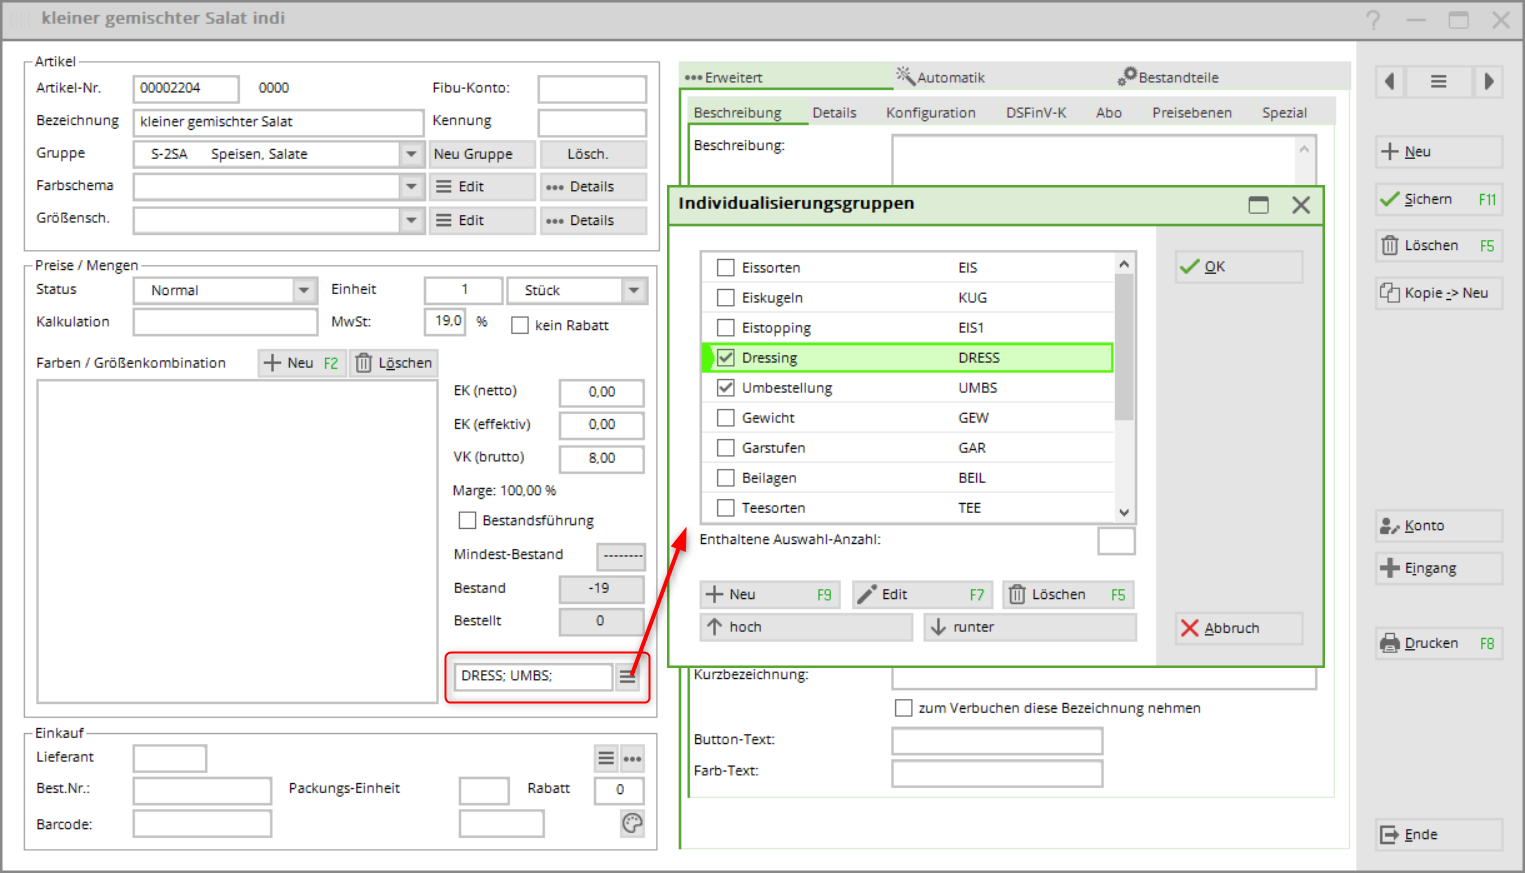
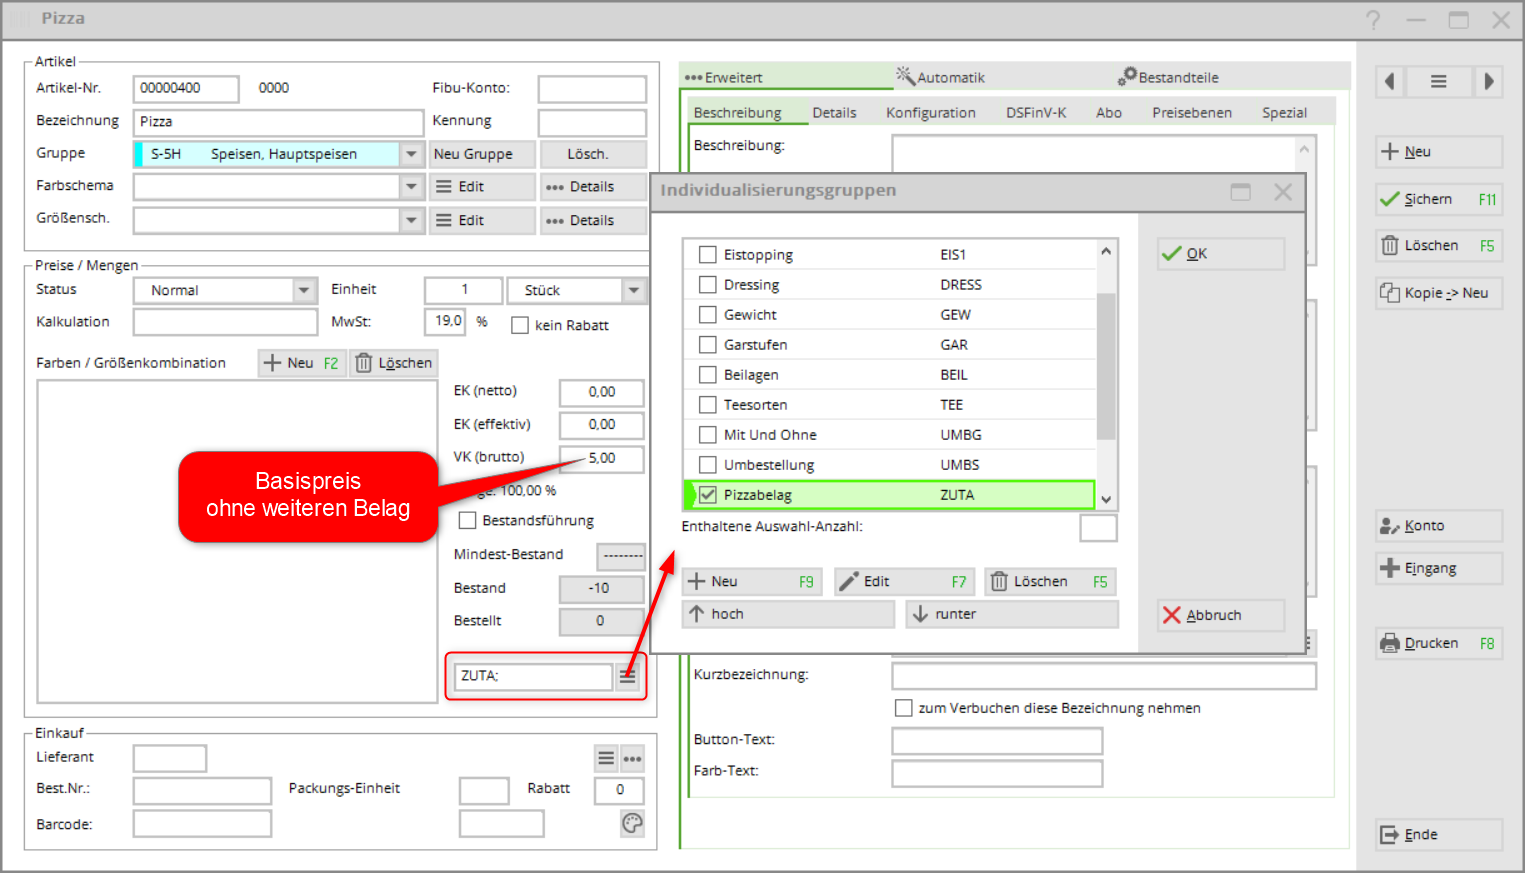
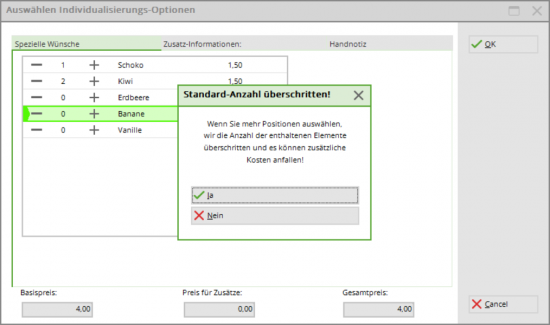
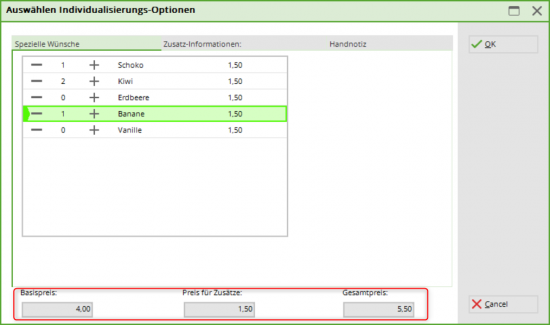
Item individualisation, or „ArtIndi“ for short, offers you the option of quickly individualising the items for the guest during the ordering process.
No separate articles are created, as is the case when using colour/size combinations or components.
:!:You cannot print statistics via the ArtIndi.
We have listed a few examples of the creation and use of the ArtIndi here.
We would also be happy to advise you.
Drinks, with/without ice
Tea, varieties and reorders
Salad, choice of dressing and "please without"
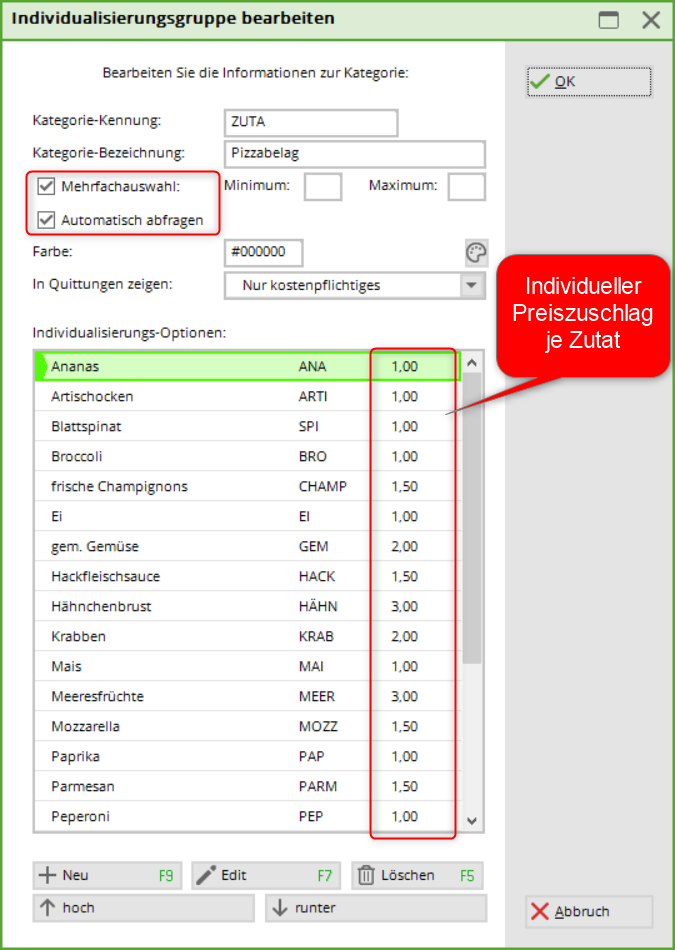
Pizza
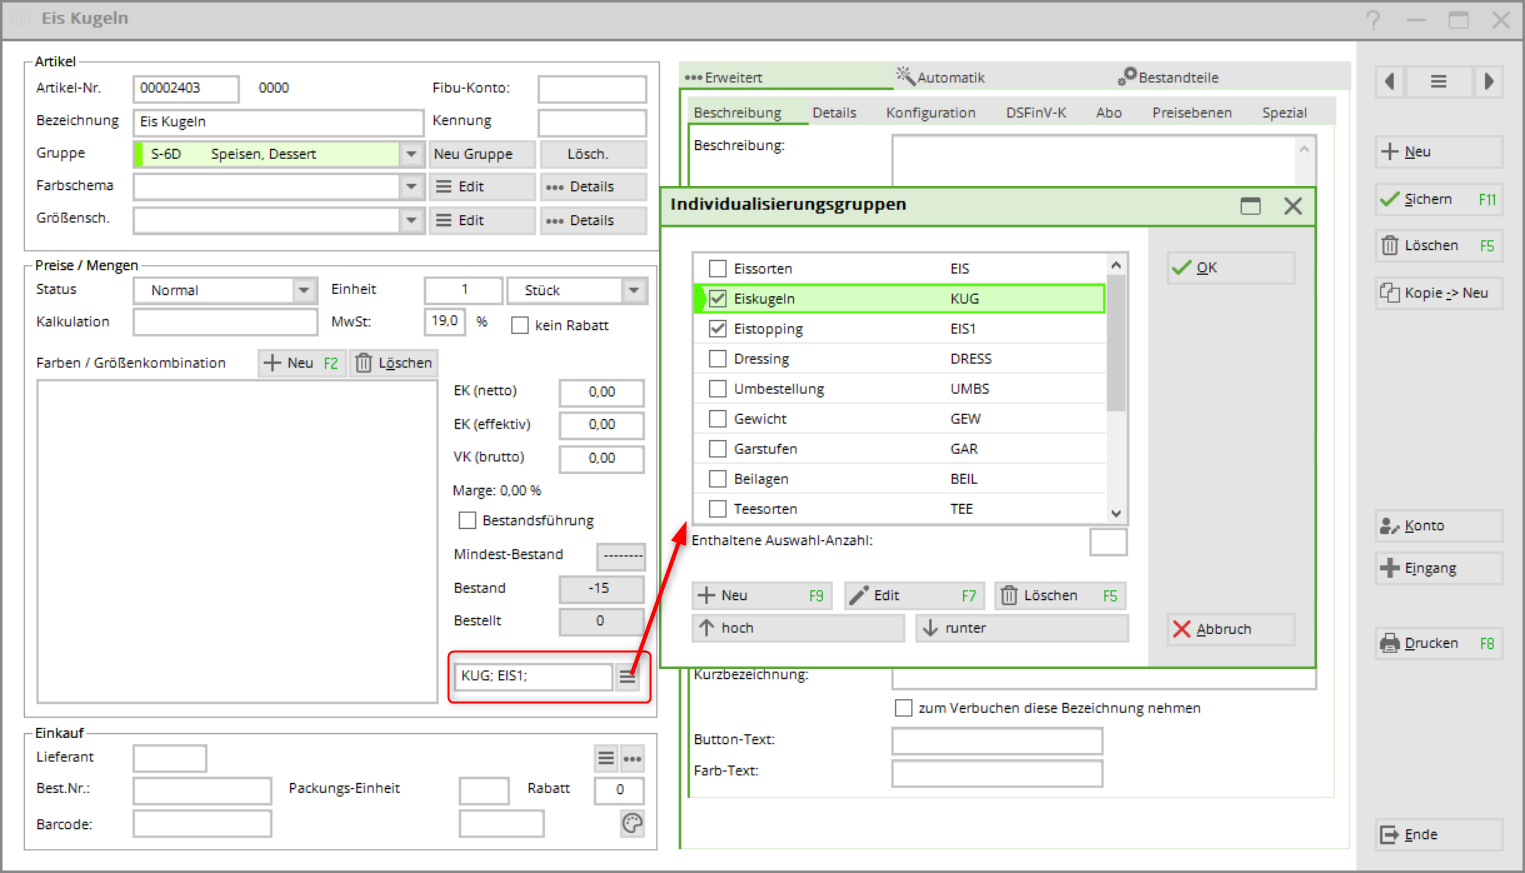
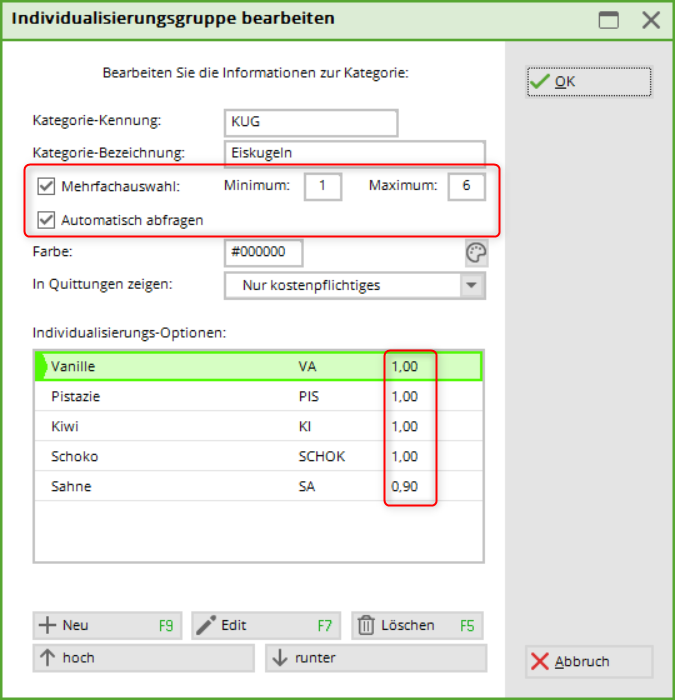
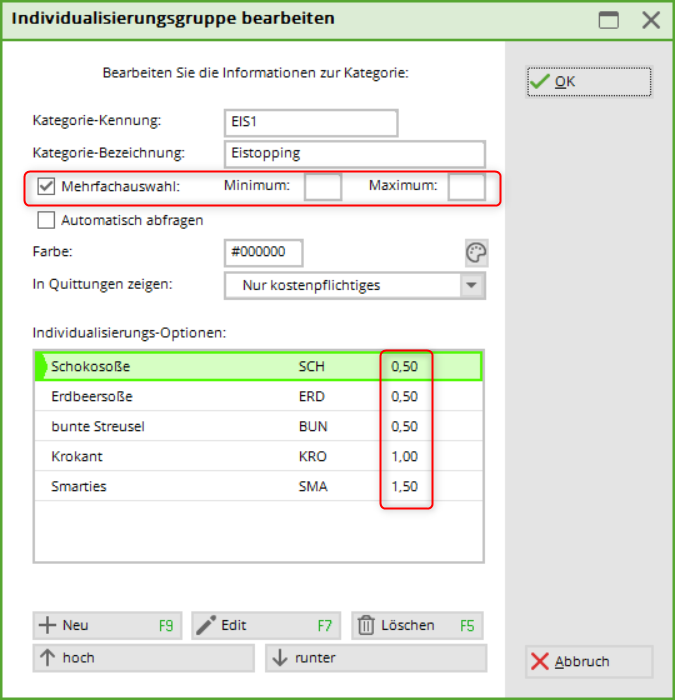
Ice cream scoops, flavours and toppings
Mixed ice cream
Wine, glass query for bottle only
Purchasing
Here you can enter your purchasing information. Select the supplier, enter your order number, packaging unit and any discounts granted.
Under Barcode, you can, if you wish, also scan the barcode printed by the supplier. The item is then recognised in the checkout using this barcode. This is more commonly used in the Proshop, e.g. for ball boxes.
Further entries
In addition, this window offers you further input options on the right-hand side with the following buttons:
 Scroll up and down the article list using the arrow keys or open the article list using the list button.
 This allows you to create a new blank item.
 If you want to make changes to an item, press this button. It now has the name
  Once you have made the desired changes, click this button to save the settings for this item.
 You can use this button to delete an item.
 Use this to create a copy of the item. The description is given a „1“ at the end and the next available article number is automatically selected. This is very helpful if you want to create a similar item or if you want to keep the initial digits of the item number in the same scheme.
 Here you define a blanket, automatic article assignment for a specific group of people. This is less needed for catering, more for green fee bookings Green fee article
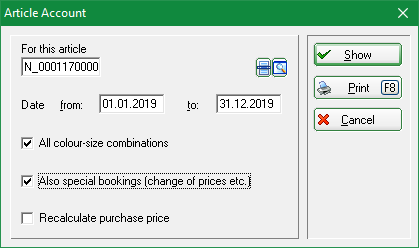
 Here you can display or print out the article account.
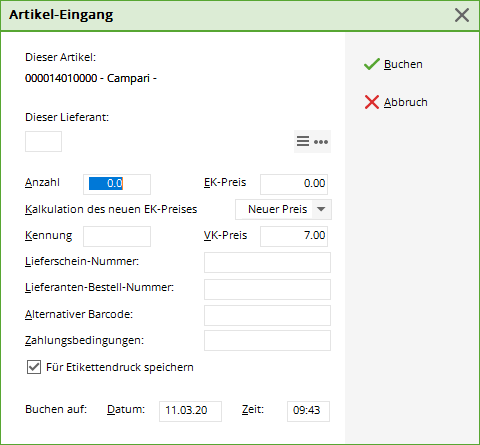
 This button is used for the merchandise management system, where goods receipts are posted.
The supplier is adopted according to the entry in the article window. After entering the number of goods received and entering the purchase price, the following selection is available to you:
- New price - the new purchase price is defined as the effective purchase price
- Average - The average between the two purchase prices is calculated and defined as the effective purchase price
- Calculated - The calculation stored in the article is used.
The other entries refer to the delivery note or terms of delivery. If you do not wish to print a label, uncheck the box.
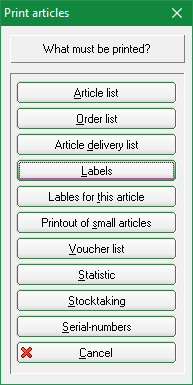
 You will receive various print options. Print
Components
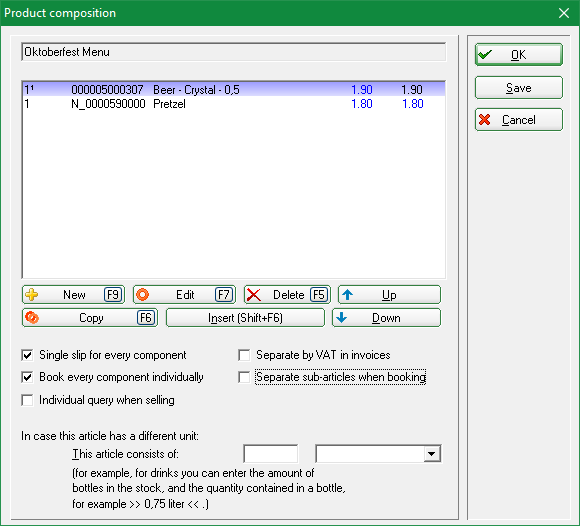
You can use this function to split an item into several components, e.g. for multi-course menus or packages (snacks and dinner).
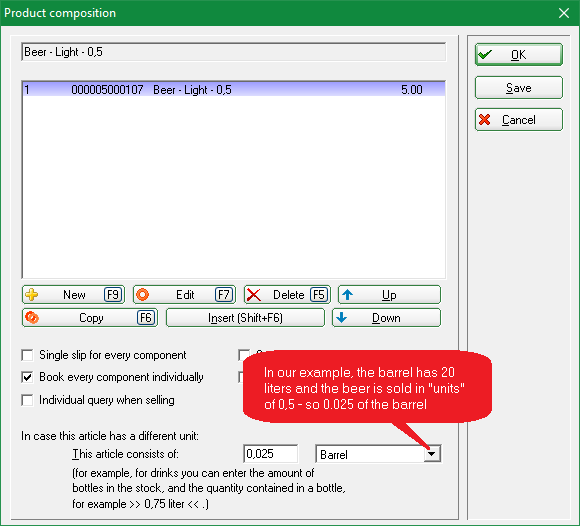
Or access a purchase item. For example, if you buy your drinks in different containers than those sold.
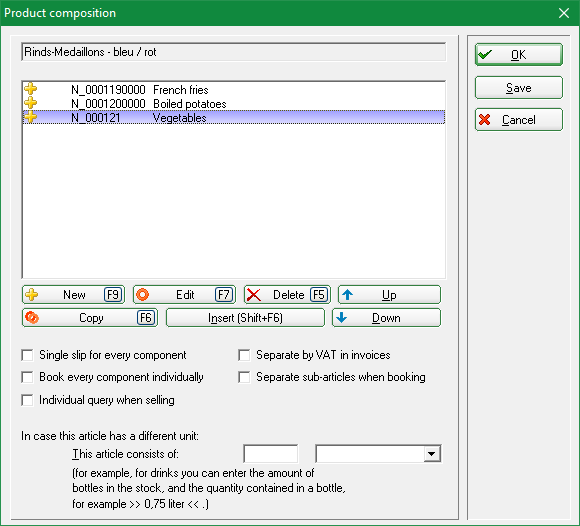
You can also set up follow-up articles here, e.g. for optional side dishes or ice cream scoops.
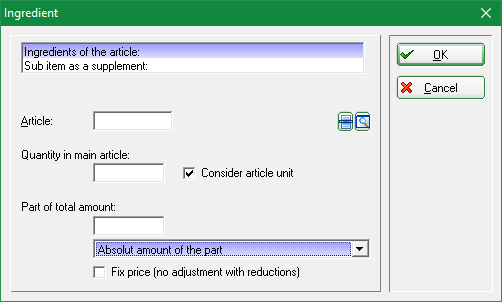
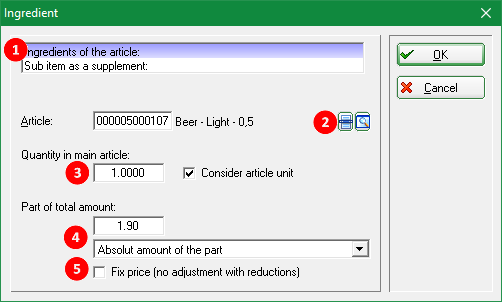
Via the button New button takes you to the screen where you can select and set an existing article that is to become a component or follow-up article to the main article.
Bestandteil:
- Leave the marking on Component of which the article is composed
- select the corresponding article via the list button
- determine the quantity and whether the item unit should be taken into account
- define the value share, which can relate to the main item price in different ways:
* Absolute value of the share - here it is important that the sum of all components corresponds to the sales price of the main item
* % share of the total value of the main item
* % share of the remainder up to this item
* % share of the previous remainder - If this box is ticked, no pro rata discount will be granted if a discount is granted on this component
Component EK article
- Pay attention to the correct quantity conversion between sales and purchase items.
- If you do not enter anything here, the sales price of the sales item is automatically used.
TIP Stock management should only be activated for the purchase item. By setting the components, the sale is then automatically noted in the stock of the purchase item and reduces it.
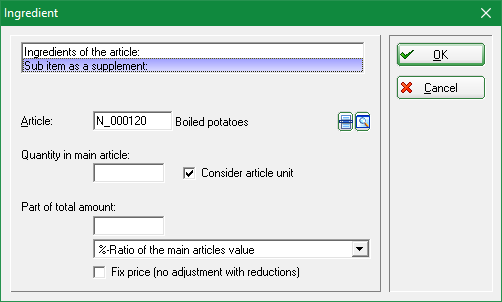
Follow-up article
To do this, simply click on Follow-up article suggested as a supplement wird: and select the article to be suggested in the automatic query.
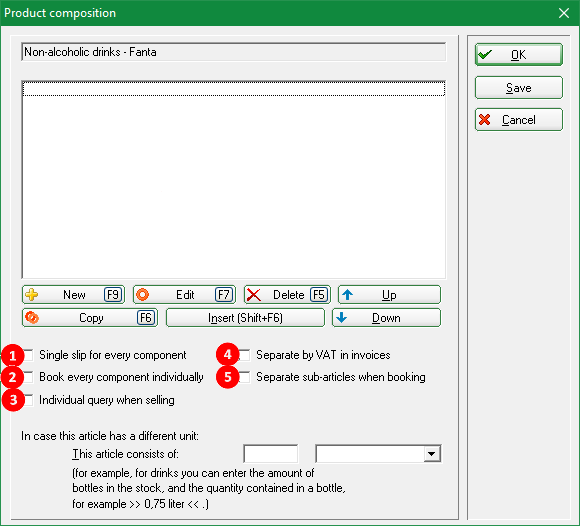
Tick the box for the components
- Individual receipts for each ingredient - A receipt is printed out for each component. This is used, for example, for menus where individual receipts are required for different courses and stations (drinks and food).
- Book each component individually - Tick this box if the sales and stock are to be posted to the component items. If the box is not ticked, the sales are not split between the components, even if you have made the setting.
- Individual query for sales
- Split according to VAT in receipts - This checkbox is ticked, for example, for Logis articles if you set components with different VAT and want to display this in detail.
- Separate sub-items when posting - When posting to the account, the difference is that the items are then posted as normal individual items and are no longer component items. This is used, for example, if you actually have a component item „Overnight stay + breakfast“, but only the breakfast is to be included on the private invoice after posting.
Details
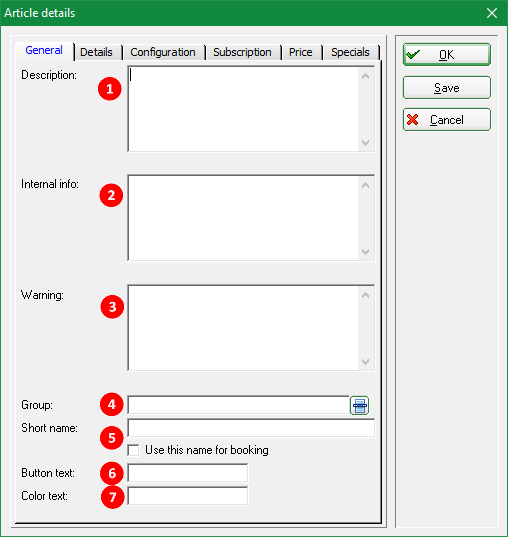
Tab General
- Description:
- Internal info:
- Warning:
- Evaluation group:
- Short description: for the quick selection button, takes the text entered here instead of the article name; with | you cause a line break on the button - if you tick the box below, this text is also printed on receipts and invoices
- Button text: here you set the text for the fixed keyboard on the handheld (if it should differ from the item name)
- Colour text:
Tab Details
- Order name:
- Order info:
- Weight and customs information:
- Add attachment and picture:
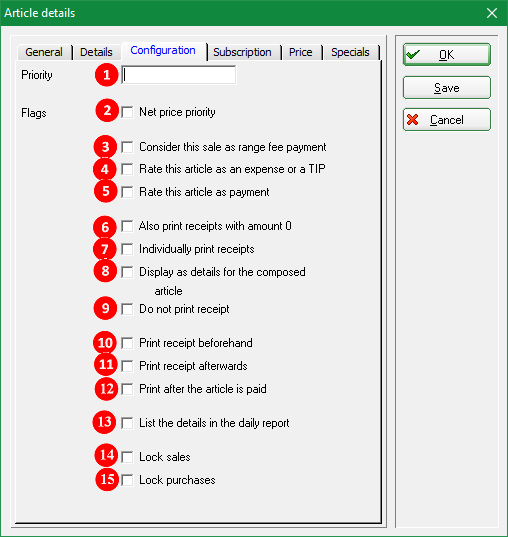
Tab Configuration tab
- Priority
- 2
- 3
- 4
- 5
- 6
- 7
- 8
- 9
- 10
- 11
- 12
- 13
- 14
- 15
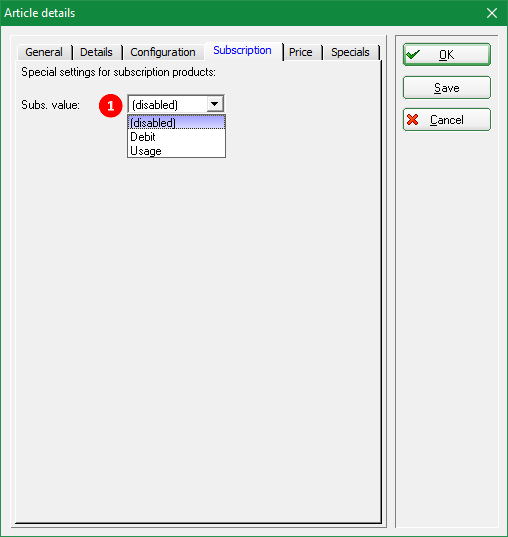
Rider Subscription
- abo_verwaltung_20 - if the article is a subscription, you can set here whether it is a cancellation or consumption article
Tab Special
- price
- Language
- .
Menu
2-course menu at a fixed price, with starter & main course or main course & dessert. The advantage is that you can use the existing starter, main course and dessert items without making any major changes.
- Meaningful name of the item
- Based on this, PCCADDIE knows that the subsequent item changes the price to 0.00 and makes it part of the menu
4 course menu, with 2 starters
MENU:1 is entered for each starter. PCCADDIE knows that 2 starters are selected in this menu.
DSFinV-K settings
Business transaction types Cash security regulation
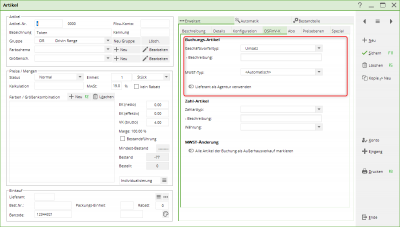
Posting article
For each booking article, a business transaction (GV_TYP/GV_NAME) must be defined for each booking item: You can find more detailed descriptions of the types of business transactions here: Definition of business transactions |
- Turnover
- Deposit
- Deposit repayment
- Discount
- Surcharge
- SubsidyReal
- AllowanceNon
- TipAG
- TipAN
- Single-purpose voucherPurchase
- Single-purpose voucher redemption
- Multipurpose voucherPurchase
- Multi-purpose voucher redemption
- Receivables creation
- Debt cancellation
- Down payment cancellation
- Down payment cancellation
Article payment type
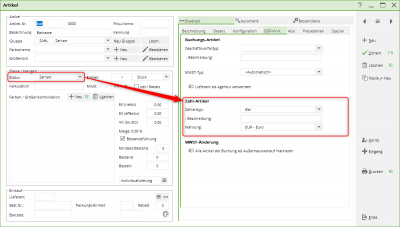
For payment type Article the payment method and the currency must be set.
The following options can be selected as the payment method:
- Cash
- Non-cash
- None
- EC card
- Credit card
- Electronic payment service provider
- Prepaid card
VAT article
In PC CADDIE, postings are by default recognised as in-house sales are posted as in-house sales.
For a VAT article, you can specify whether the associated articles are to be posted as out-of-house sales are to be booked as out-of-home sales.
Configure quick selection
Read information on the Cash register - quick selection
Operating the PC CADDIE cash register
Read here information about Operating the cash register .
Voucher management
With the help of this function you can easily organise the sale and redemption of vouchers and track the corresponding sales, see Voucher administration .
Entering suppliers
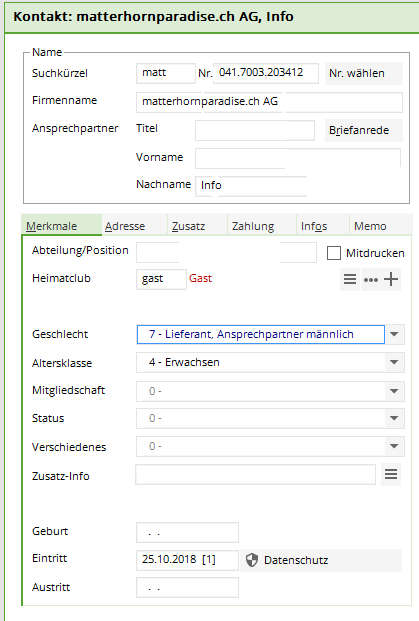
It may also be necessary or useful for the catering trade to create suppliers in the PC CADDIE. This is done in exactly the same way as for persons and companies via Persons/…enter new, change delete. For suppliers, first enter the gender „7 - Supplier, contact person male“ or „8 - Supplier, contact person female“. Otherwise, creating a supplier is similar to creating a company member. firmen_und_clubs_erfassen
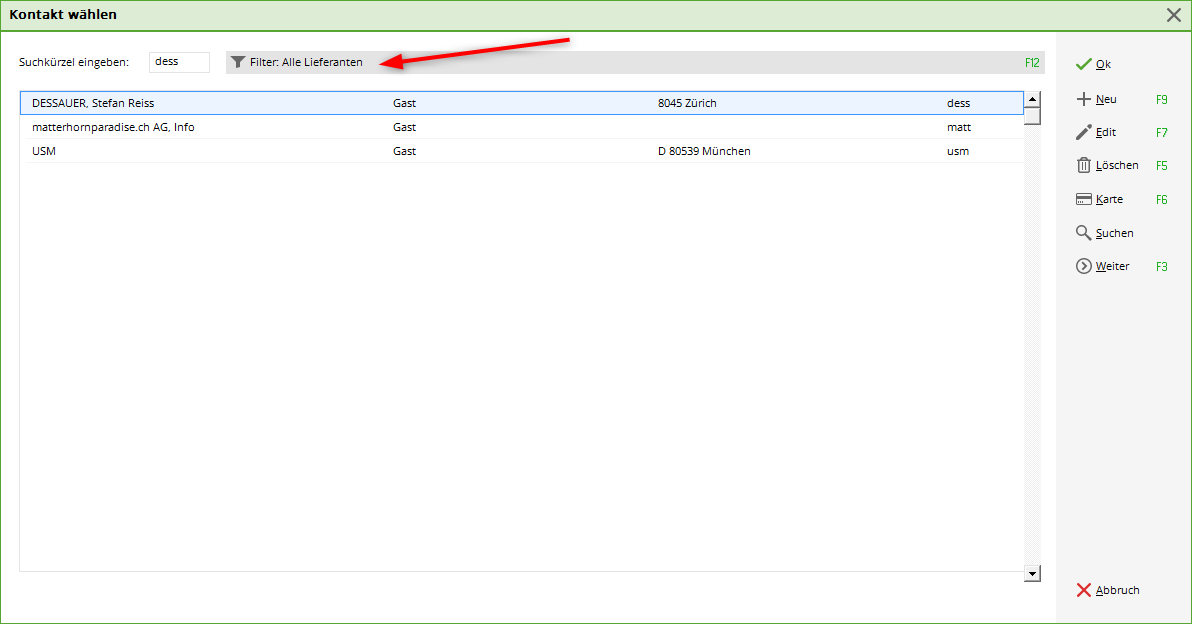
However, it is important that you set the „All suppliers“ filter in the „Members and guests“ selection list so that the suppliers are displayed.
Filter
In the cash register, the filter can be changed so that all members are displayed first and then the guests.
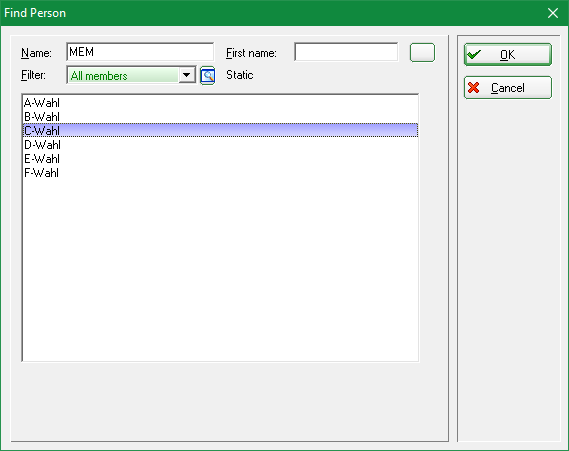
1. go to the list, then the „Search person“ window opens
2. enter name
The list appears. At the top all members followed by guests
If you would like this selection, please contact our support team: support@pccaddie.com
- Keine Schlagworte vergeben

