Inhaltsverzeichnis
Invoices

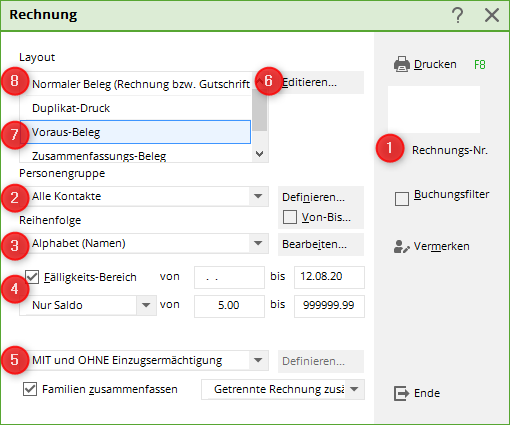
Please go to Sales/Print…/Invoices.
Proceed as follows:
- Check invoice number (only at the beginning of the year)
- Group of persons
- Print sequence
- Note due date range
- Basic settings (mostly suitable)
- Check layout
- Print advance document
- Print normal receipt
Creation of serial invoices
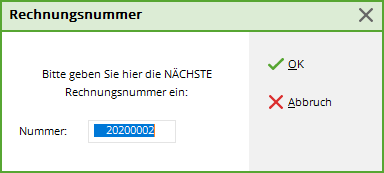
Invoice number

TIP So that you can start each year with the invoice number „1“, the PC CADDIE team recommends the following invoice number: YEAR00001. So if you had the year 2020, you would start with the invoice number 202000001.

PC CADDIE then numbers through automatically.
Person group
Here you can select the group of people here. You can find out how to create a filter here: Person group. If you simply want to invoice everything that is prepared in the accounts, select the „All persons“ filter.

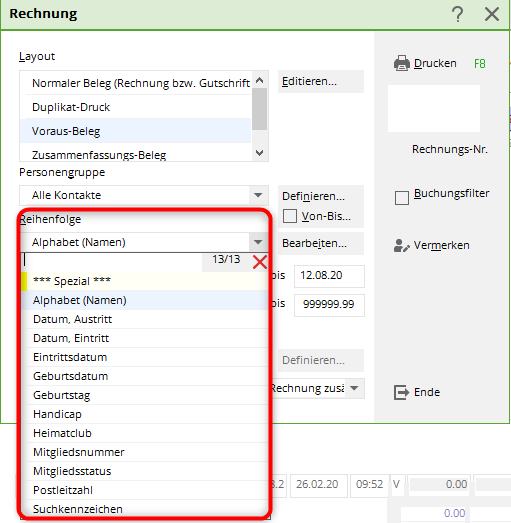
Order of printing
The order of printing is usually „alphabetical“, but it could also be sorted by „postcode“ or similar.

Due date range

Basic settings
TIP The basic settings are usually stored appropriately.
Balance only
„Balance only“ from 5,- to 999999,- means that only amounts from 5 Euro upwards will be charged.
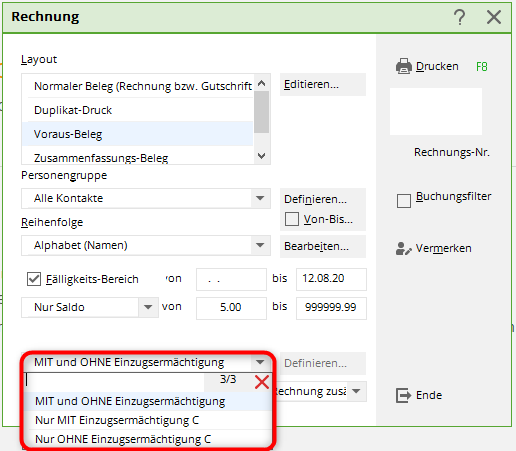
Direct debit authorisation
Some people want to differentiate between people with direct debit authorisation and people without direct debit authorisation when printing invoices, e.g. if only invoices without direct debit authorisation are sent by post.
Summarise families
Here is still the tick for Combine families is important. PC CADDIE suggests this by default. However, if you want invoices to be printed per person in your club, please contact us and we can set up a different default setting.
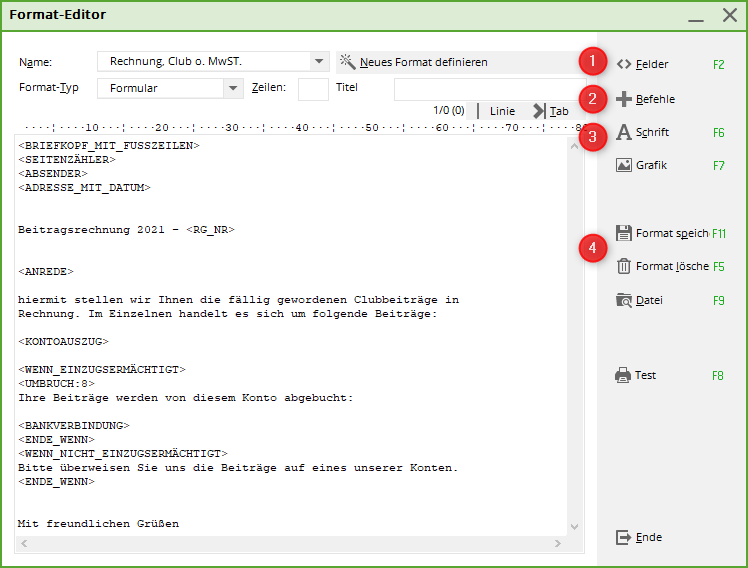
Edit layout
A suitable layout is usually already stored here.
If you would like to change the layout, you can use the following tools:
- Add the desired fields (date, bank, sort code…).
- The commands commands are very important for invoices (address with date, bank statement…).
- Also the font can also be changed (bold, italic…).
- Saving is very important here, but please remember this if you have changed something in the actual format and are not sure whether it is correct, save it save it under a new name.

TIP We will be happy to create your customised stationery for you (for a fee), which you can print out directly with the invoice. Simply send us an e-mail to support@pccaddie.com .
Commands
Commands are defined words that trigger an action when the letter is printed. For example, the programme prints a letterhead above the letter and its subsequent pages as soon as the command <BRIEFKOPFMITFUSSZEILEN> appears in the letter. A command must always stand alone in a line. All letters must be capitalised. The command is then executed during printing, the remaining line is ignored (there is also no blank line).
| COMMAND | EXPLANATION |
|---|---|
| <BRIEFKOPFMITFUSSZEILEN> | This command ensures that a letterhead with club name and club address is printed above the letter. This letterhead is automatically compiled by PC CADDIE from the club data entered in Settings/Programme settings/Club address, bank details are entered. In addition, a footer with the bank details is printed under each page. |
| <BRIEFKOPFOHNEFUSSZEILEN> | Works like the command above, except that no footers are printed. |
| <FUSSZEILEN> | This command ensures that only footers and no letterhead are printed (this is useful if, for example, you are using stationery with letterhead but without printed bank details). |
| <SEITENZÄHLER:3,6,T> | If this command appears in the letter, the page count function is activated. The number of the following page is then printed above the footer and the page number is printed at the top of the following page. The parameters mean the following: 3=margin in print lines from the bottom, at the position of which the page counter is printed 6=Margin at the top of the following page, where the following page numbering takes place T=Activated subsequent page numbering at the top, alternatively F=No subsequent page numbering at the top |
| <ABSENDER> | This command prints a sender line above the address (for window envelopes). Normally, the sender text is automatically compiled from the club data. However, it can also be entered individually by selecting the next command from the list: |
| <ABSENDER:> | Please complete the command with your details. For example: <ABSENDER: Golfclub Schwarze Heide e.V. - Bottrop> |
| <ADRESSE> | This command inserts the address. It automatically ensures that the address is printed on the correct line for window envelopes. Of course, this only works if the printer parameters are set correctly. |
| <ADRESSE_MIT_DATUM> | In addition to the address, the print date is also printed flush right. |
| <TYP> | The type is entered here by PC CADDIE, for example „Invoice“. If you use this command, PC CADDIE automatically recognises whether you are printing an invoice, a duplicate or a summary. PC CADDIE then automatically writes the correct command in the layout. |
| <ANREDE> | Instead of the line containing <ANREDE> the correct salutation is automatically inserted for the persons addressed. For example, „Dear club members“; „Dear Mr So-and-so…“. |
| <ANREDE_HERR_FRAU> | Works in the same way, except that members are also addressed as „Dear Sir“ and not as „Dear Club Member“. |
| <KONTOAUSZUG> | This command inserts an account statement for the person addressed and, if applicable, their family in the letter. This account statement should be an indispensable part of an invoice. It explicitly lists the contributions to be paid for each family member individually. |
| <KONTO TEXT DATUM ZEIT MWST NETTO BRUTTO> | You can use this command to specify exactly what should appear in the account. All input options are listed above. If you only want individual components, simply delete them. |
| „TEXT“ | Ensures the output of the extended posting text. The normal text is always output, even if „TEXT“ was not specified. Therefore „TEXT“ cannot be meaningfully combined with „DATE“ and „TIME“ can be combined. If here „SECOND“ is entered here, the entries that are already marked with „R“ or another processing indicator (for second invoices or account statements in reminders) are also included in the account statement. This entry has no effect on the appearance of the account statement. |
| <RECHNUNGEINZELN> | This command provides you with an itemised list of all purchased items. |
| <RECHNUNG> | Only the invoice numbers with date and total amount are listed in the mail merge. The two commands <RECHNUNGEINZELN> and <RECHNUNG> offer additional options. These two options are particularly important for printing statements in Proshop or catering accounts for invoices that have been posted to the account (i.e. not paid immediately). |
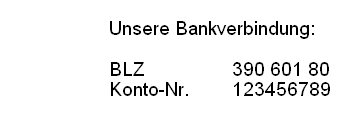
| <BANKVERBINDUNG> | This command inserts the complete bank details of the member to whom the invoice is addressed for checking purposes (indented in the centre). |
| <BANKVERBINDUNG_LEFT> | This command is used to write the complete bank details flush left |
| <BANK_XXX> | This command makes the IBAN number unrecognisable |
| <BANK_HIDDEN_LEFT> | Left-aligned:This command makes the IBAN unrecognisable. Only the first and last 4 characters are recognisable |
| <WENN>, <WENN_EINZUGSERMÄCHTIGT>, <WENN_NICHT_EINZUGSERMÄCHTIGT>, <ENDE_WENN> | These commands can be used to customise the letter for different types of person. The area between the <WENN> and the <ENDE_WENN> is only ever printed if the if-clause is fulfilled for the person being written to. |
| <UMBRUCH:> | This command forces a page break if the printer has already reached the X-last line of the sheet, otherwise the command is ignored. |
| <UMBRUCH:6> | This means, for example, that a page break is made if the line containing the command is the 6th print line from the bottom. This command can therefore be used to ensure that a page break is made before an area that should always be unseparated on a page. |
| <RECHNUNGEN> | Listing of outstanding invoices with invoice date, amount and dunning level. |
| <FIBU> | Fibu account number is also printed on the invoice. Command in <KONTO TEXT DATUM BRUTTO> integrate. E.G. <KONTO TEXT FIBU DATUM BRUTTO> |
| <NOPOS> | Prevents the numbering of posts if you remove the tick next to „Combine families“. |
Fields

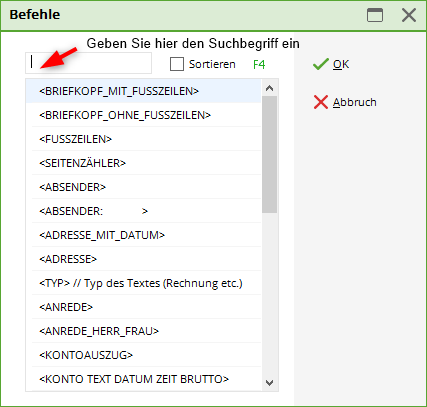
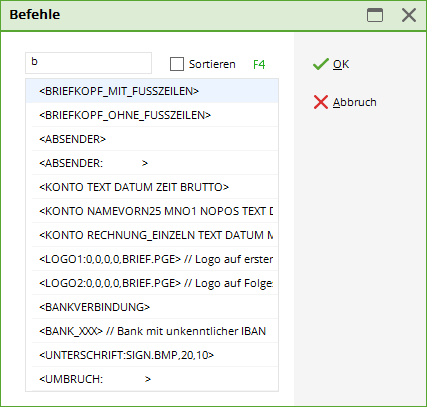
Press the button Fields button. You can now easily select a command or field from the list that opens:
PC CADDIE inserts the selected field at the cursor position.
Tabs

However, if you print this text in proportional font (where, for example, an i is narrower than a W), it will look like this:
Tabs must therefore be placed in the positions that should also appear below each other in the printout. To do this, use the button  button above the input window. You can also use the key combination Alt + T key combination. The tab key on the keyboard does not work, however, as it is required to switch between the input fields. The example text should now look like this in the editor window:
Printed, it will look like this:
Tabs are particularly important for the design of tender texts.

Fonts
The variety of fonts in PC CADDIE is of course not as large and flexible as in Word, for example. Nevertheless, there are a few options: Click on font to select a font command. For example, if you enter „this is ~F~U TEXT ~f~u“, „TEXT“ will be bold and underlined. „TEXT“ is printed in bold and underlined will be printed. You can select the start of a specific formatting with ~CAPITAL LETTER (for example F = bold, U = underline, B = wide etc), the end of a certain formatting with ~lowercase (again f = bold off, u = underlined off, b = wide off etc.).
It should also be noted that you can define a specific text for duplicate printing at this point. If you want the word „Duplicate“ to appear after the invoice number in a duplicate printout, you can do this by inserting the ~D font command before the word and ending the command after the desired word with ~d.
Advance document
The „advance voucher“ is very practical if you want to check the invoice text and the persons concerned again before the actual printing.


Normal receipt
The „Normal document (invoice or credit note)“ then generates the invoices with consecutive invoice numbers. The invoice numbers are already generated when printing on screen.
Further options
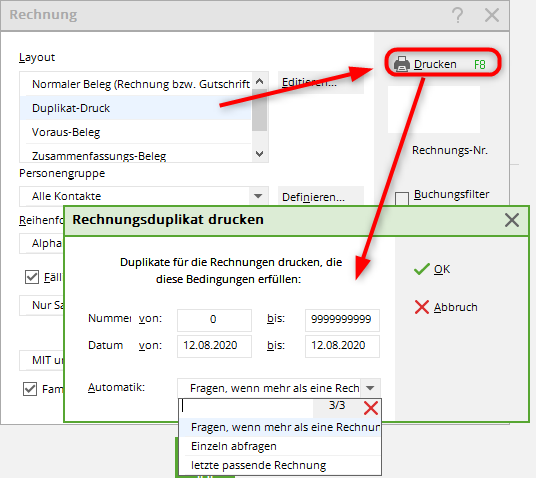
Duplicate printing
Duplicate printing„ for serial invoices prints the duplicates of invoices that have already been created. The ORIGINAL INVOICES are printed.
Select „Duplicate print“, then go to Print, so that the following window opens:
If you require a different invoice layout for the entire invoice run, it is better to reset the invoice numbers invoice numbers should be cancelled and the entire invoice printout restarted with the appropriate layout.
Only individual invoices can be changed with regard to the invoice layout. Read ⇒ here
Fill in the fields according to your requirements and confirm with OK.
Summary document
The „Summary document“ shows the summary of several invoices per person. This allows you to print everything that is in a person's account. A suitable layout is important for this, which is stored in the summary document.
Booking filter
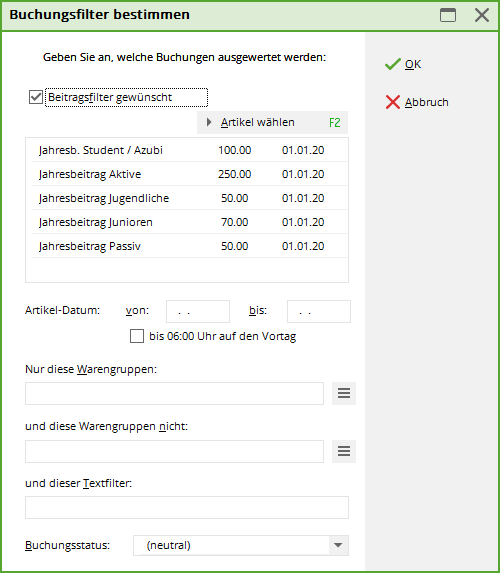
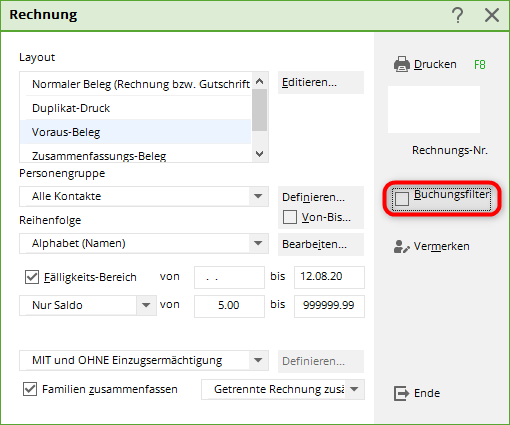
A posting filter if you only want to create an invoice for certain items. Click on the button Buchungsfilter:
The following window opens. About Select article you can directly access the item list in the current account area.
Now tick the desired items and confirm twice with OK. If the booking filter is active, you will see a tick in the button.

It would also be possible to create a separate account area for the catering flat rate for a clean separation of the postings, e.g. if the catering flat rate can be collected with a SEPA mandate and is to be credited directly to the catering account.
Note in CRM\DMS
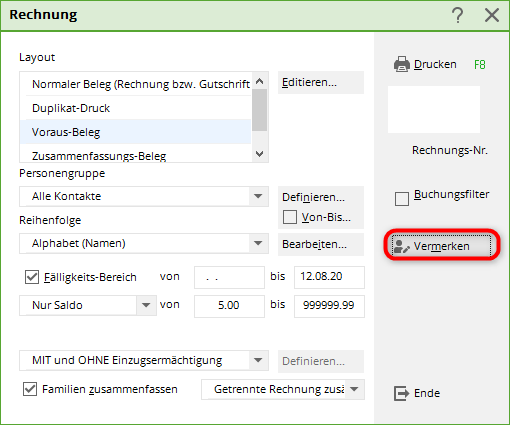
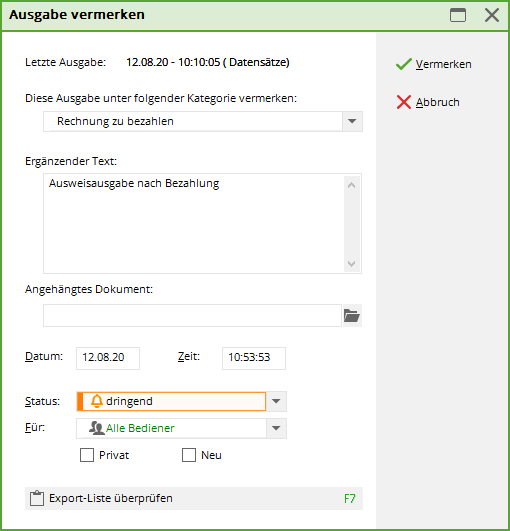
You can make a note of the invoicing by entering the following before printing the Normal receipt clicking on the button Note button before printing the normal receipt.

The following window opens:

TIP If you would like the invoices to be stored as a PDF in CRM\DMS, please contact PC CADDIE Support. Read more detailed information about the PC CADDIE module here CRM\DMS .
Invoice to company with extended information
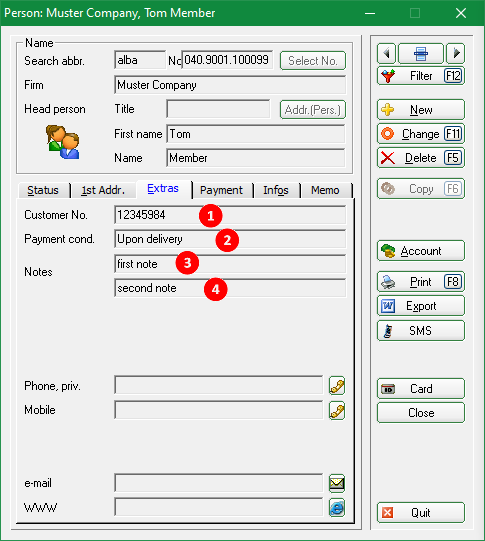
Many companies require more information on the invoice than a private individual. With the following commands in the invoice layout, additional fields from the person mask can be printed & displayed.
1. customer no.: <KUNDENNR > or <CUST_NO>
2. payment term: <ZAHLUNGSB > or <PAYCOND>
3. remark line 1: <COMPINFO1>
4. remark line 2: <COMPINFO2>
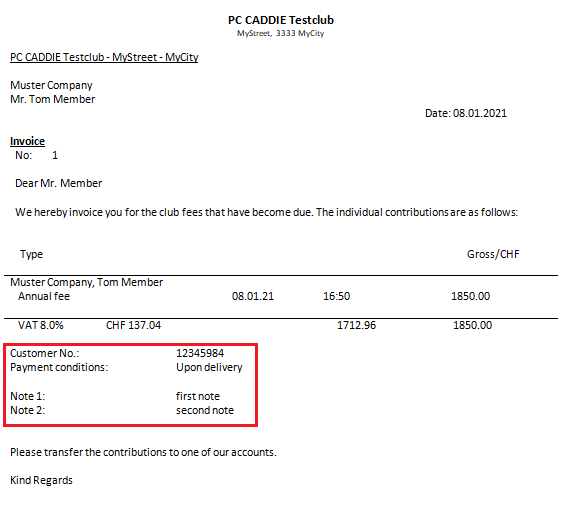
On the invoice or letter, it will look like this:
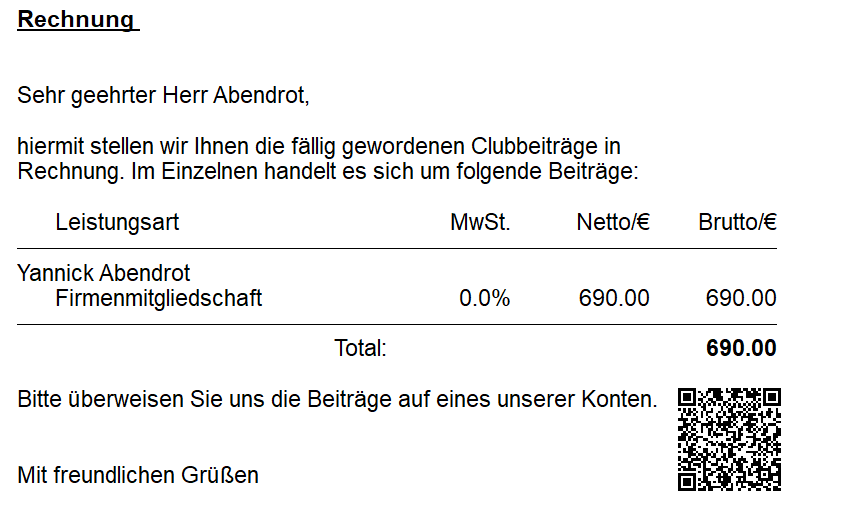
QR code on the invoice
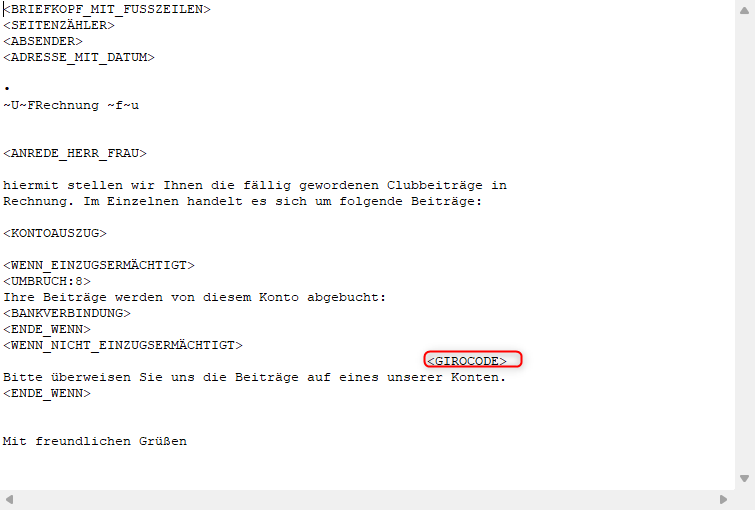
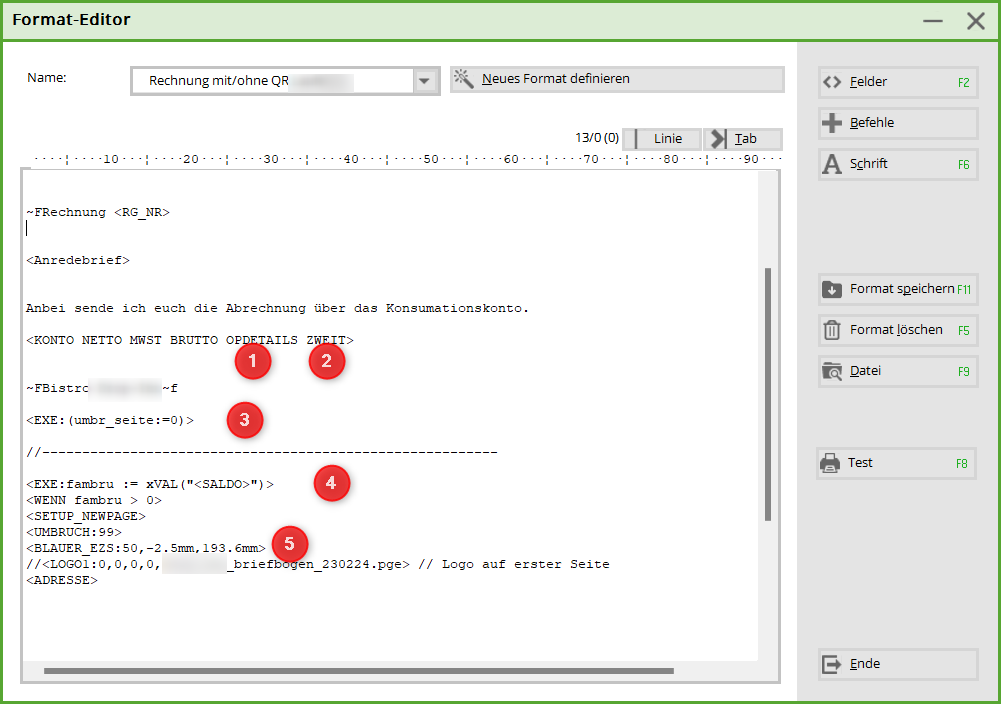
With the command <GIROCODE> command, Pc Caddie generates the QR code. The bank details stored in Pc Caddie are saved.
QR Code - Print account balance
~FRechnung <RG_NR>


<Anredebrief>


Anbei sende ich euch die Abrechnung über das Konsumationskonto.

<KONTO NETTO MWST BRUTTO OPDETAILS ZWEIT>


~FBistro~f

<EXE:(umbr_seite:=0)>

//---------------------------------------------------------

<EXE:fambru := xVAL("<SALDO>")>
<WENN fambru > 0>
<SETUP_NEWPAGE>
<UMBRUCH:99>
<BLAUER_EZS:50,-2.5mm,193.6mm>
//<LOGO1:0,0,0,0,briefbogen_230224.pge> // Logo auf erster Seite
<ADRESSE>
- Keine Schlagworte vergeben

