Inhaltsverzeichnis
Course & Event Management
The event module is identical to the course module with one small exception.
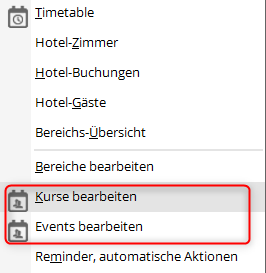
The course module can be accessed via the menu item Timetable menu item:
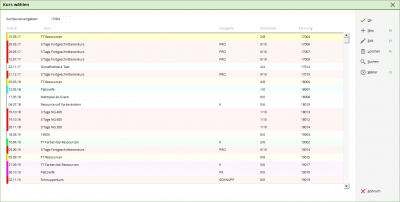
If you select the menu item Edit courses, the overview window for the courses appears, in which you can Create, edit or delete courses:
Link event with betting game
When an event is created, it can often happen that a small betting game is held. So that this event does not have to be created twice, this can be linked.
1.create event
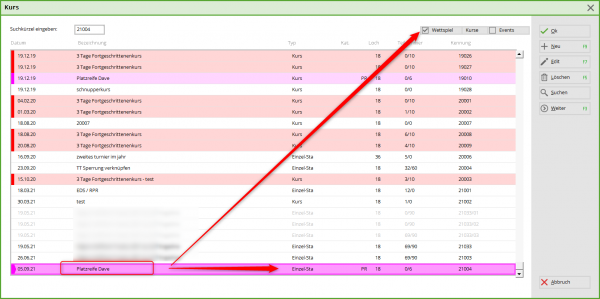
Open the trophy and tick the Events box.
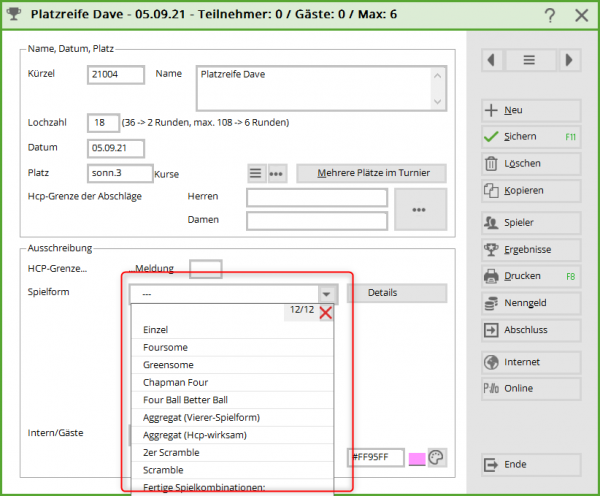
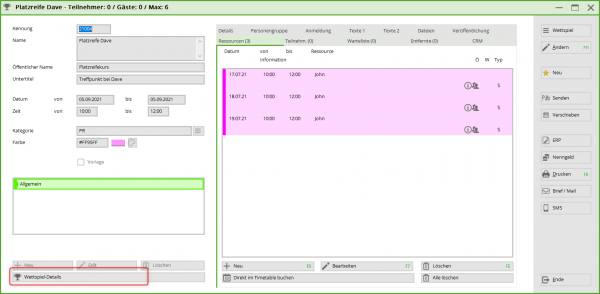
Open the desired event and change the type of game from Event e.g. to Single/Stableford. Save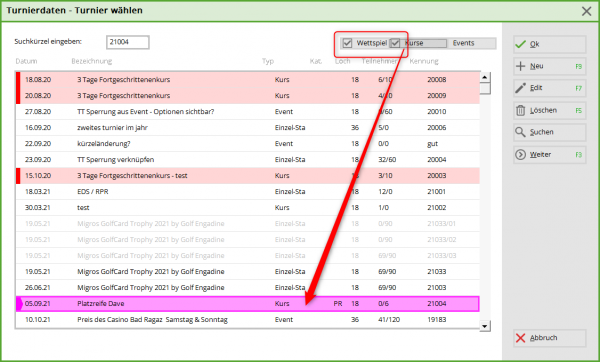
The event is now mainly to be found under the betting games, but can also be opened here with the check mark for betting game in events.
5. the menu item „Betting games“ has been integrated for easier switching.
Admission depending on event participants / timetable resource
You can find the instructions here: Event management
Create a new course or event
Basic settings
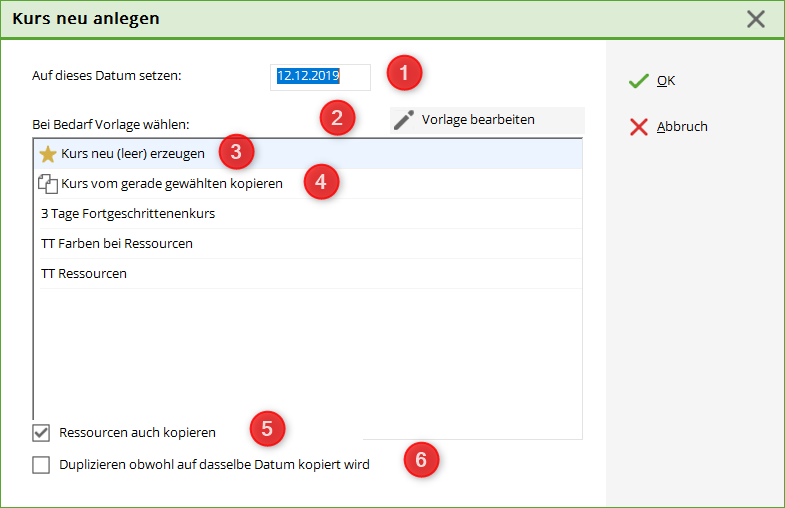
Via the button NEW button opens the following window. Many entries are analogous to the tournament administration and will certainly be familiar to you. However, a short description of the fields follows:
1. set to this date: Important Enter the date of the new event here. PcCaddie will then use this to check the resources.
2. edit template: The template can be edited or deleted.
3. create (new) course: A completely empty course/event is opened.
4. from currently selected: The settings of the selected course/event are taken over. Below this, all templates are listed.
5. also copy resources: Checked - resources will be copied. Uncheck - resources will not be copied
Course mask
Identifier:
The identifier is automatically assigned consecutively by PC CADDIE.
Name:
Enter the name of the new course here. Z. E.g. Pro Tim taster course - or place release course
Public name:
Here you have the option of entering a different course name for the online presentation. If, for example, you have entered „Taster course from Pro Tim“ for the name, you can now specify here that this course is only displayed as „Taster course“ on the homepage.
Subtitle:
In addition to the name, further information can be entered here. If it is an exercise course, the type of course can be entered here. - short game - long game - special
You will then also find this information online.
Date:
Here you can enter the date on which the course should take place. If it is a course that only takes place once, enter the same date in both date fields. However, it can also be a course that takes place on several dates, in which case the date of the first and the date of the last date must be entered here.
Time:
Start and end of the course
Category:
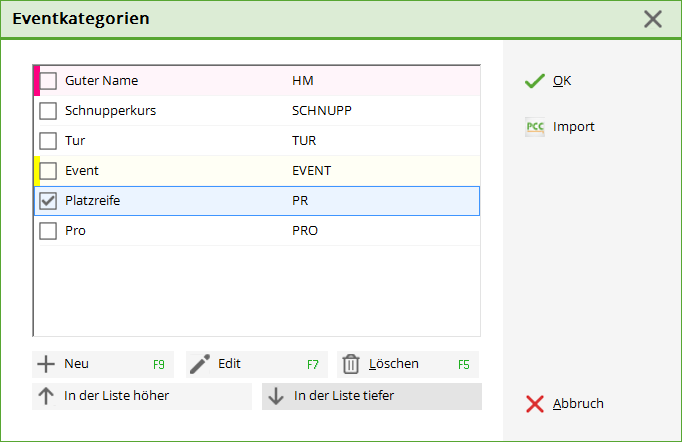
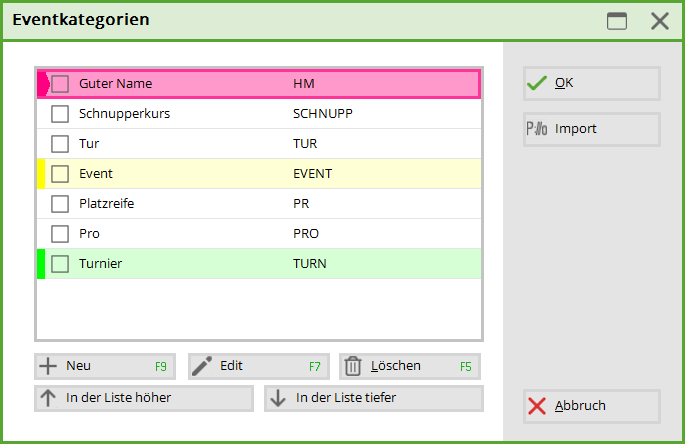
Newly, unlike in the tournament, there is now a selection window for the categories. Categories can be selected, created, edited and deleted here. If there are already categories in PC CADDIE://online that are not visible here, they can be deleted with the button From Online button to retrieve and import them.
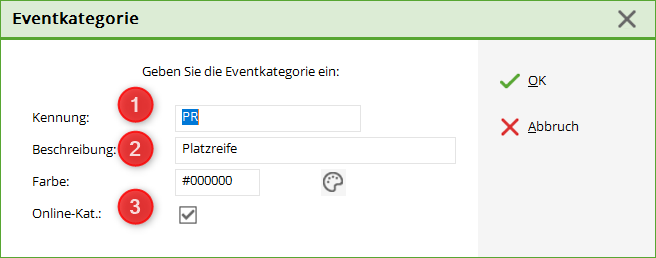
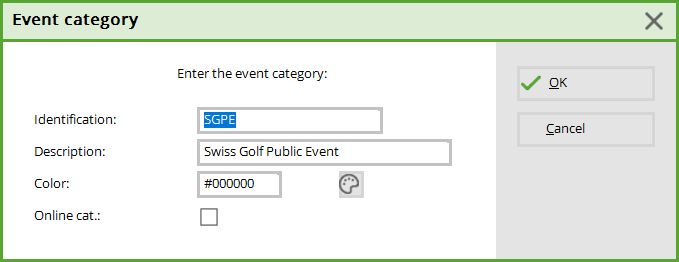
Via the button NEW button, the following window appears in which you can enter a new category:
(1) Category identifier: Enter an identifier for the category here.

(2) Description: Please enter the name of the category here.
(3) Please select here whether this category can also be used online.
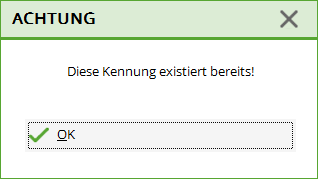
If an abbreviation is assigned again during entry, you will receive the following error message:
Colour:
Template
If checked, this course/event will serve as a template for you in the future. You can find examples here:
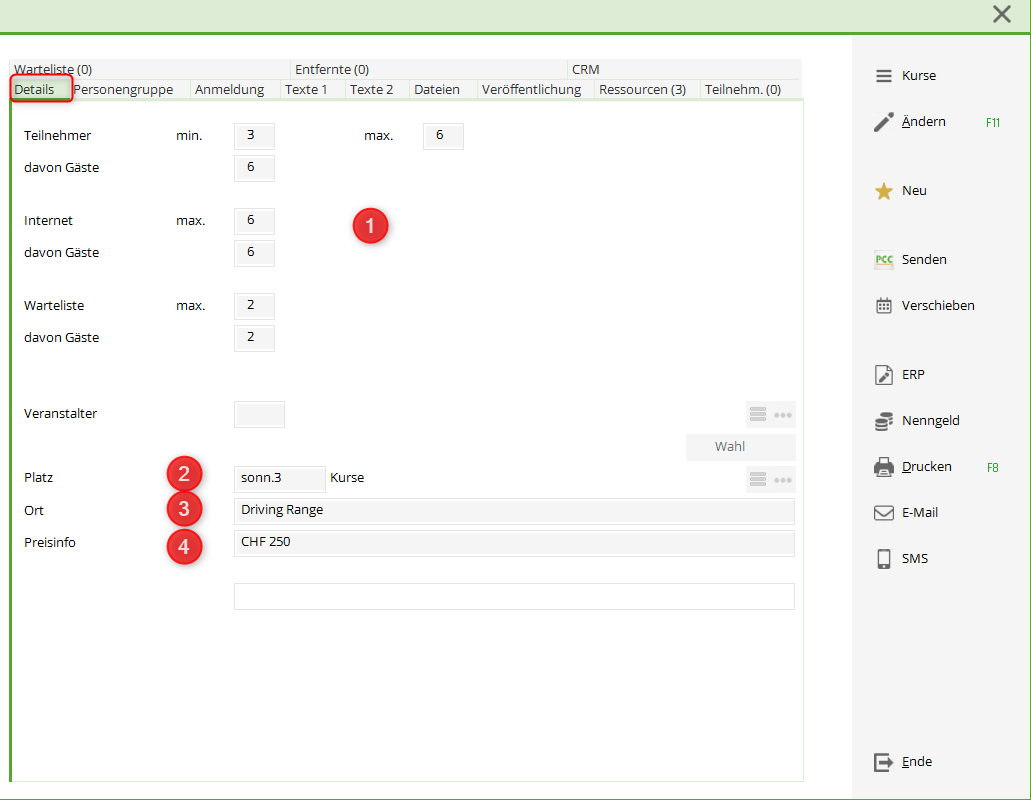
Details
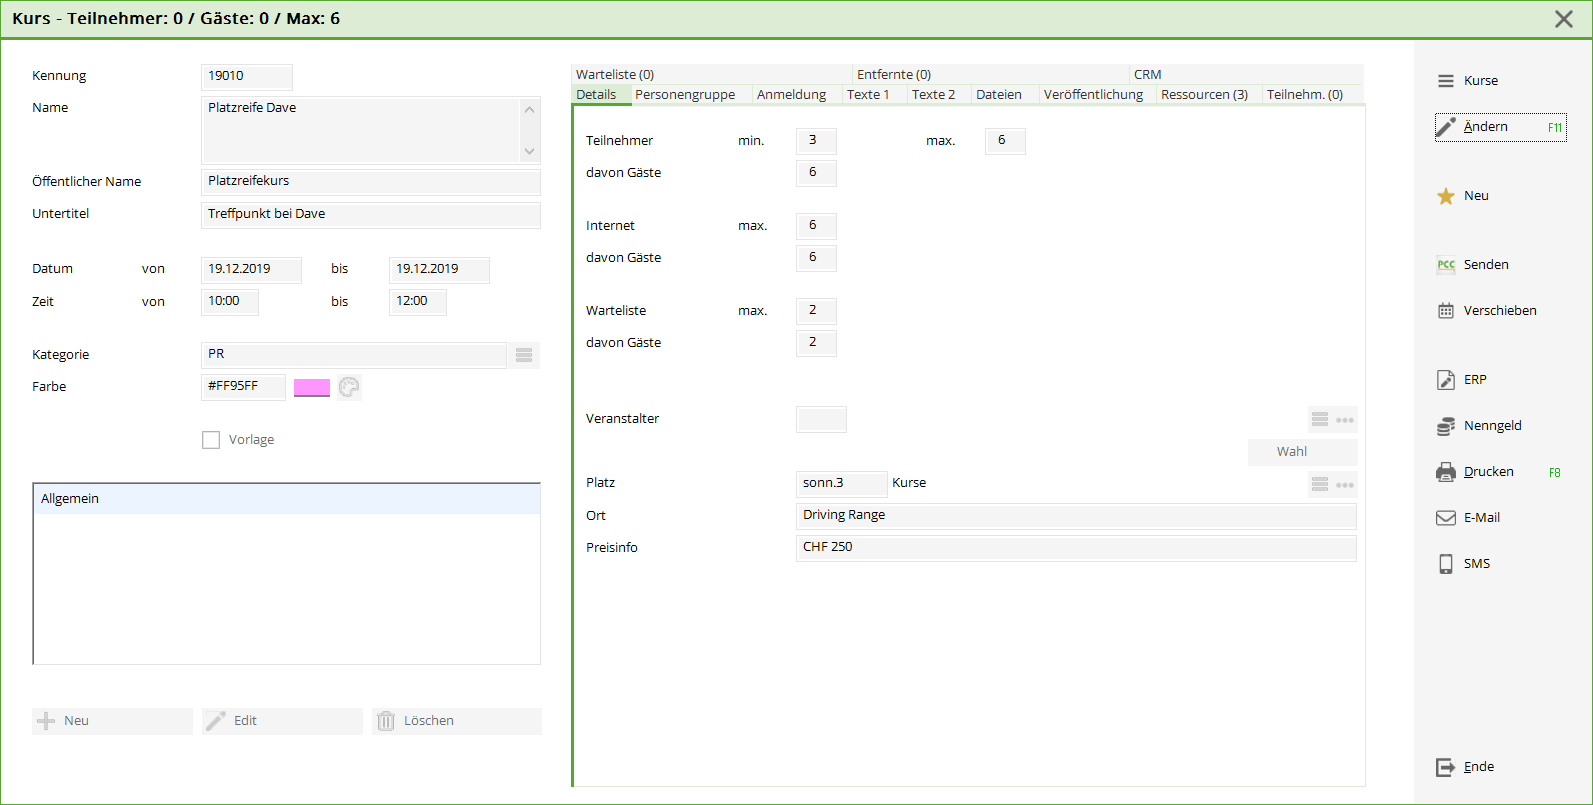
(1) In the upper part of the form you can enter the number of participants for members and guests. Also enter the permitted number of internet registrations and, if desired, the number on the waiting list. This information is identical to the tournament settings.
(2) Organiser:
Enter a corresponding search abbreviation here (if required) or select a person via the list selection button. 
(3) Place: Enter the location of the course here, e.g. driving range or putting green, etc.
(4) Price info: Here you can enter price information for members and guests.
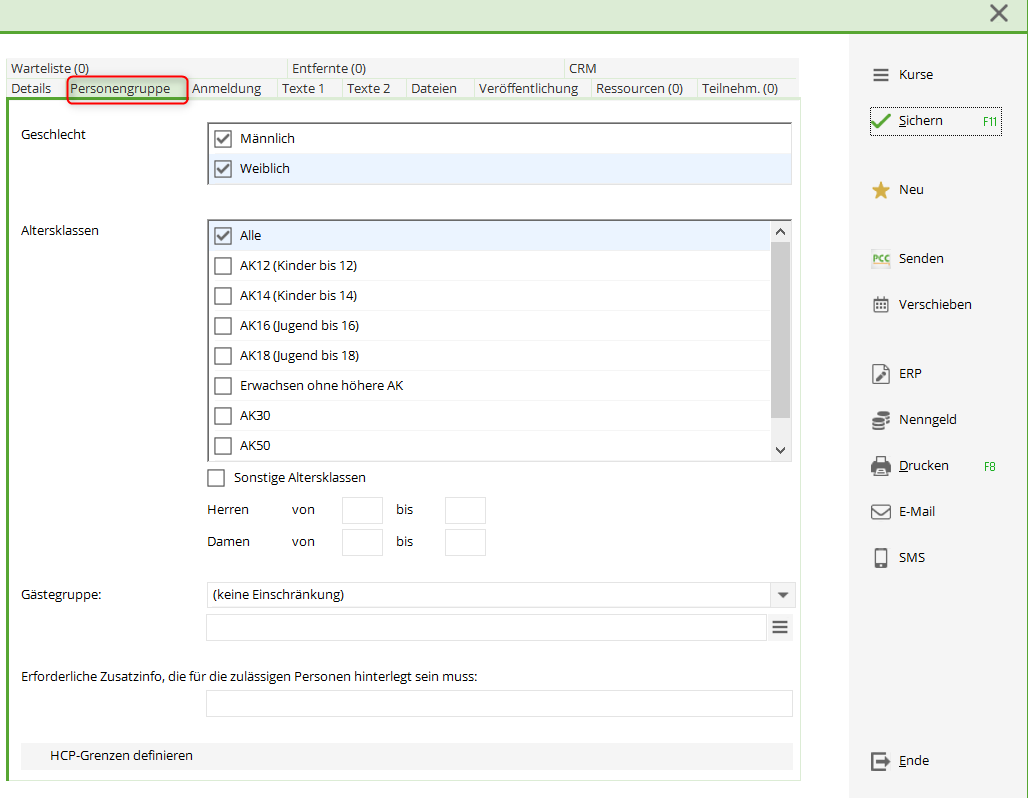
Group of people
Gender
Select the gender of the admitted group of persons here.
Age classes
Select the appropriate age category here, if required.
or
enter the age class via Other age groups to enter the relevant information.
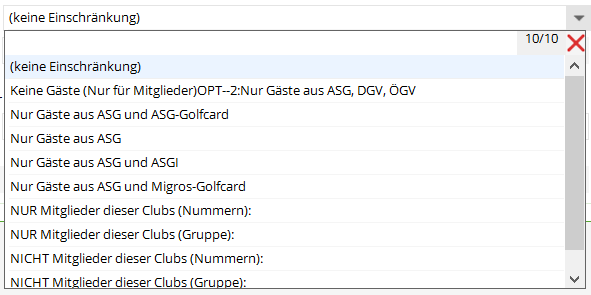
Guest group
Here you have the possibility to set various restrictions for guests in order to select for an online registration:
If you select an option here that requires a number, then the corresponding club number must also be entered in the adjacent field. However, you can also select this club via the list selection button:
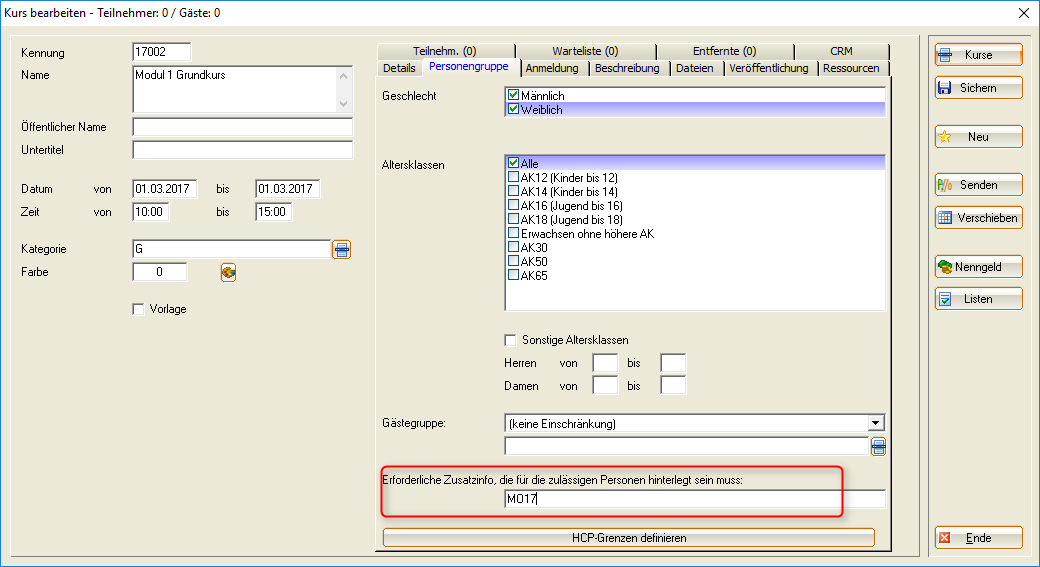
Required additional info
Here you can specifically define the registration for a group of people.
Via the additional info in the person mask, you can assign an identifier to individual persons and
allow them to register here accordingly.
If several additional information items are permitted for registration, please separate them with a comma (means: either or)
If 2 additional pieces of information must apply at the same time for the registration, separate with semicolon (means that both additional information must apply to the persons).

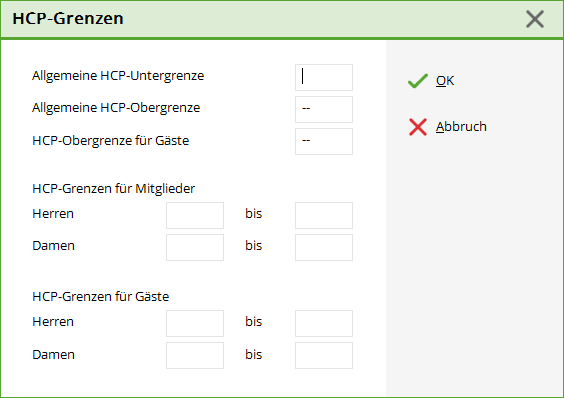
Define HCP limits
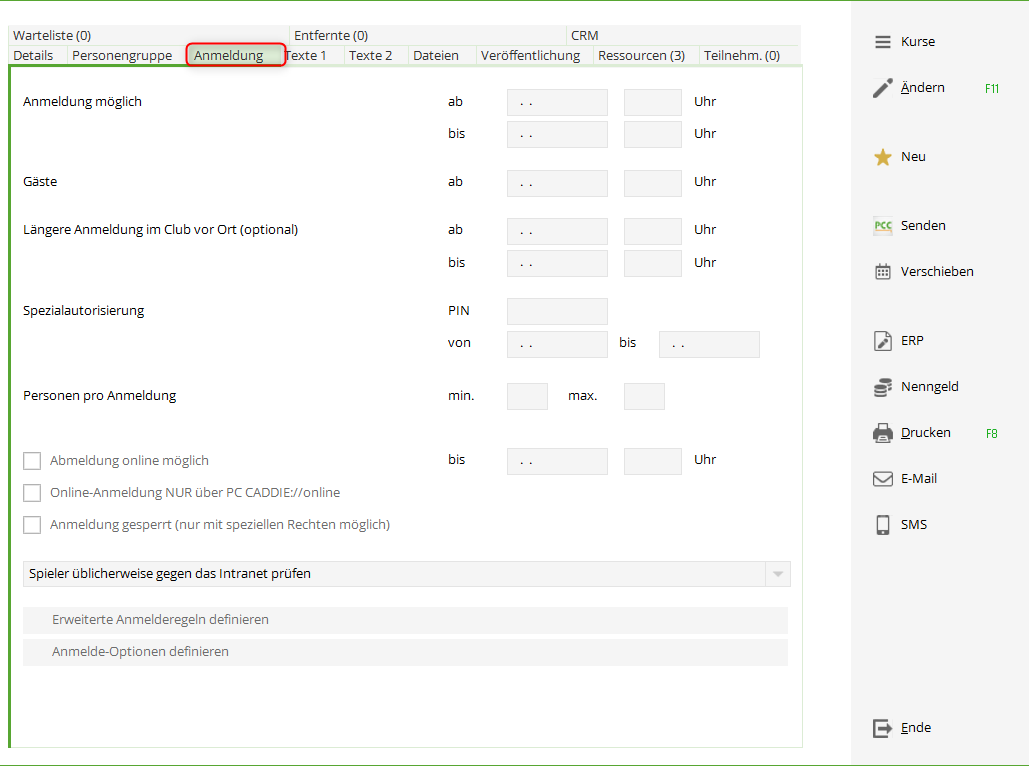
Registration
Registration possible
Enter the date from and until when registration may take place.
Guests
If there is a different registration deadline for guests, this must be noted here.
Longer registration on site (optional)
If you would like to end the online registration, but still allow on-site registration or registration by telephone, you can longer, you can enter this here accordingly. This will appear online.
Special authorisation
With a PIN assignment, you can enable a special registration for members or guests. Here you can give people a PIN and this PIN allows them to log in during the specified period. This is practical if you want to allow these persons to log in before the log-in date set in the tab above or if they are only allowed to log in to a specific group.
Persons per registration
If it is possible for a person to register other persons at the same time, you can enter the corresponding selection here. enter the corresponding selection here.
Enable deregistration online
Enable deregistration online if the basic settings in the Club Manager are set differently. Otherwise, the basic settings apply.
Online registration ONLY via PCCADDIE://online
Online registration only possible via own homepage or app
Registration blocked (only possible with special rights)
This refers to the special authorisation.
Players usually check against the intranet
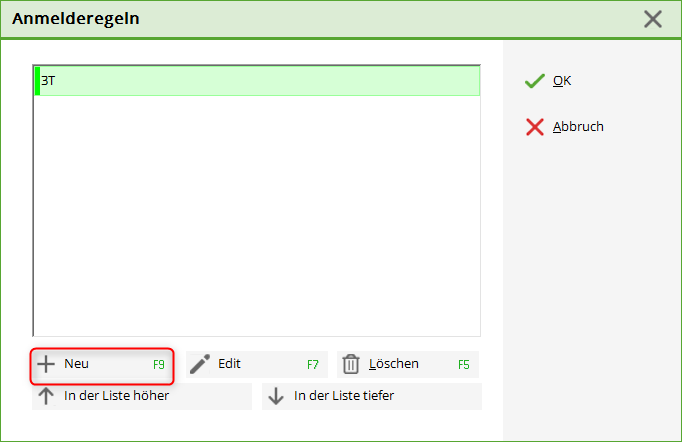
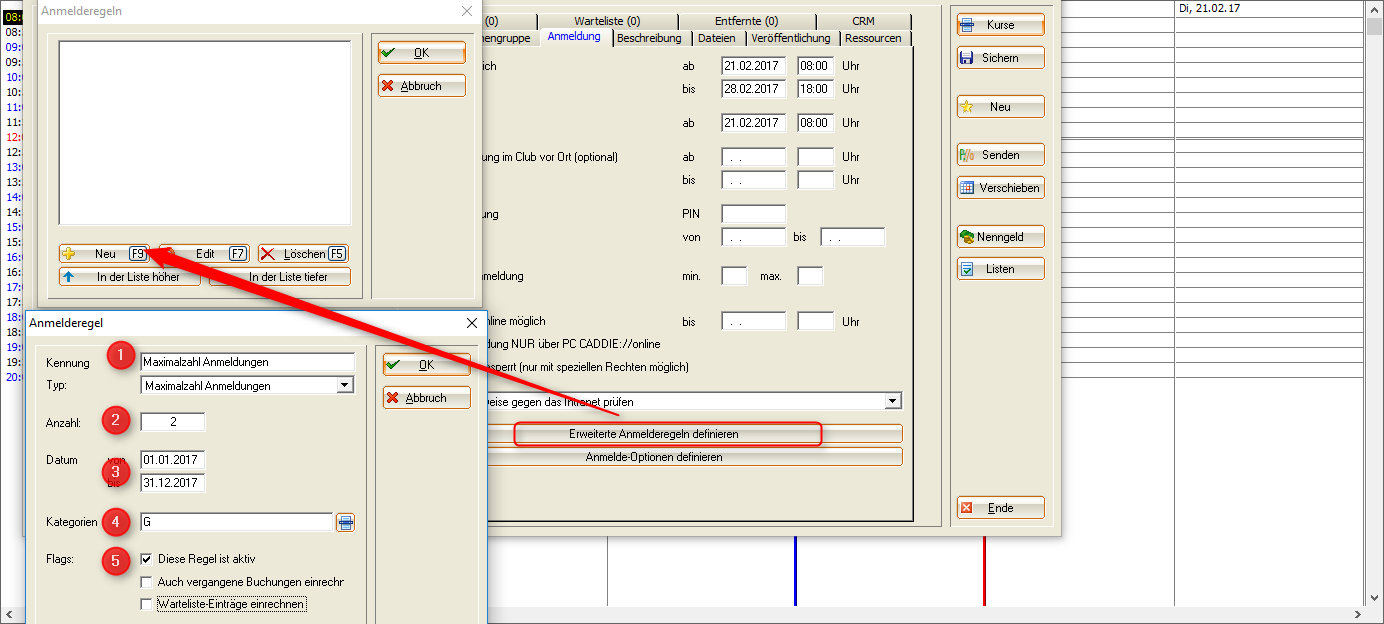
Define extended filing rules
Via the button Define extended registration rules button, the following window appears
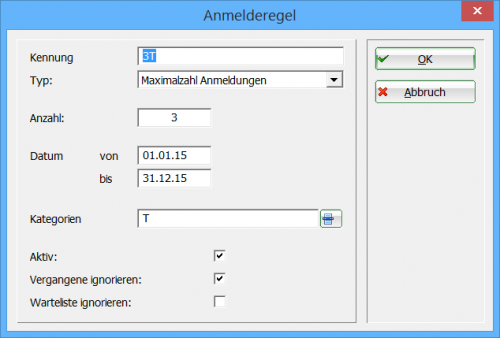
Here it is possible to set different rules for a registration. How many courses a player may take at the same time or whether a guest can book this course at most once a year.
Open via the button NEW button to open the next window and set the desired options. Here in the screenshot, a rule for the maximum registration for 3 course dates in 2015 is set as an example:
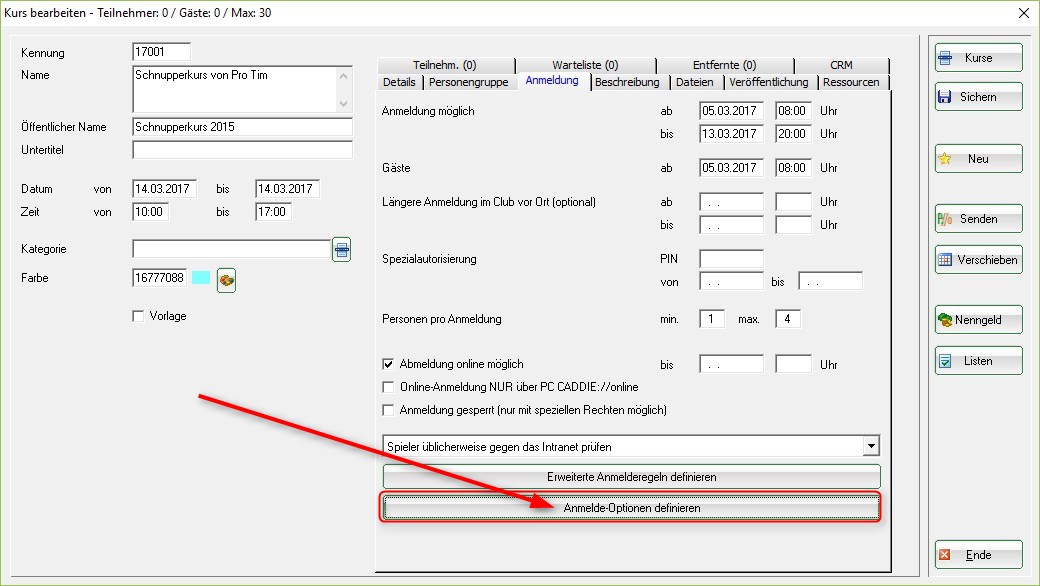
Define login options
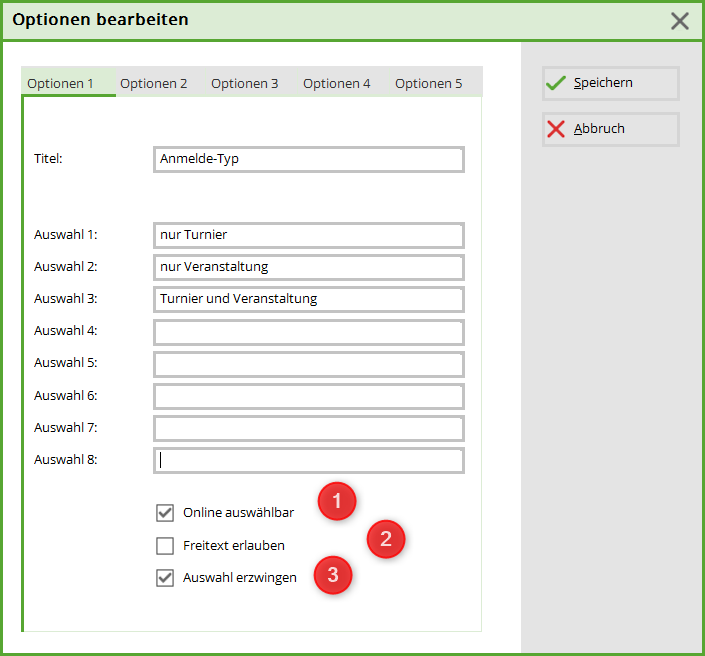
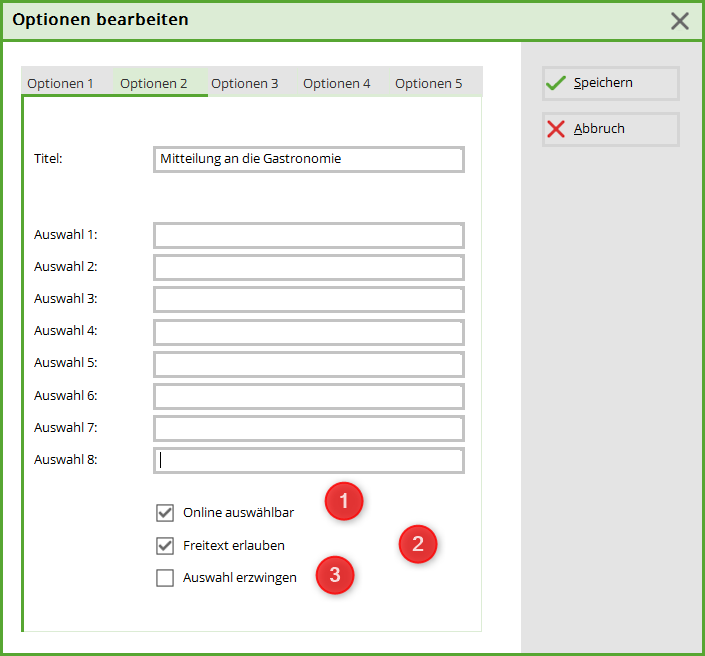
Do you still have different queries for your customers during registration? Via the button Login options you can set comprehensive query options:
1. online selectable - only with this tick the option online is displayed.
2. allow free text - if ticked, the customer could write a message here.
3. force selection - without a selection, the registration will not be completed.
That's why 2. is unchecked in this case. Because not everyone wants to communicate something.
1. selectable online - is displayed online
2. allow free text - customer can write a message
3. force selection - unchecked because not everyone wants to share.
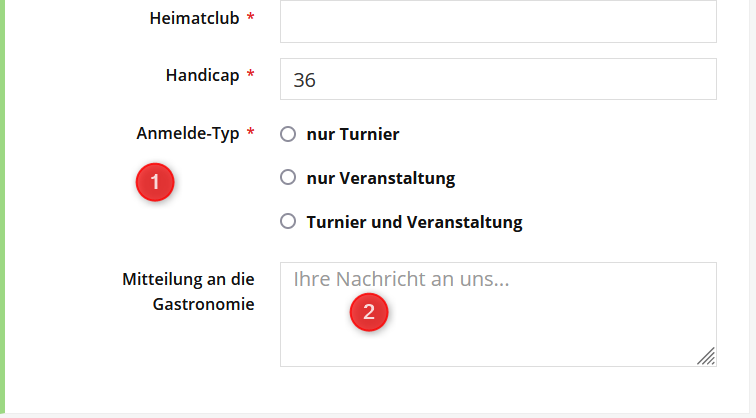
The set query then looks like this for an online registration:
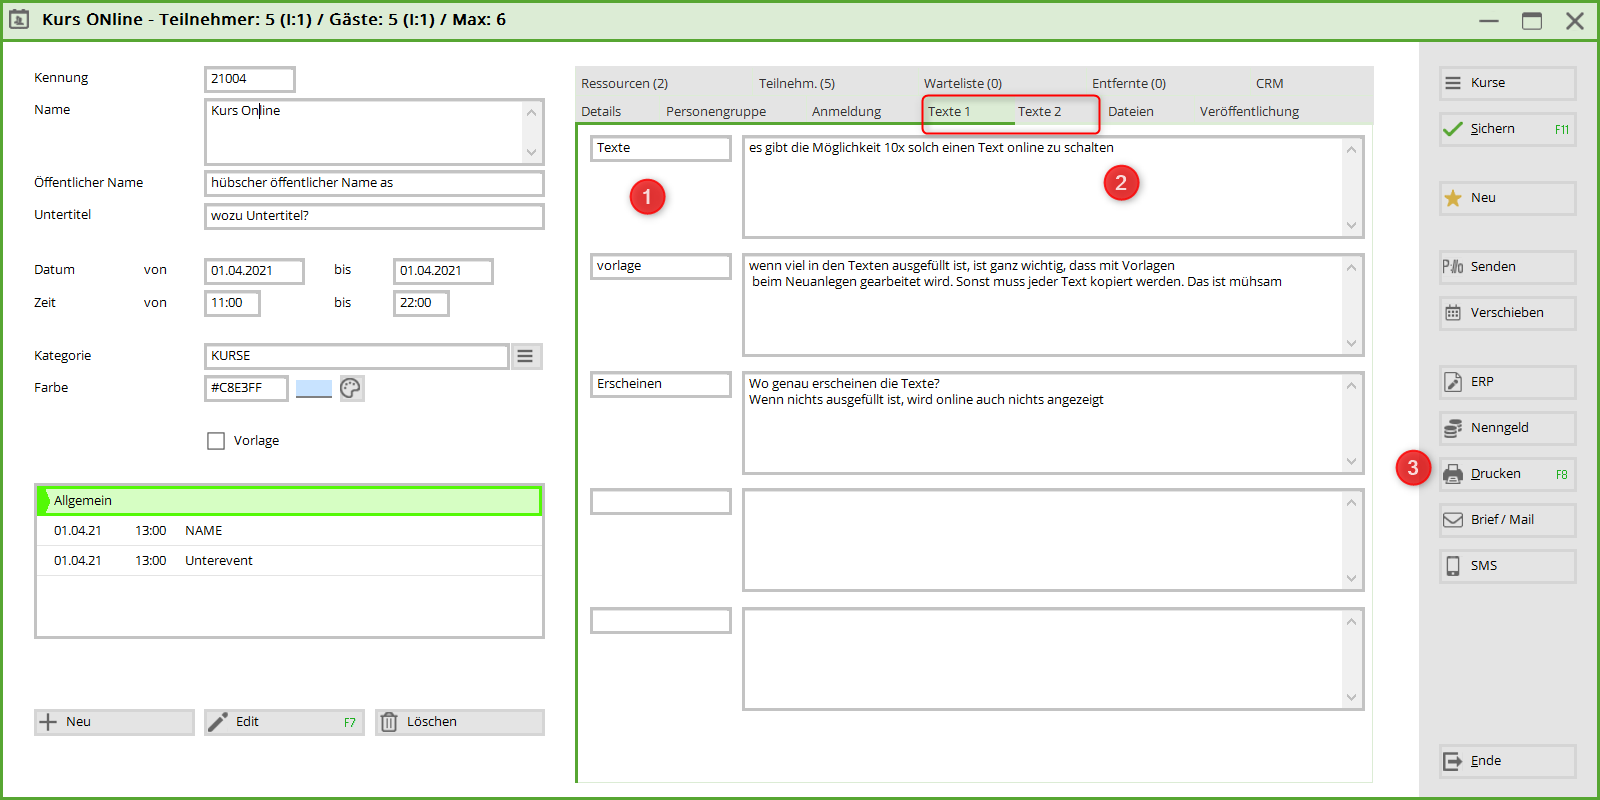
Texts 1 and 2
In this tab you can describe the event or the course. There are 10 fields available for this purpose.
- Title. Texts, Template and Appearance is preset.
- You can enter the description here. If the field remains empty, nothing appears online.
- If you would like an overview to check the texts, a special parameter must first be entered. To do this, contact Support at support@pccaddie.com.
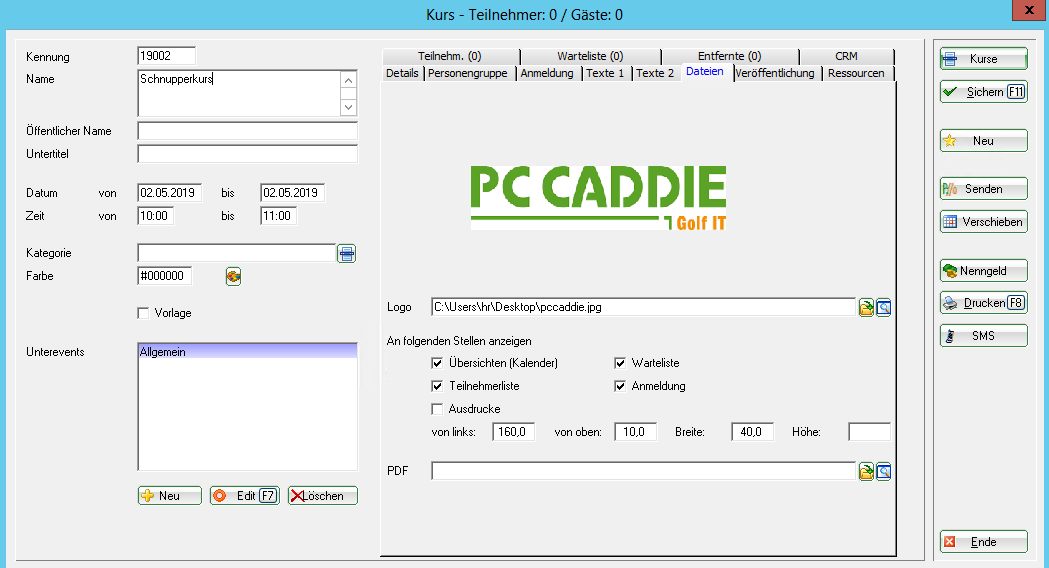
Files
Here you can store a logo for each course. This logo can then be displayed for the selected be displayed. You can change it at any time using the fields from the left …. from the top …. Width: …. height … position. At the moment, the logos are still stored separately in the online club manager. In the future you will be able to directly here and upload them to the online module.

In future, you will also be able to attach PDF files here, which can be opened online.
Publication
Publication on SwissGolf
If you wish your courses and/or events to be published on SwissGolf as well, they must belong to the category: SGPE and be transferred again.
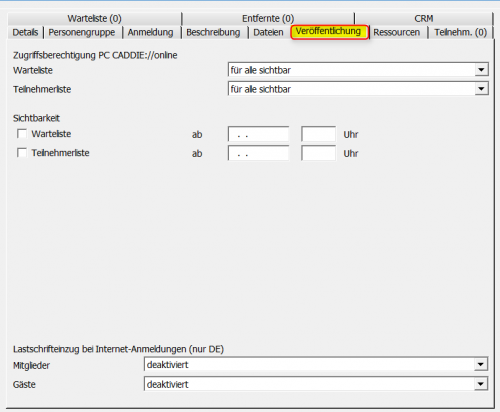
Access authorisation PC CADDIE://online
Visibility
You can also define the visibility here. Enter a date from which the waiting list or the participant list is visible online.
Direct debit
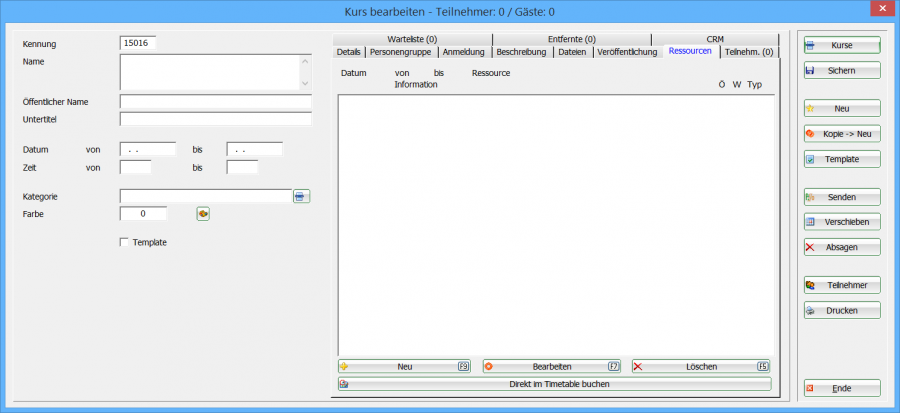
Resources
Book resources
In this tab you schedule your resources. A resource can be reserved in the timetable or just to be known and not have a timetable area. You can make a block directly for a course in the timetable or enter a filter.
Would you like to define a new timetable view? Follow this link: Define timetable views

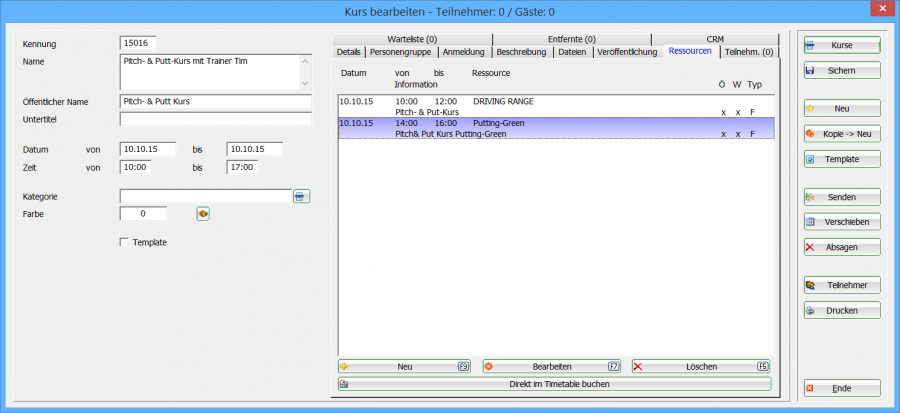
Below is an example of how you can enter and plan the necessary resources for a pitch and putt course on 10.10.2015 in the time from 10.00 - 17.00.
For this, 2 blocks or resources are required:
1. blocking Driving Range 10.00 - 12.00 hrs - 2. closure Practice area 14.00 - 16.00 h
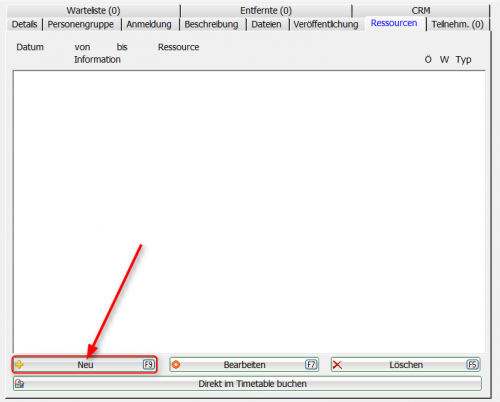
Via the button NEW you can open the window for reservations:
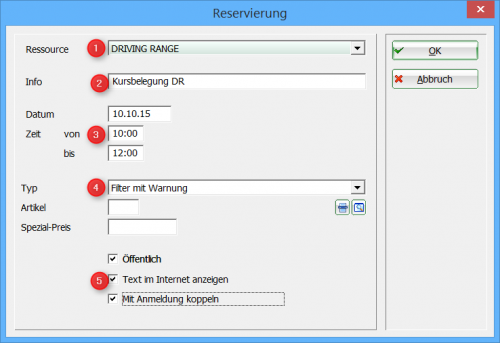
Complete the following fields here:
(1) ResourceSelect the corresponding timetable area in which you want to enter a filter for marking or blocking.
(2) InfoThis is the name of the booking in the timetable.
(3) Date and time Enter the date and time for the blocking in the timetable area here.
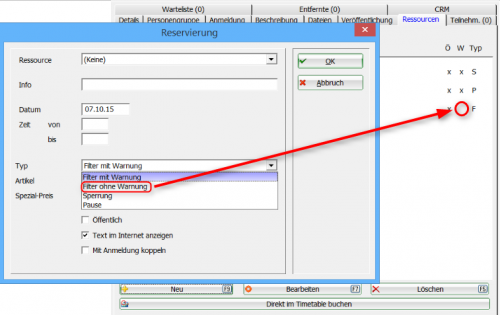
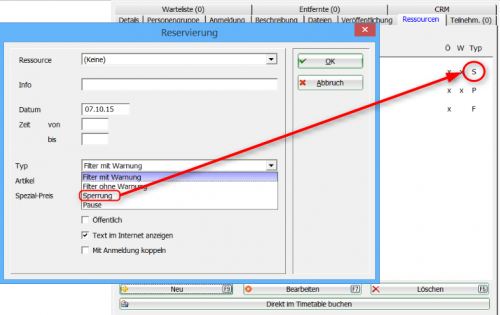
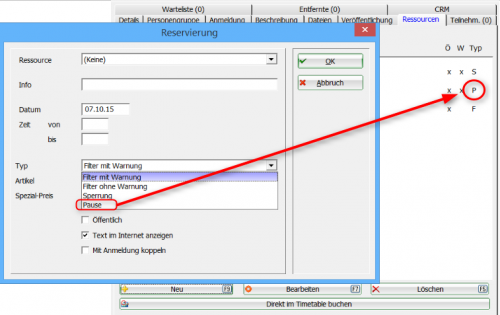
(4) Type: There are these reservation types to choose from:
| Reservation types |
|---|
| Filter with warning |
| Filter without warning |
| Block |
| Pause |
(5) Now select how this blocking should appear: Public , Display text on the Internet or should the blocking possibly be linked to the coupled with logging on to the on the Internet
Click OK to exit the input mask. Via NEW the second blocking for the training area can now be carried out.
If you have added both entries, the window now looks as follows:
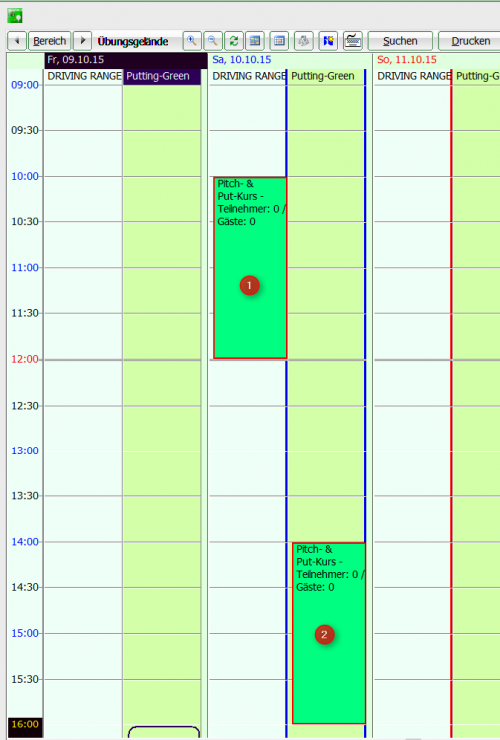
In the corresponding timetable areas, the automatically corresponding block or filter has been stored:
(1) Closure for the driving range (2) Closure for the practice area

Manually book resources into the timetable
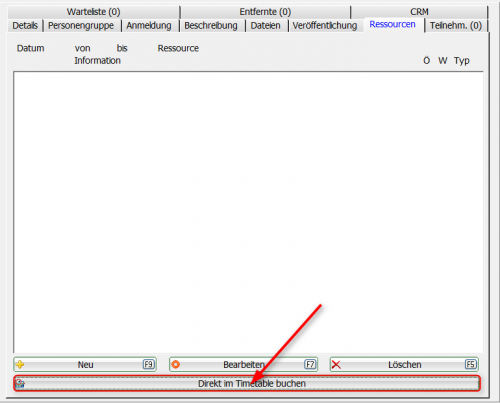
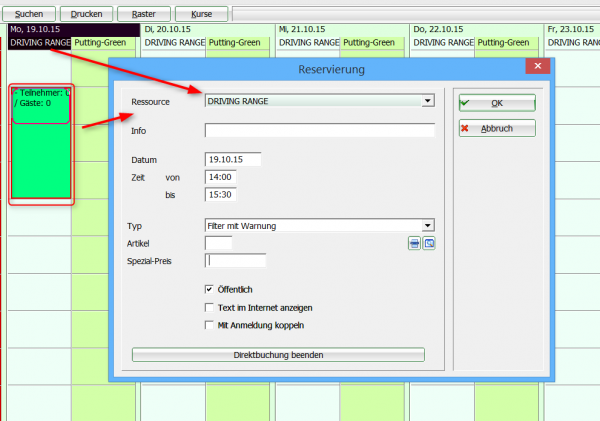
It is also possible to use the button Book directly in the timetable to note a block/filter in the timetable and thus book the resource at the same time.
Clicking on this button takes you directly to the timetable display. Double-clicking on a time automatically opens the reservation window and the desired timetable range is already set. All you have to do is add the time frame.
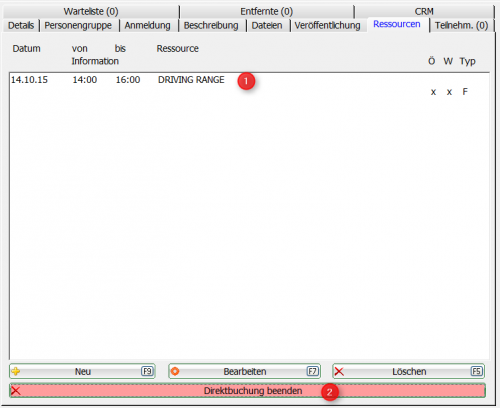
With OK you end the entry and automatically return to the course booking screen. Here you can now also see the manual booking (1). End the manual entry by clicking on the button (2). End direct booking

Marking in the resource window
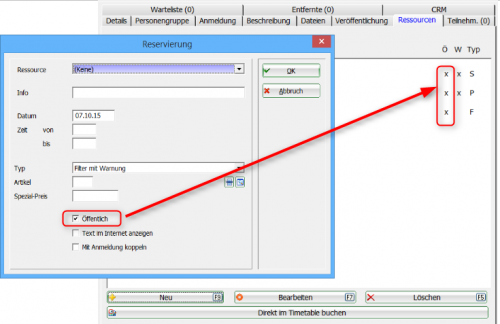
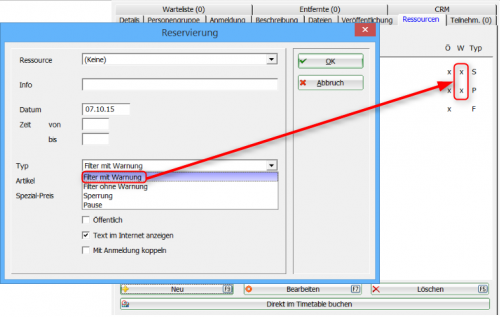
The labels in the window have the following meanings:
The labels have the following meanings:
Public
Filter setting with warning
Filter setting without warning
Blocking
Break
Participant
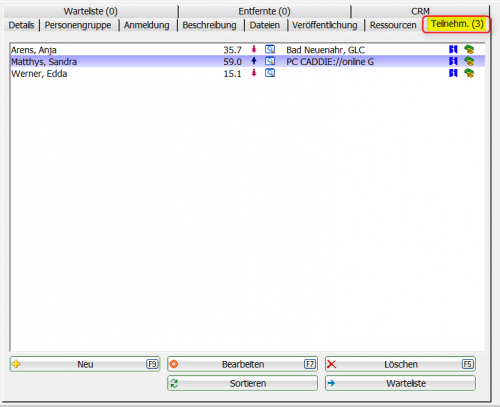
Here you can find the participants for your course. About NEW you can enter the participants manually. Online registrations are automatically entered here.

Edit
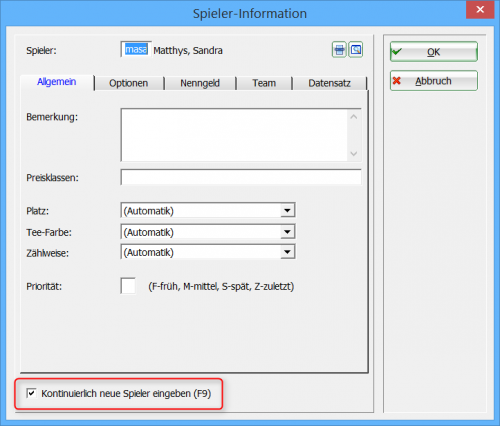
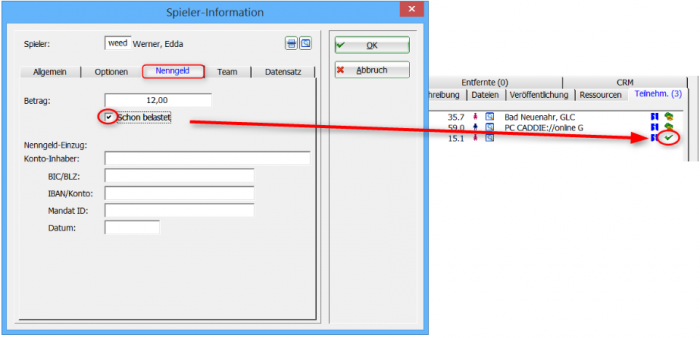
Via the button Edit button or by double-clicking on the magnifying glass ![]() opens the Player Information Window.
opens the Player Information Window.
In this window you can note whether a participant has already paid the entry fee or whether it has already been collected. As soon as the tick already debited has been selected, a green tick will also appear in the list of participants:

Delete
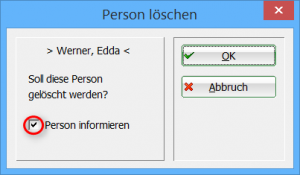
To delete a course participant, select a player and click on Delete. The following dialogue appears. Here you can also choose whether you want to inform a participant directly about the deletion:
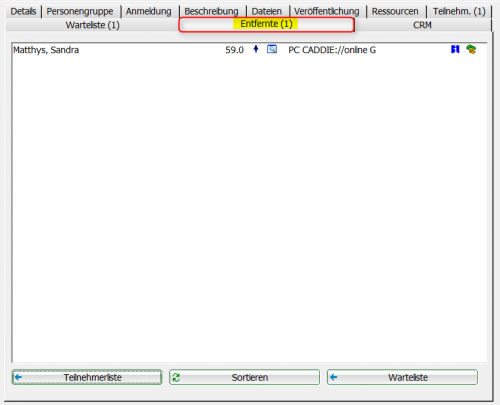
The deleted participants are then entered in the tab Removed moved.
Sort
The participants can be sorted by clicking the Sort button to restructure the participants. The functions for sorting can be found via this link: Sort
Waiting list
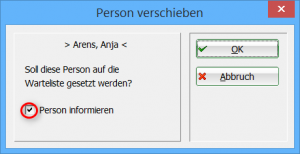
With this button you can put a participant on the waiting list. The following dialogue appears. Here you can also select whether you want to inform the player automatically about the transfer to the waiting list:
Waiting list
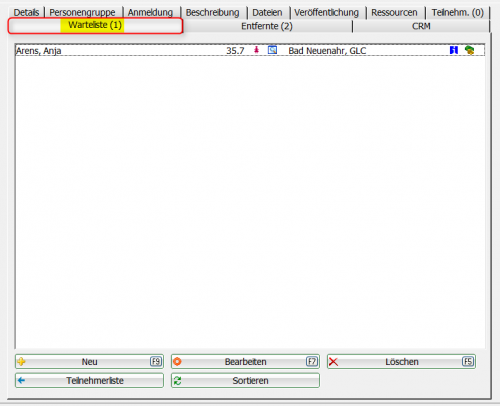
Here you can find the participants who have been put on the waiting list or who have been registered.
Remote
Participant list
Via the button Participants list you can move a deleted player back into the participants list.
Sort
Sorting the list
Waiting list
With this button you can move a participant back to the waiting list.
CRM
| CRM | Customer Relationship Management | Customer relationship management, customer care |
|---|
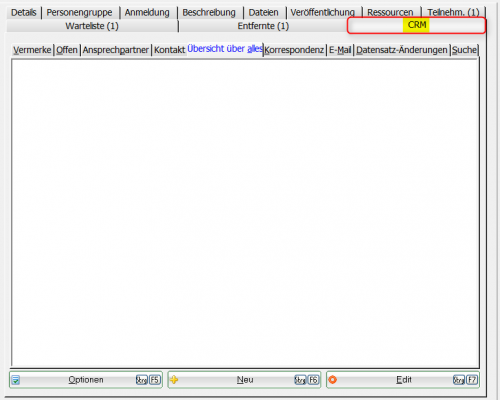
In this window, you can store all relevant information on a course, create notes, create correspondence on the course and store contact persons.
You can find out how to work with the CRM system via this link: CRM/DMS
More button
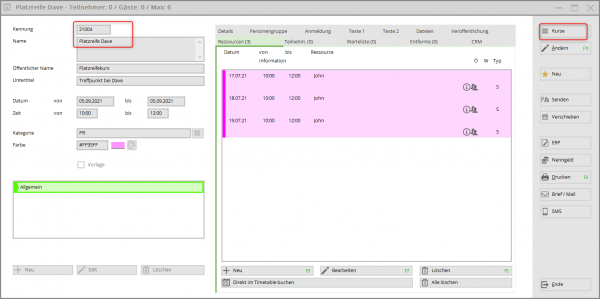
(1) Courses: List view of all courses
(2) Modify: Change the selected course
(3) New: Enter a new course
(4) Send: Starts the alignment with the online module
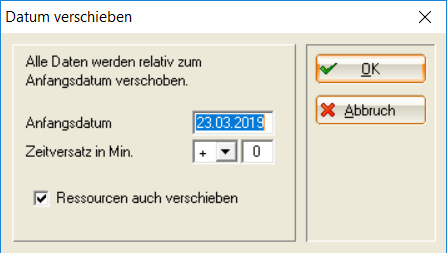
(5) Move: This allows the entire course to be moved to another date. All dates are moved relative to the start date. The entries in the timetable are also automatically moved to the new date - if desired.
(6) Entry fee: Enter/deposit course fee article
(7) PrintHere you can print lists from the course event module.
Flatrate
You have the possibility to create a course with different modules. The customer buys a flat rate for this course. this course. You determine how often and in which period of time the customer can register for the individual modules.
Example:
- A total of 80 courses take place throughout the year with different pros with different topics. - Each week, 4 modules can be booked, the client may select a maximum of 2 of them.
In PC CADDIE it is to be created as follows:
- 80 modules distributed over the weeks and pros on different topics. - Individual topics can be assigned to different categories/topics
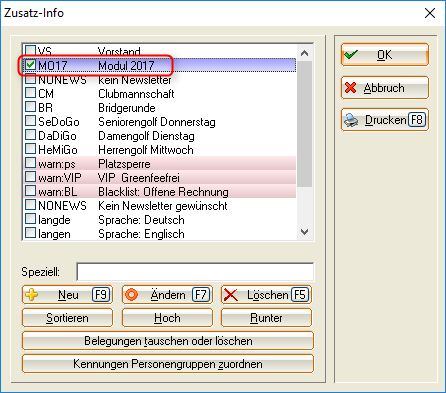
IMPORTANT: In order for the classification to work, an additional info must be stored under the person group both in the module/course and in the person mask (MO17). in the module/course and in the person mask (MO17).
This ensures that only people who have this additional information can book this course/module.
Restriction: 2 courses per week out of 4
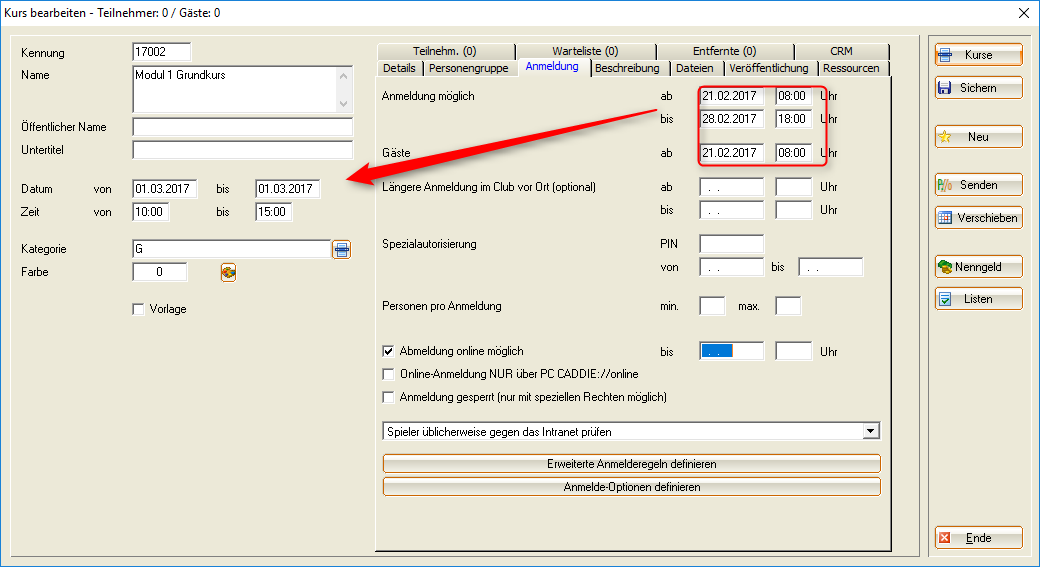
Under the Registration tab, enter the week for from - to. Course date: 01.03. Week to register 21.02 - 28.02.
In addition, a registration rule must be entered: Maximum number of enrolment. This means that only 2 courses of the selected category can be booked.
1. name of the rule
2. restriction
3. valid period
4. valid categories
5. activate rule
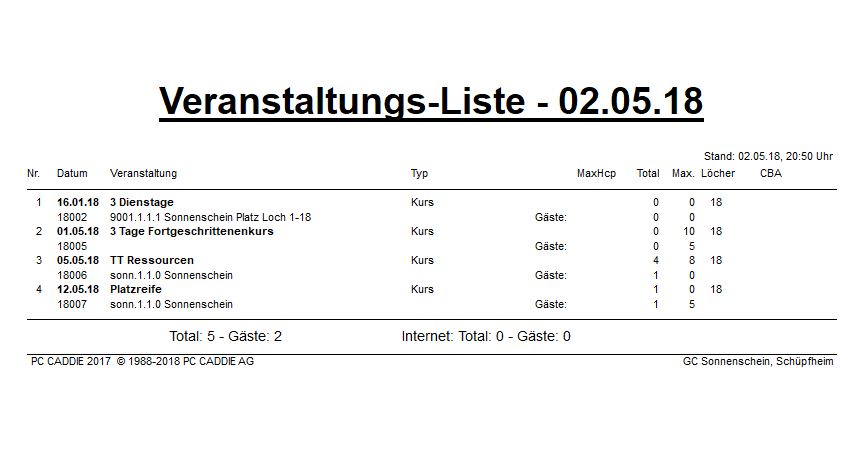
List of events
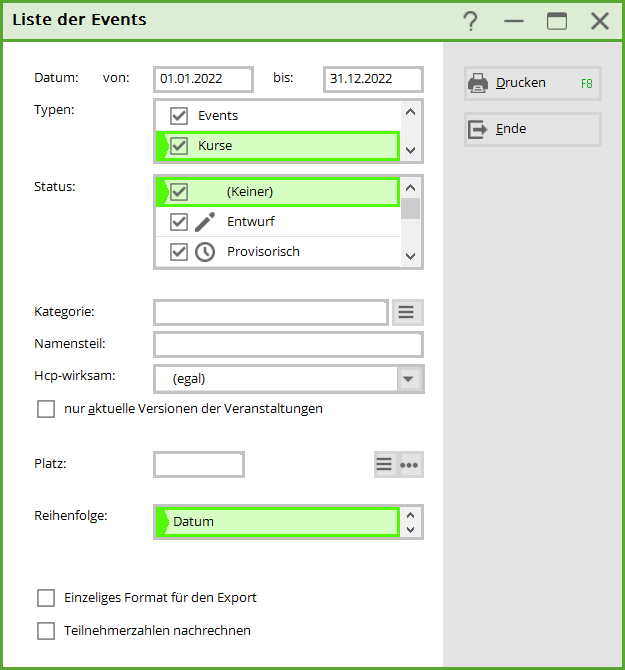
At Events and at the bottom List of EventsCourses & Events can also be printed.
This view can also be narrowed down, e.g. by category.
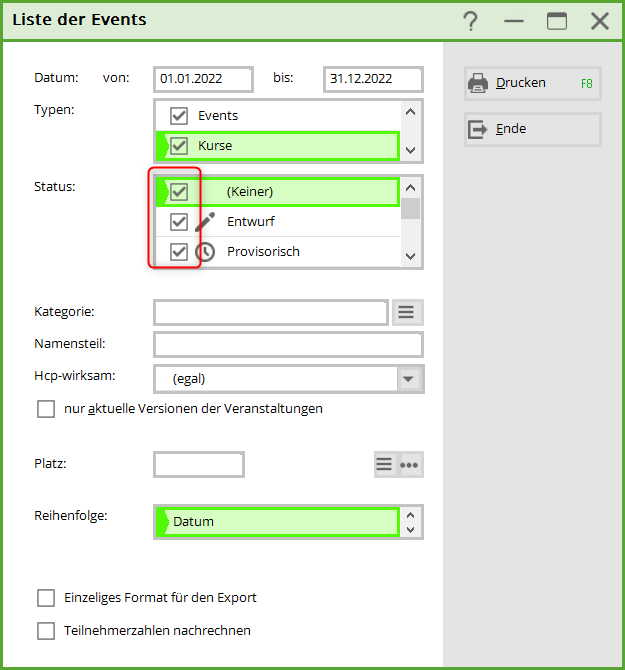
or priorities/status
The Finished List shows all courses or events selected in the period.
Individual layouts
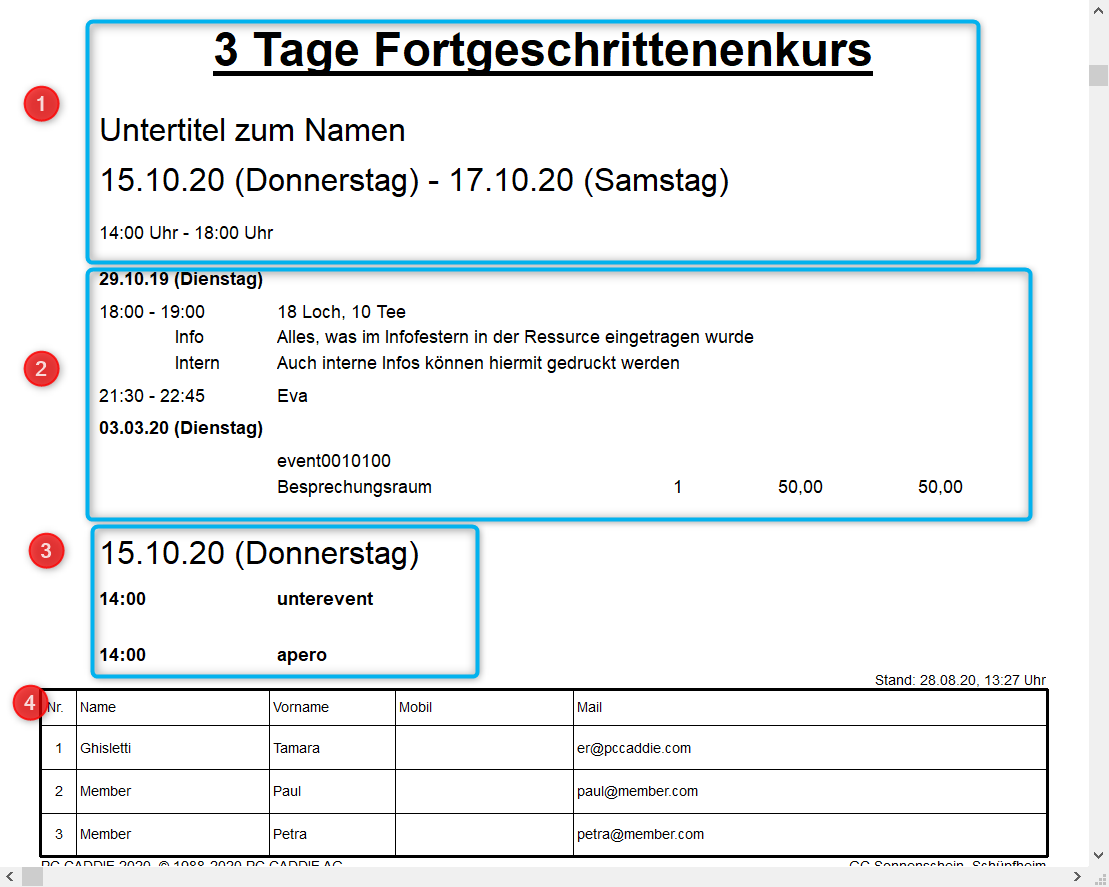
Function sheet
- General event information: Event name, subtitle, start & end of the event, time from - to.
- Individual resources: time, place or area, deposited information, if applicable article with price
- Sub-events: Time and title
- Information on the participants
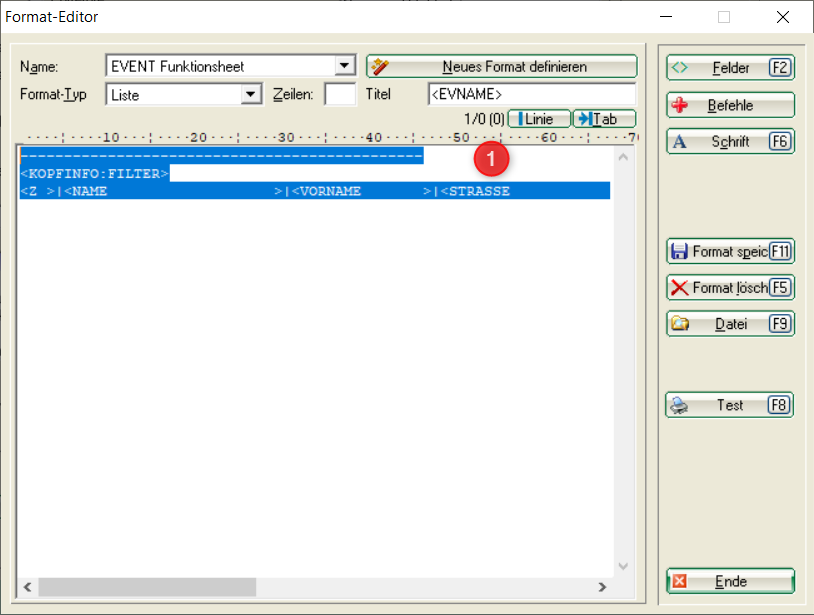
Layout for setting
1. command to copy. Of course, street, city, etc. can be added. However, it may be necessary to print in landscape format. 
----------------------------------------------
<KOPFINFO:FILTER>
<Z >|<NAME                   >|<VORNAME       >|<STRASSE                >|<PLZ     >|<ORT                    >|<MOBIL                >|<MAIL                              >
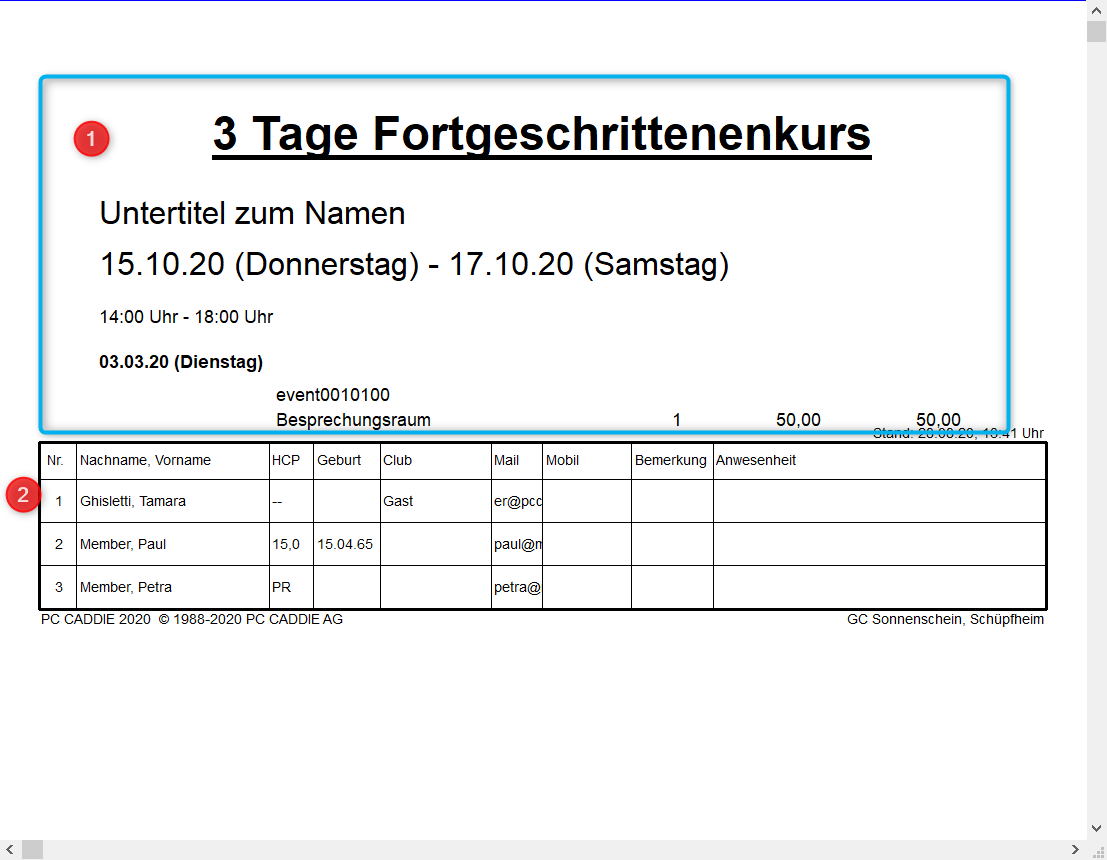
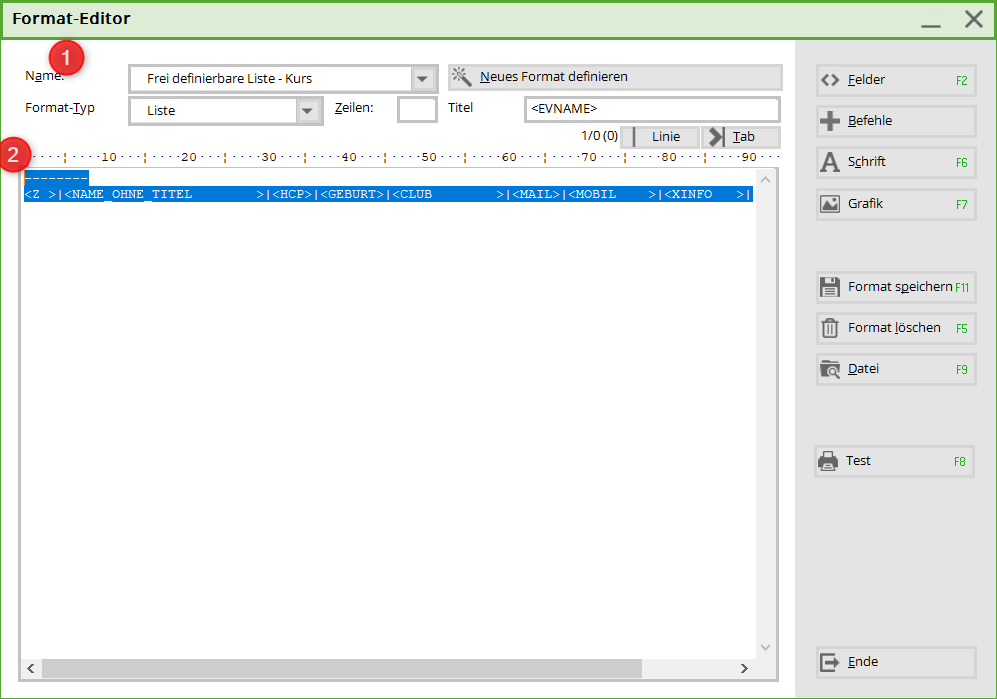
Freely definable list course or event
- Settings taken from the print window (tick activated or deactivated)
- Freely definable layout
- please adjust
- copy the layout below
--------
<Z >|<NAME_OHNE_TITEL        >|<HCP>|<GEBURT>|<CLUB        >|<MAIL>|<MOBIL    >|<XINFO   >|
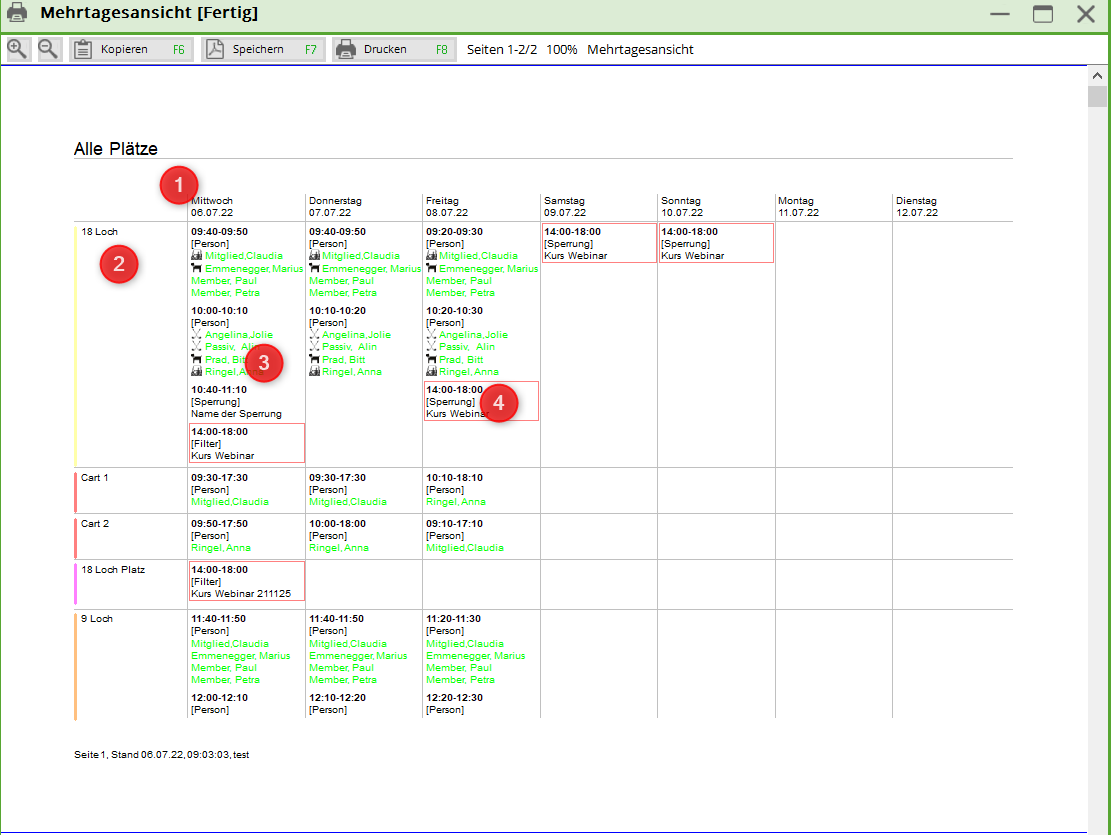
Multiday view
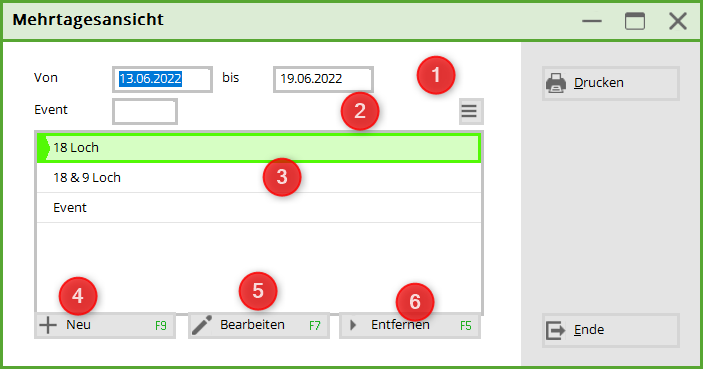
Open the multi-day view via Events | or directly in the event.
- Print portrait format - 7 days max
- Print landscape format - 14 days max
- The sections: Event, Tournaments, Courses are created automatically
- The multi-day view is the „image“ of the timetables
- For events, courses or tournaments only blockings, filters or resources are printed per event
- Date range
- Selection of event/event
- Saved print layouts
- Create new print layout
- Edit print layout
- Remove print layout
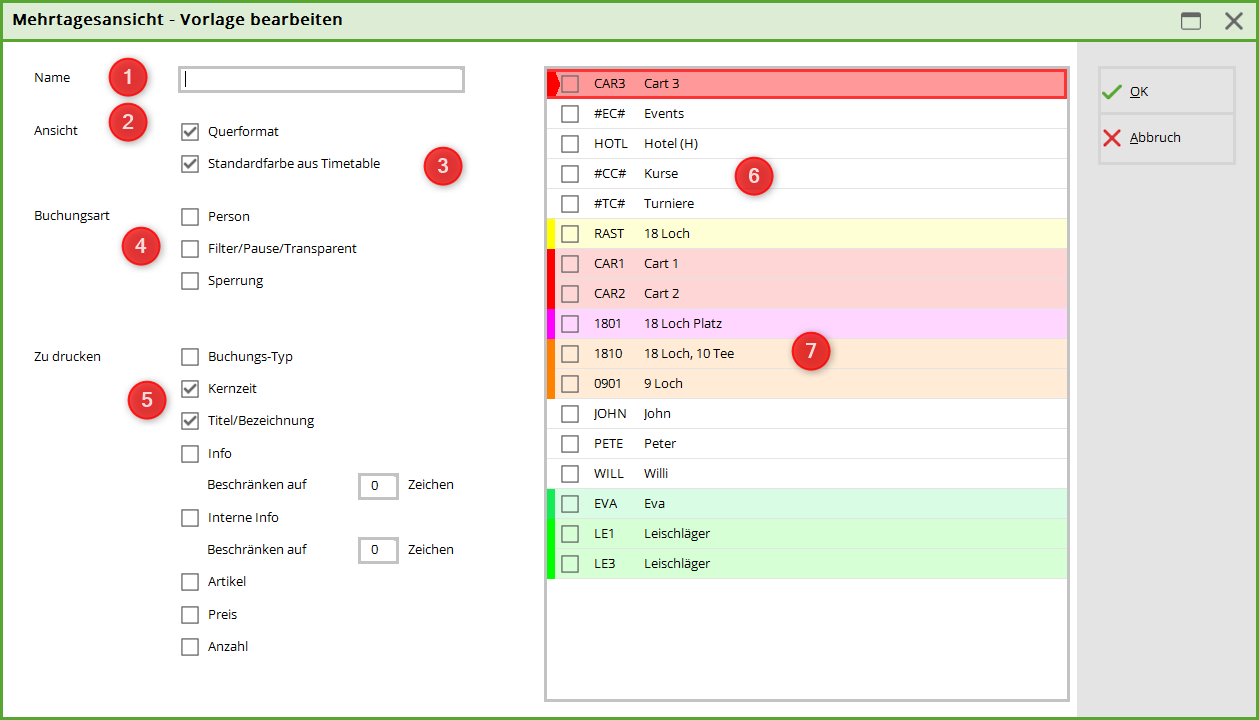
Explanations of the print layout
- Name: name the print layout
- View: Select here whether you want to print in landscape format. Without selection, printing is in portrait format
- Default colour from timetable: the printed information is outlined with the colour of the timetable area. An explicitly selected colour, e.g. in the blocking or resource, is always printed. It does not matter whether this tick is set.
- Booking type: What should be printed? Persons (flights or individual bookings), Filter/Pause/Transparent, Locking
- What information (apart from the time/date) should be printed?
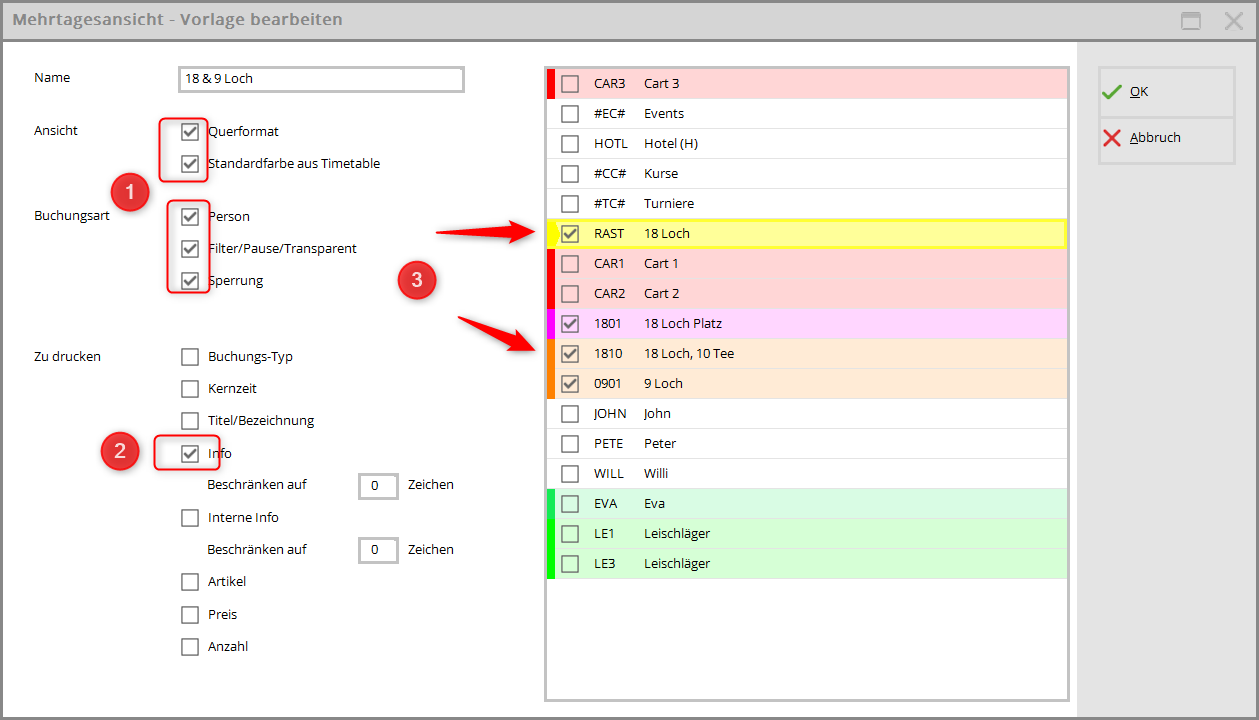
- Automatically created timetable areas: Courses, Tournaments & Events
- All other timetable areas
Example layout for timetable areas
- Keine Schlagworte vergeben

