Inhaltsverzeichnis
Cash desk
Basic settings for the general cash register function and the special catering cash register are made here.
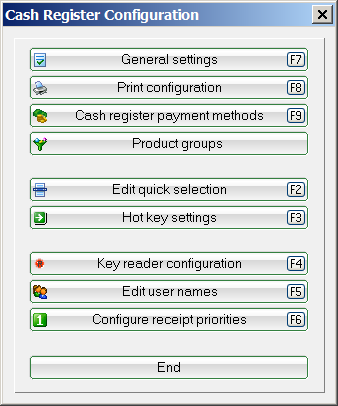
You can access this via Cash register/Cash register configuration to access the basic cash register settings.
Basic settings
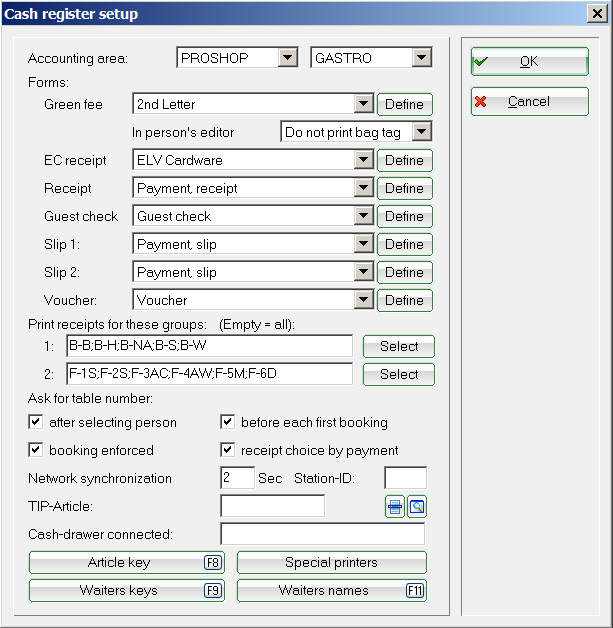
You can use Post to accounts to select the account area in which a cash register opens. Enter here e.g. PROSHOP and GASTRO here. When the cash register is open, you can collect payments for these two account areas in the cash register.
With Greenfee the green fee layout is stored which is required for bag tag printing (see also chapter greenfeebagtag). The PC CADDIE Support Team will be happy to help you make the exact settings for the bag tag.
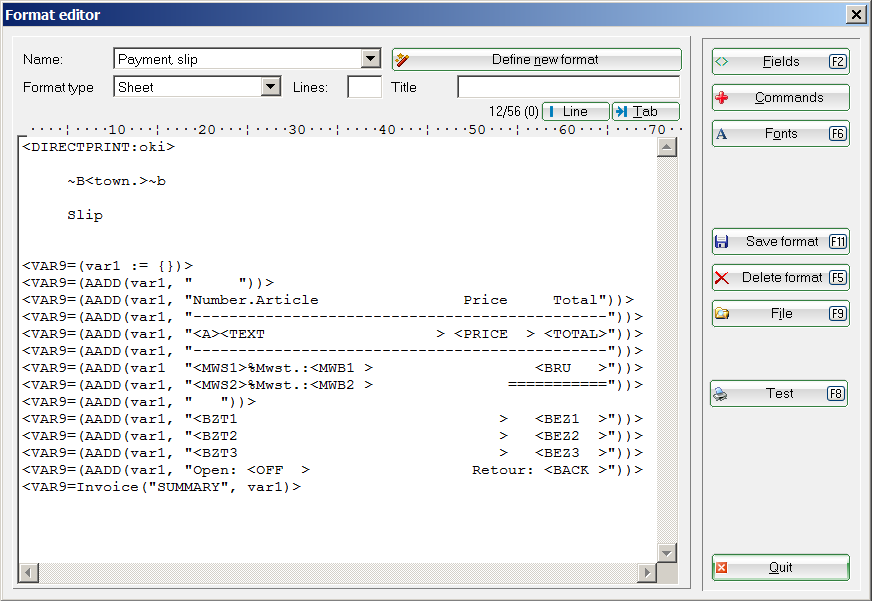
With EC receipt, receipt, guest check and voucher the respective layout is stored. You can access the respective layout via Define. Here too, the PC CADDIE Support Team will be happy to help you take your wishes into account.
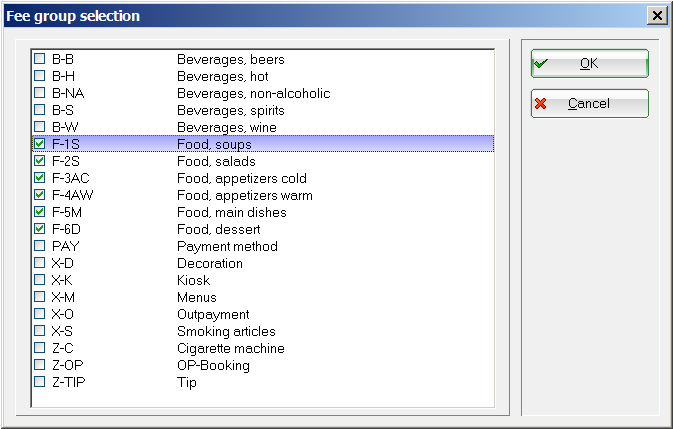
The other settings are primarily intended for the catering cash register. With Receipt 1 and Receipt 2 different printers can be stored. For example, it is possible to print receipt 1 at the counter in the catering trade and receipt 2 in the kitchen. This can be set differently for each account area. If two printers are to be used for the receipts, you must define which printer prints which items. You can do this under Receipt printing for these product groups store. In this example, the product groups are divided into bar and kitchen. Click on the button Selection button and tick the desired product groups.
Receipt 1 will therefore contain all drinks and cigarette items for the counter. The receipt printer that processes this receipt is also stored in the layout of the receipt print.
The other settings relate exclusively to a catering cash register. Tick the box Table enquiry after person selection, the catering cash register is activated. If you also tick the before each first booking a table must be allocated after a person has been selected in the cash register. You can of course also book a table immediately by entering a number from 1-999. This will book the respective table.
When Activate mandatory booking the item is automatically booked, the waiter no longer has to do this himself with F11. Booked items can only be cancelled. Items that have not been booked can simply be deleted.
With Receipt selection for payment you can set that a receipt is always printed out. Please tick the box here.

Checkout synchronisation in the network is preset to 2 seconds, no changes need to be made here.
If you are working with several cash register stations, you can assign each cash register a unique cash register number to each till. This enables you to print out sales statistics for specific cash registers. However, this means that a daily closing must also be carried out at each till. If you leave the field blank, the daily closing will include all daily takings from the various cash register stations.
If you want to post tips, enter the following under Tip booking type the article for this. The respective tip is then shown in the daily closing. For example, the following is noted: €515.00 cash income, of which €15.00 is a tip and €500.00 is actual cash income. You can recognise the corresponding payment in the cash book. The waiter can take the tip from the till.
If you have a cash drawer connected to your cash register, the Cash drawer on whether the cash drawer is controlled directly or via a receipt printer. The PC CADDIE support team will be happy to help you with this.
Further layouts
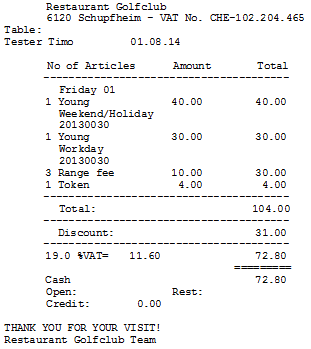
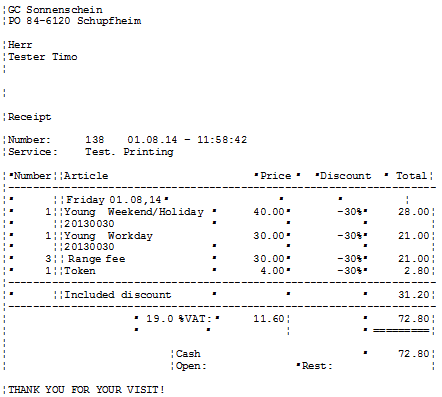
Receipt with discount
This special parameter must be entered so that the discount can be entered (in the person mask):
KASS_RGRABATT = Discounts are shown on the receipt
If you want a more detailed view, you need the customised layout.
// Vorne das kleine x wegnehmen, dann startet der Ausdruck ohne Rückfrage!
<xDIREKTDRUCK:1,LPT1>
<RAND:    •>
~B< heimatname.>~b
~S< heimatstra.> - < heimatplz.> < heimatort.>


<ADRESSE1.>
<ADRESSE2.>
<ADRESSE3.>

<ADRESSE4.>


~B<TYP.>~b

Nummer:  <RG_NR.>      <DATUM.> - < TIME().>
Service: < secu_name.>


<VAR9=(var1 := {})>
<VAR9=(AADD(var1, "    •"))>
<VAR9=(AADD(var1, "²Zahl••Artikel               ²Preis ² ²Rabatt  ²   Summe•"))>
<VAR9=(AADD(var1, "---------------------------------------------------------"))>
<VAR9=(AADD(var1, "² <A>••<TEXT                >²<OGES  >²<OEDIF%>²<GES   >•"))>
<VAR9=(AADD(var1, "---------------------------------------------------------"))>
<VAR9=(AADD(var1, "           ²<MWS1>%Mwst.:²<MWB1 >•             ²<BRU   >•"))>
<VAR9=(AADD(var1, "           ²<MWS2>%Mwst.:²<MWB2 >•          ²===========•"))>
<VAR9=(AADD(var1, "   "))>
<VAR9=(AADD(var1, "                    •<BZT1                 >   ²<BEZ1  >•"))>
<VAR9=(AADD(var1, "                    •<BZT2                 >   ²<BEZ2  >•"))>
<VAR9=(AADD(var1, "                    •<BZT3                 >   ²<BEZ3  >•"))>
<VAR9=(AADD(var1, "                    •Offen: <OFF  >    ²Retour: <RUECK >•"))>
<VAR9=(AADD(var1, "                   <DISCVAL.  >    <DISCTYP.   >
<VAR9=KassRechnung("AUSZUG", var1)>


Vielen Dank für den Besuch!!
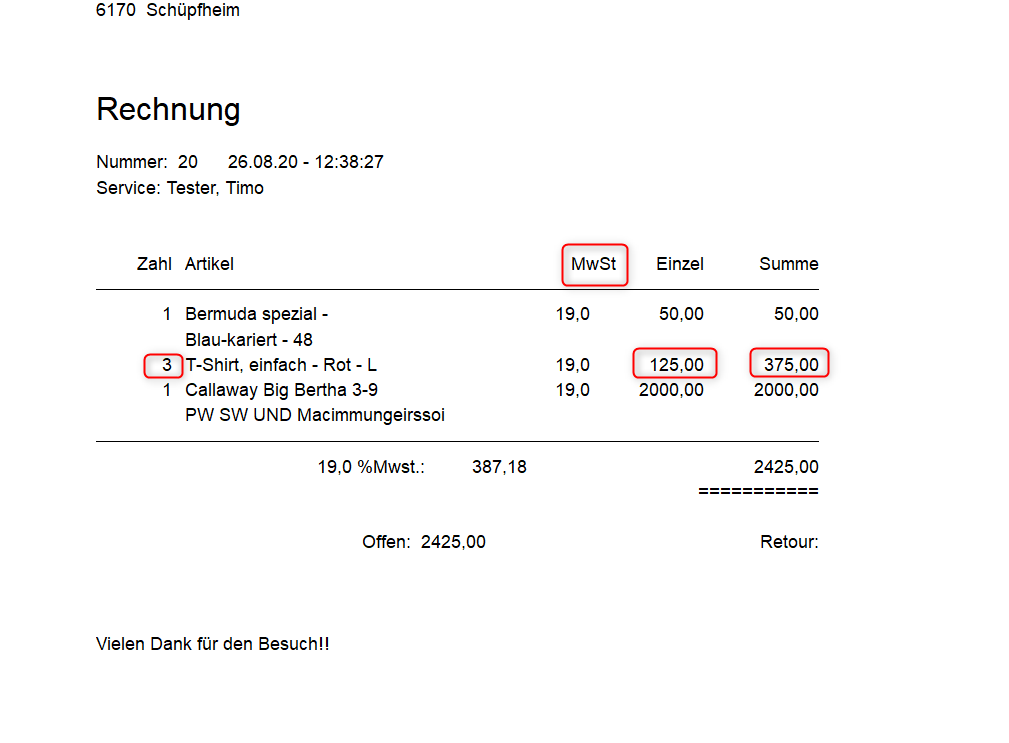
Receipt with unit price and VAT listing
If you sell several identical items, both the unit price and the total price are shown and the respective VAT is added.
The layout to copy for the cash register setting
// Vorne das kleine x wegnehmen, dann startet der Ausdruck ohne Rückfrage!
<xDIREKTDRUCK:1,LPT1>
<RAND:    •>
~B< heimatname.>~b
~S< heimatstra.> - < heimatplz.> < heimatort.>


<ADRESSE1.>
<ADRESSE2.>
<ADRESSE3.>

<ADRESSE4.>


~B<TYP.>~b

Nummer:  <RG_NR.>      <DATUM.> - < TIME().>
Service: < secu_name.>


<VAR9=(var1 := {})>
<VAR9=(AADD(var1, "    •"))>
<VAR9=(AADD(var1, "²Zahl••Artikel                    ² MwSt²Einzel²   Summe•"))>
<VAR9=(AADD(var1, "---------------------------------------------------------"))>
<VAR9=(AADD(var1, "² <A>••<TEXT                    >²<MW>²<EINZ  >²<GES   >•"))>
<VAR9=(AADD(var1, "---------------------------------------------------------"))>
<VAR9=(AADD(var1, "           ²<MWS1>%Mwst.:²<MWB1 >•             ²<BRU   >•"))>
<VAR9=(AADD(var1, "           ²<MWS2>%Mwst.:²<MWB2 >•          ²===========•"))>
<VAR9=(AADD(var1, "   "))>
<VAR9=(AADD(var1, "                    •<BZT1                 >   ²<BEZ1  >•"))>
<VAR9=(AADD(var1, "                    •<BZT2                 >   ²<BEZ2  >•"))>
<VAR9=(AADD(var1, "                    •<BZT3                 >   ²<BEZ3  >•"))>
<VAR9=(AADD(var1, "                    •Offen: <OFF  >    ²Retour: <RUECK >•"))>
<VAR9=KassRechnung("AUSZUG", var1)>


Vielen Dank für den Besuch!!
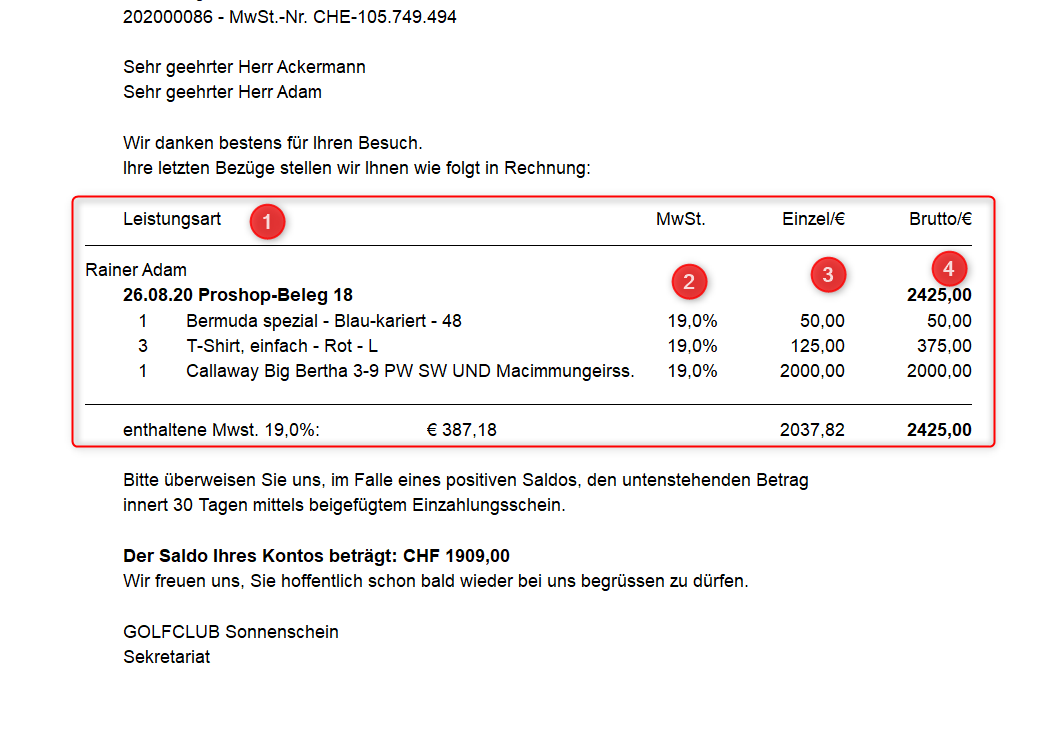
If the payment is made via the OP area, please enter the following command in the layout of the invoice (in the OP area).
<KONTO TEXT MWST EINZBRU BRUTTO OPDETAILS>
The unit price and VAT of the vouchers are then listed.
1. OPDETAILS
2. VAT
3. INCREASE
4. GROSS
Print configuration
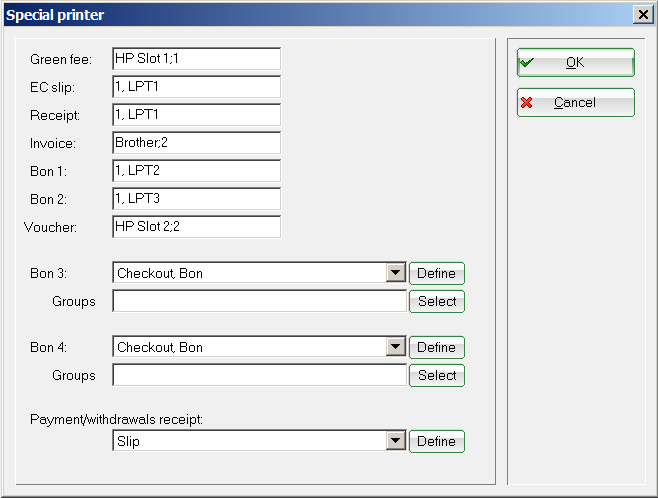
Special printers for the various layouts can be entered here. Further layouts of receipt 3 and 4 are defined here (button Define) and the corresponding product groups (button Select). The layout of the receipt/payment slip of the cashbook is defined here at the bottom, see also Cash book ).
Cash register payment types
A detailed description of the cash register payment types can be found at Cash register payment types.
Product groups
A detailed description can be found at Product groups .
Edit quick selection
You can find a detailed description at Quick selection.
Fixed key assignment
You can find a detailed description under Fixed key assignment.
Operator lock configuration
You can find a detailed description under Operator key.
Set user name
You can find a detailed description under Operator names.
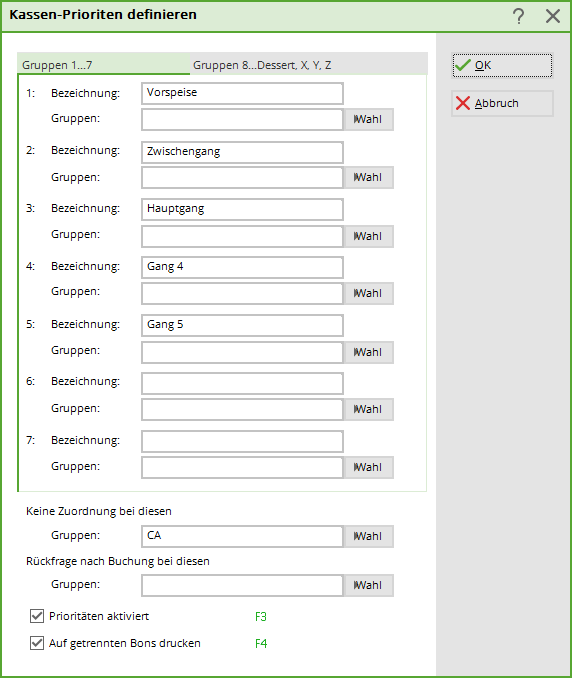
Set receipt priorities
Here you define which product groups are assigned to which aisles.
This is a general setting and can also be changed individually when posting items in the cash register.
With the tick Priorities activated these settings are activated. If the tick Print on separate receipts is ticked, the receipts are printed separately. This can be very practical if, for example, the salads and cold starters are prepared at a separate pass/workstation in the kitchen.
Conversion from CHF to Euro
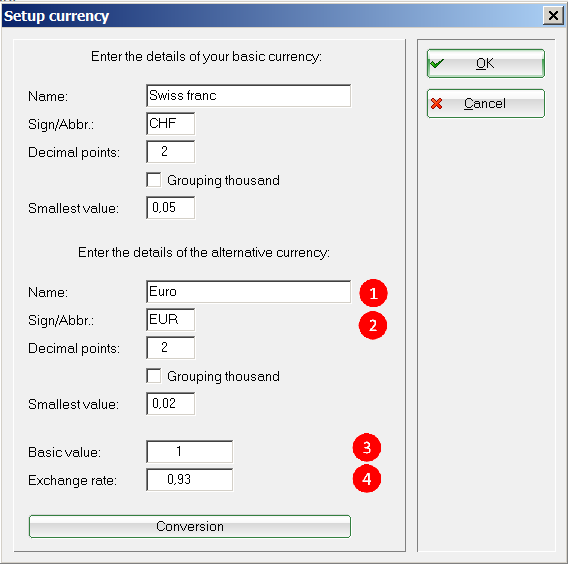
In order for CHF to be automatically converted into euros in the cash register, some preliminary work is necessary.
The conversion rate must be created. Click on Settings/Programme settings/General settings and then open the tab Turnover tab and click on Further details.
- Denomination: enter the desired currency
- Abbreviation: Enter the abbreviation of the desired currency
- Base value: enter 1
- Market value: enter the current value
With OK to confirm.
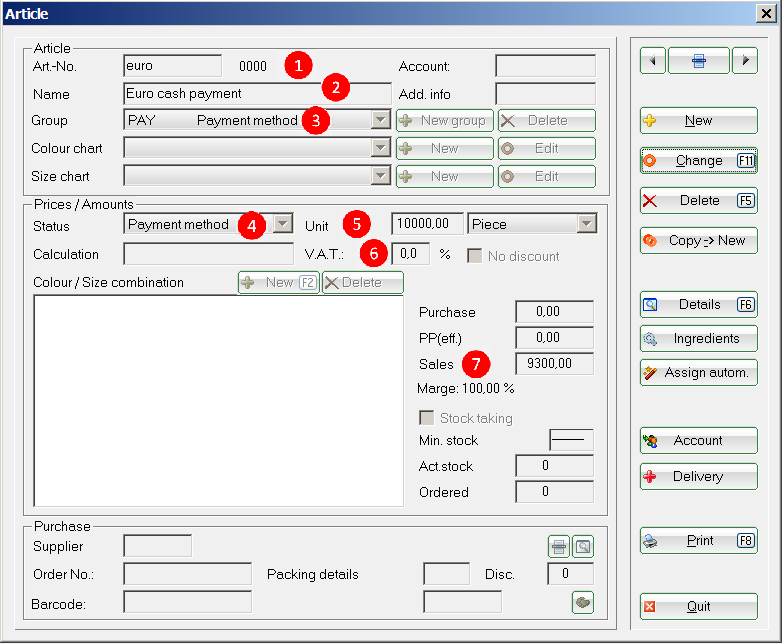
Next, the payment item is created. Settings/contribution types/articles/…create, edit, delete
Create new article
- Article no.: Euro
- Article description: Euro Cash payment
- Group: Payment method
- Status: Payment method
- Unit: 10000
- MwsT: MwsT
- VK(gross): 11800.00
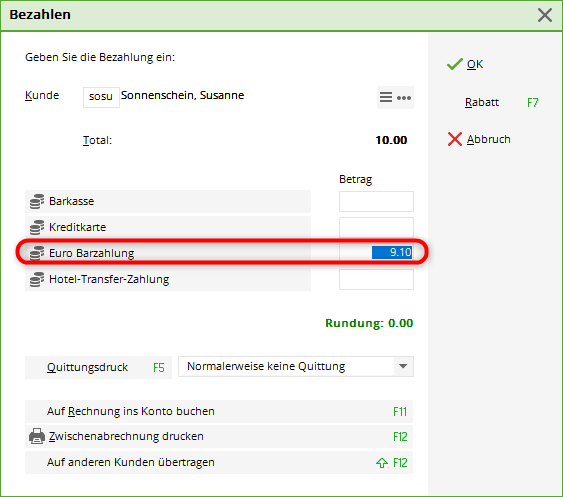
The payment looks like this in the cash register:

With a special layout, your receipt could now look like this:
If you need help creating the receipt, please contact PC CADDIE Support.
- Keine Schlagworte vergeben

