
Inhaltsverzeichnis
Time recording administration
Create in timetable
Open the timetable. Click on the „Area“ button and then on „New“

Create employees as follows:
1 Search abbreviation of the employee
2 Name of the employee
3 Start of the grid (depending on the start of work)
4 End of the grid (depending on the end of work)
5 Display of working time in minute increments, e.g. 15 minutes
6 Select colour to identify employees more quickly
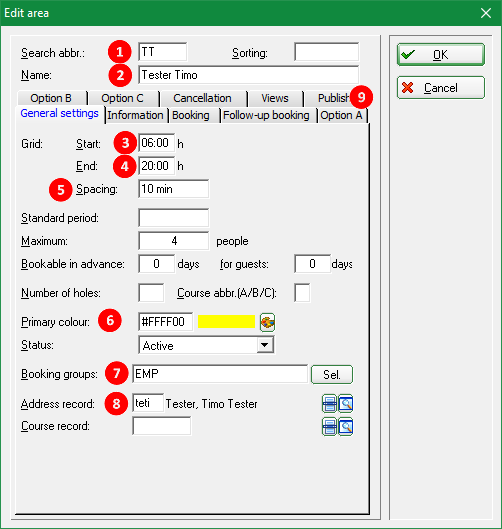
7 Select or create employee group
To do this, click on „Select“ in the Booking group field. The following window appears, whereby the groups already created can vary.

If there is no employee booking group yet, click on „New“ and create the group as follows.

Then confirm twice with OK.
8 Select the employee's address data record or create a new one if necessary and then select
9 Activate time recording
To do this, go to the „Publish“ tab. Tick „Use this area for time recording“. Confirm with OK.

When everything has been created, the employee appears as an „area“, see screenshot 1. Now select the employee that has already been created, hold down Ctrl. Hold down Ctrl. and click on „New“ to create a copy of the created employee. With this copy function, not all of the above points need to be processed, e.g. the colour and booking group have already been selected. Change the search abbreviation, the name and the address data record and confirm. Create all employees in the timetable.
Create in the password management
Call up the menu item via „Settings, Password management“. Create new employees via „New“, edit existing employees with „Change“. Select the „Details“ tab. Enter the relevant address data record and the timetable area. Tick the „Time recording“ box.

Under the CRM/DMS tab, you can assign a colour so that the person who is listed in the time control can also be found quickly in the password management.
Only people who have a „Yes“ in the „Parameter“ option in the password management are shown the „Time recording administration“ menu item. Users without parameter authorisation cannot save any changes if they call up the overview of their own time recording via the login dialogue from the employee overview.
Time recording administration
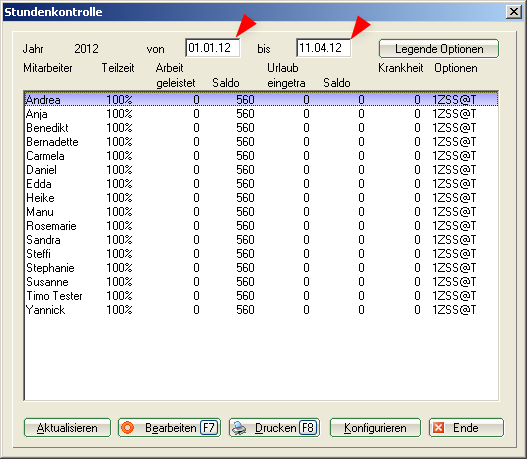
Open the administration via „Timetable, Time recording administration“. All persons who have been created should appear here.
If a person is missing from this list, please check whether all options as described above („Create in timetable“, „Create in password management“) are set for the missing persons.
In the date fields, you can adjust which period is calculated. If you want a list from 2011, for example, please enter from 01.01.2011 and until 31.12.2011. Then click on „Update“. PC CADDIE calculates the specified period. If you already want to enter data for the next year (holidays, working time……), you can also pre-date the date.
If you only want a single day to be displayed, limit the date to this one day.
The individual persons can be edited via „Edit“. The necessary settings for the individual persons are described below.
You can print out the „Time control“ window via „Print“.
Settings relating to working hours are made via „Configure“. This means that, for example, holidays are calculated using the daily hourly rate or sick days. These settings are usually only necessary once, when starting to manage the time control via PC CADDIE.
Configure
In the „Passwords“ tab, keywords are stored which are then used in the timetable to calculate the working time if the employee does not log in automatically.
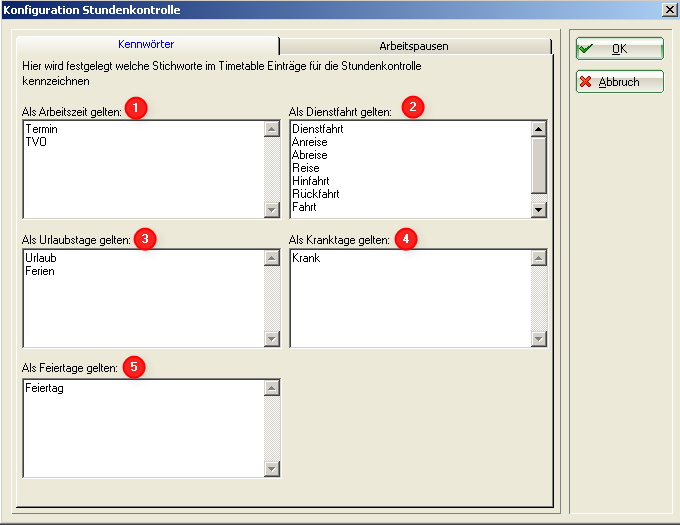
If employees do not have any appointments outside of work, it is sufficient to store the texts for holidays and sick days in window 3 and window 4.
If there are employees who have appointments outside the office, you can enter the texts for working hours in window 1 and for business trips in window 2. If you do not need to differentiate between working hours and business trips, it is sufficient to enter a text in one of the two windows. If you want to add working times manually, e.g. from the previous month, the text that you enter in the manual entries is best entered in window 1. The text should be kept relatively short to avoid spelling mistakes, e.g. Dienst or Arbeit.
You can enter a text for public holidays in window 5. In the employee options, there is the option of calculating the public holidays for all employees according to standard public holidays. At the same time, you can also make entries in the timetable with the text „Public holiday“ and have these entries calculated. This would be the case if, for example, the employee receives half a day as a public holiday at Christmas according to their employment contract, but this is not a standard public holiday.
Work breaks
In the „Work breaks“ tab, breaks can be entered which are automatically deducted from the registered working time.
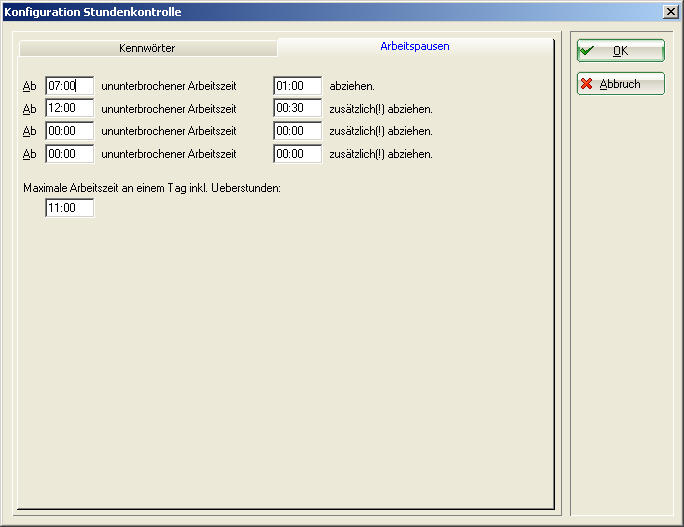
In the example above, the employee (if this is defined in the options) will have one hour's break deducted from a working time of 7-12 hours. If the employee works more than 12 hours, an additional 30 minutes break is deducted. This is only necessary if the employee is logged in continuously. It is also possible for the employee to log out when they go on a break and log back in when they return from the break.
The maximum working time on a day must be entered if it has been specified that an employee is only credited with 11 hours of working time per day, for example. If the employee would work 12 hours, only 11 hours are counted.
The entries in the „Passwords“ and „Work breaks“ tabs are confirmed with „OK“.
Edit
Select an employee and click on the „Edit“ button.
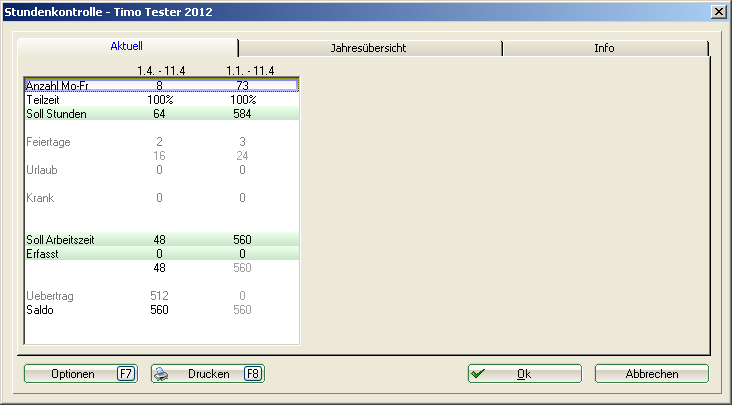
In the „Current“ tab, you will find the hours worked from the first of the month to the current day of the month.
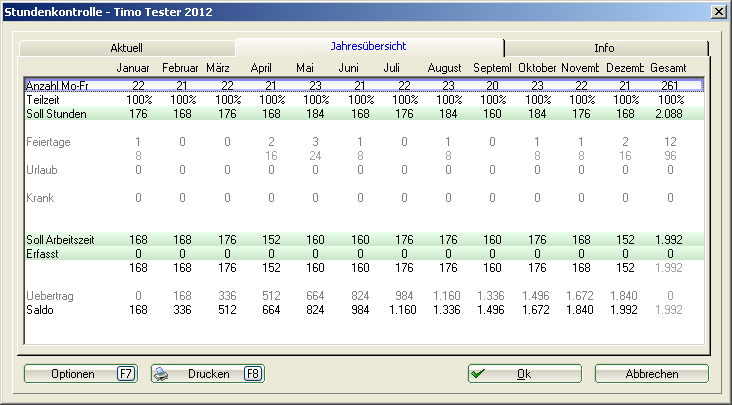
In the „Annual overview“ tab, you will find the complete list of hours worked for the corresponding year.
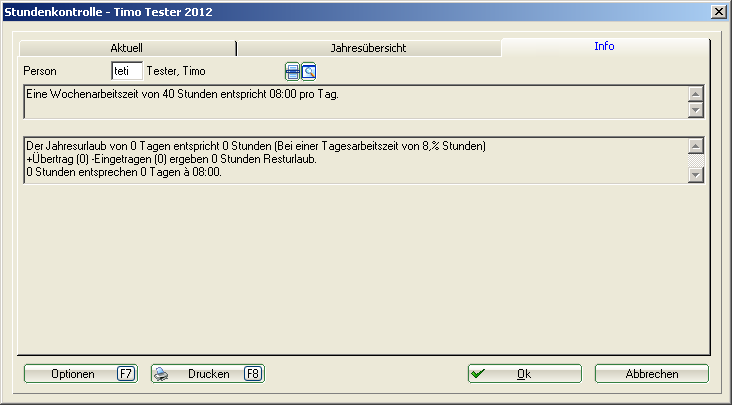
In the „Info“ tab, you will find brief information on working hours and annual leave.
Button Options
Here you will find 3 tabs in which settings must be made. These settings are normally only made once a year.
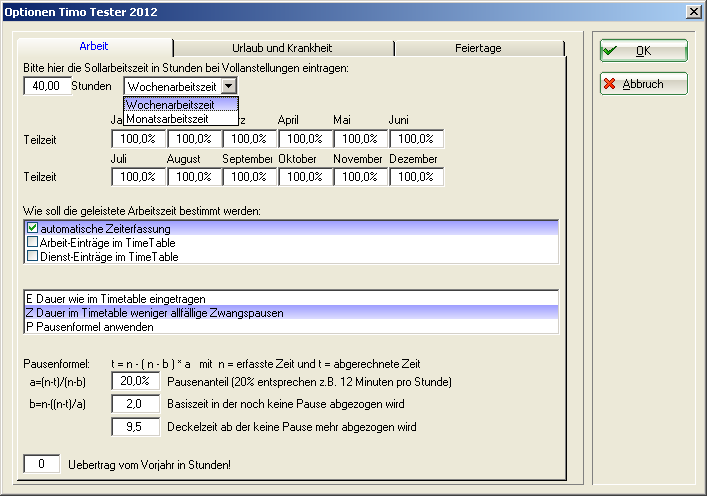
Labour tab
Hours
In the „Work“ tab, enter the employee's „Planned working time“ at the top. You can then select whether the hours are „weekly working hours“ or „monthly working hours“.
Part-time
Under part-time, enter the percentage of time worked. For a working time of 40 hours in the example above, this corresponds to 100%. If the employee only worked 20 hours, 50% would have to be entered here. In the case of a half-day employee, 20 hours could also be entered for the number of hours and 100% for the percentage. The percentages are stored for each month in which the employee works. If time recording is only used from 1 May, for example, the percentages from January to April are set to 0%. In the following year, 100% must then be entered for January to April.
How should the hours worked be determined?
There are three options in the first window:
1. automatic time recording - calculates the time between automatic logon and logoff.
2. work entries in the timetable (see Configure in this description)
3. service entries in the timetable (see Configure in this description)
Select how the working time is to be calculated. If the employee has no appointments outside the workrooms, it is sufficient to select „Automatic time recording“. If there are appointments outside the workrooms or manual supplements, tick the box next to „Automatic time recording“ for work entries and, if required, also for duty entries.
Only one option can be ticked in the second window. The options below can also be found in the „Holiday and sickness“ and „Public holidays“ tabs.
E Duration as entered in the timetable → Calculates the complete time between logging in and logging out of a day
Z Duration in the timetable less any compulsory breaks → subtracts the forced breaks entered under Configure from the time between logging on and logging off for a day.
P Apply break formula → with this option, the break formula to be entered in this window is applied.
Break formula
The break formula allows you to calculate and deduct breaks using a specific formula.
Carryover from previous year in hours
The overtime from the previous year is entered here in hours. Please note that the overtime has a minus sign, e.g. -40 for 40 hours of overtime. Without the minus sign, there would be too few hours worked.
Holiday and sickness window
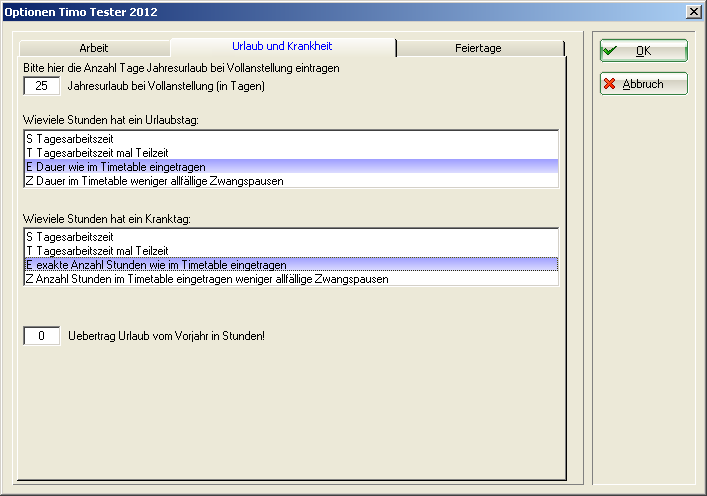
The annual leave is entered at the top.
The following windows show how the hours of a holiday day and the hours of a sick day are calculated.
How many hours does a holiday day have
S Daily working time → The exact daily working time is calculated here, i.e. for a 40-hour week, PC CADDIE calculates 8 hours per day regardless of how long the entry in the timetable for holidays is made.
T Daily working time times part-time → The part-time working time is divided equally between the 5 normal days
E exact number of hours as entered in the timetable (hours public holidays daily working time) → calculates the complete time entered in the timetable
Z number of hours in the timetable less any compulsory breaks (hours public holidays daily working time) → subtracts the compulsory breaks from the time entered in the timetable
How many hours does a sick day have
S Daily working time → the exact daily working time is calculated here, i.e. for a 40-hour week, PC CADDIE calculates 8 hours per day regardless of how long the entry is made in the timetable for a sick day
T Daily working time times part-time → The part-time working time is divided equally between the 5 normal days
E exact number of hours as entered in the timetable (hours public holidays daily working time) → calculates the complete time entered in the timetable
Z number of hours in the timetable less any compulsory breaks (hours public holidays daily working time) → subtracts the compulsory breaks from the time entered in the timetable
Holiday carried forward from previous year in hours
Enter the remaining leave days from the previous year in HOURS without a sign here.
Holidays tab
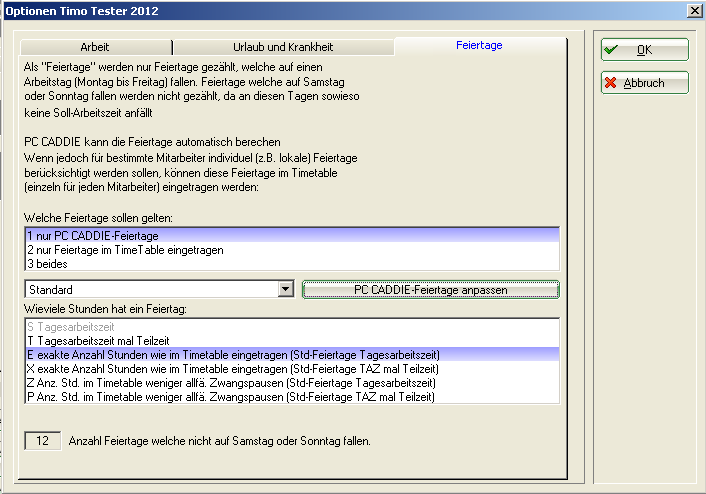
Which public holidays should apply
Again, there are three different options:
1 PC CADDIE holidays only → Only the public holidays that were entered using the „Customise PC CADDIE public holidays“ button are calculated.
2 Only public holidays entered in the timetable → Only public holidays that are entered manually with the text previously entered under „Configuration“ are calculated.
3 both → The PC CADDIE public holidays and the manually entered public holidays are calculated.
How many hours does a public holiday have
S Daily working time → the exact daily working time is calculated here, i.e. for a 40-hour week, PC CADDIE calculates 8 hours per day regardless of how long the entry is made in the timetable for a public holiday
T Daily working time times part-time → The part-time working time is divided equally between the 5 normal days
E exact number of hours as entered in the timetable (hours public holidays daily working time) → calculates the complete time entered in the timetable
X exact number of hours as entered in the timetable (public holidays TAZ times part-time) → calculates the complete time entered in the timetable in relation to the part time
Z number of hours in the timetable less any compulsory breaks (hours holidays daily working time) → subtracts the compulsory breaks from the time entered in the timetable
P Number of hours in the timetable less any compulsory breaks (hours public holidays TAZ times part-time) → subtracts the compulsory breaks from the part-time working time entered in the timetable
PC CADDIE Adjust public holidays
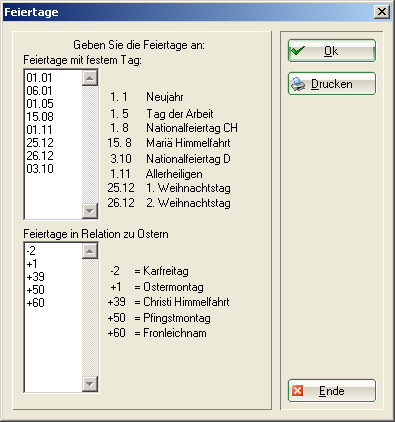
The public holidays that apply to the respective federal state or canton are entered in this window. The public holidays listed above are entered by default. If one of the public holidays listed above does not exist in your federal state/canton, simply delete the corresponding date or number in relation to Easter from the list. Then confirm with „OK“. You can print out the list of public holidays using the „Print“ button.
The public holidays entered are displayed in the Options tab at the bottom. Please note that the number shown here may vary with your public holidays if one of the public holidays falls on a Saturday or Sunday.

All options now entered are confirmed with „OK“. Edit each individual employee as described above.
Further
With Shift and a click on Options you can make settings for individual months. However, you can only make the settings that are also available for selection under Options.
Logging on/off working time via a reader
Meaning of the buttons
1 = logged in
2 = occupied
3 = do not disturb
0 = log off.
If nothing or 9 is pressed, information on the current status is displayed.
First press the button depending on the presence level, then hold the card in front of the reader.
Automatic configuration is also possible. If you hold the card in front of the reader and are logged out, you are automatically logged in. If you are already logged in and hold the card in front of the reader, you will be logged out. If you wish to change your configuration, please contact support.
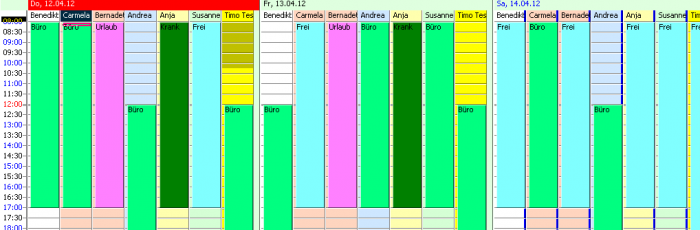
Writing the rota
You can use the timetable in PC CADDIE to write the complete duty rota for your employees. To do this, enter the employees' working hours via a filter entry in the timetable. The text of these work entries must not be the same as the text entered for the working time under Configuration.
Create a filter for your employees via „Define timetable views“. This will give you an overview of who is working each day.
In the example, the entries with „Office“ are purely informative. These entries are not counted for time recording. The entries „Holiday“ and „Sick“ are credited to the employee with the corresponding hours. If an employee works at the weekend, for example, and is given a day off during the week, these times are cancelled out. The hours from the weekend are counted, but the hours with the text „Time off“ are not.
If the „Daily working time“ option is activated for holidays, sick days and public holidays, an entry of e.g. 15 minutes in the timetable is sufficient for the employee to be credited with the full daily working time.
Filter entries and automatic entries can be edited with Shift + double-click on the entry.
Enter time manually
A new feature is that double-clicking or tapping Enter in a timetable area that is assigned to a person no longer opens the editing window for the timetable, the editing window for the timetable is no longer opened, but the window for creating a CRM entry is created. This only happens if you have selected the module "CRM/DMS (Customer Relationship Management and Document Management System)" module as a customer. This has the advantage that new CRM entries that are to be displayed in the timetable (tick „Show in employee schedule“) can also be created directly in the timetable. Timetable can also be created directly in the timetable. Double-click on the time to open a CRM todo window.

1. enter subject
2. enter time/duration
3. if the box is ticked, the appointment/time is displayed in the employee schedule.
If you want to open the previous timetable dialogue, you must hold down the ALT key while double-clicking or typing Enter.

1. enter the date (if the desired date was not previously selected in the timetable)
2. enter time
3. enter duration
Booking is displayed in the timetable.
- Keine Schlagworte vergeben
PC CADDIE AG
Bachtelweg 3
6048 Horw/Luzern
Schweiz
Kontakt
![]() Fon +49 2642 9854110
Fon +49 2642 9854110
Fax +49 2642 9854199
![]() Fon +41 41 5110600
Fon +41 41 5110600
Fax +41 41 5110699
![]() Fon +43 13 55667788
Fon +43 13 55667788
Fax +43 13 55667799
Mail support@pccaddie.com
Web www.pccaddie.com
Support Online-Module
PC CADDIE://online
GmbH & Co. KG
Fon: +49 2642 9854120
Fax: +49 2642 9854169
Mail support@pccaddie-online.de
Web www.pccaddie-online.de
Tägliche Supportzeiten:
April-Oktober
09.00 - 20.00 Uhr
November-März
09.00 - 18.00 Uhr