
Inhaltsverzeichnis
Online invoice & mailer
With this module you can send e-mails directly from PC CADDIE. These can be invoices, invitations to the AGM, information and much more.
Get a licence for the PC CADDIE module. You can request a quote at support@pccaddie.com . As soon as the module is licensed for you, you will find the menu item E-mail in PC CADDIE directly under People/Email
Mail and SMTP settings
For the basic settings for sending mails, please go to Settings, Programme settings to the Mail and SMTP settings
Please note: an unlimited mail server is required to use the mailer. Limited products, e.g. from Office365, are not suitable and can cause costs when troubleshooting. We recommend domain email hosting from PC CADDIE. We would be happy to send you a quote.
Basic settings
You can access directly via System/Contacts and Mail and SMTP settings to the basic settings.


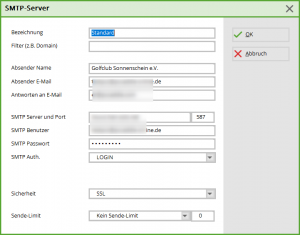
- Enter your SMTP server data here.
- Test function
- Directly to the STMP server (for test purposes only). Then please switch to dispatch by service.
- Default mail programme remains set
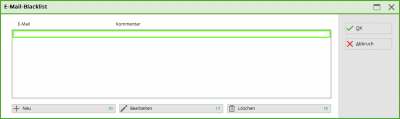
- Blacklist
- You can access the mail templates here


Spell check
To activate the automatic spell check, go to System, Language. Here, tick the box next to „Spell check: Check as you type“

Templates
Any number of templates can be created in the configuration. The templates can be customised individually.

(1) New

- (1) Name of the new template. A template with the same name must not exist
- (2) Template to be copied for new creation
- (3) Group to which the template belongs. A new group can be created by adding ???_ in front of the name
(2) Edit
Opens the window for editing the selected template.
(3) Rename
Renames the selected template.
(4) Delete
Deletes the selected template.
 A deleted template cannot be restored!
Edit template
General

ATTENTION: The command <MAIL.> always takes the mail address from the 1st address!
IMPORTANT: Use the command <MAILTO.> command, then the mail addresses in the „PAYMENT“ tab will be used if set accordingly!
- (1) Recipient: Can also be a field, as in the example.
- (2) Copy recipient:
- (3) Blind copy:
- (4) Sender:
- (5) Reply to: Email address that should receive replies to the mail.
- (6) Subject: As clear and meaningful as possible.
- (7) Enter footer
- (8) HTML: Edit HTML in the editor (preview: open mail as HTML in browser window)
- (9) Attachment
- (10) Options: Settings for sending
- (11) Preview
- (12) Fields: Show list of person fields
- (13) Text block - function is still in progress
- (14) Highlight font or heading → Insert
- (TX) Text of the mail
The commands in angle brackets <USERNAME.>, <USERMAIL.>, <USERTELE.> are user-defined and refer to the data stored in the password management. You can also enter the name, e-mail and telephone number of the contact person in the club directly here and send the e-mails in a standardised way.
Footer

HTML
We will be happy to create an HTML template for your mails. Please contact support for this.
Example:

However, you are also welcome to try this yourself according to the following instructions:
Template (to copy)
<!DOCTYPE html PUBLIC "-//W3C//DTD XHTML 1.0 Transitional//EN" "https://www.w3.org/TR/xhtml1/DTD/xhtml1-transitional.dtd">
<html xmlns="https://www.w3.org/1999/xhtml">
<head>
    <meta http-equiv="Content-Type" content="text/html; charset=UTF-8" />
    <meta name="viewport" content="initial-scale=1.0"/>
    <meta name="format-detection" content="telephone=no"/>
    <title>Rechnung</title>

    <style type="text/css">
        .ReadMsgBody { width: 100%; background-color: #ffffff;}
        .ExternalClass {width: 100%; background-color: #ffffff;}
        .ExternalClass, .ExternalClass p, .ExternalClass span, .ExternalClass font, .ExternalClass td, .ExternalClass div {line-height:100%;}
        html{width: 100%; }
        body {-webkit-text-size-adjust:none; -ms-text-size-adjust:none; }
        body {margin:0; padding:0;}
        table {border-spacing:0;}
        img{display:block !important;}
        table td {border-collapse:collapse;}
        .yshortcuts a {border-bottom: none !important;}
        img{height:auto !important;}
        .footer a, .footer a:visited, .footer {color: #25316a !important; text-decoration: none !important;}
    </style>

</head>

<body  style="font-size:12px;background-color:#eaeaea;">

<table width="100%"  border="0" cellspacing="0" cellpadding="0" style="background-color:#eaeaea;">

    <!-- Start Header -->
    <tr>
        <td style="background-color: #ffffff;" height="5" ></td>
    </tr>

    <tr>
        <td valign="top" height="40px" style="background-color: #fff;">
            <table width="700" align="center" border="0" cellspacing="0" cellpadding="0">
                <tr>
                    <td style="padding-left: 275px">
						<!-- ### BITTE ANPASSEN ### -->
                        <a href="https://www.pccaddie.net"><img  style="display: block" src="https://www.pccaddie.net/share/clubs/0410922/upload/2021-05-12_08h16_56.png"  width="150" alt="Logo" border="0"/></a>
						<!-- ### BITTE ANPASSEN ### -->
                    </td>
                </tr>
            </table>
        </td>
    </tr>

    <tr>
        <td style="background-color: #ffffff; border-bottom: 3px solid #f07d00;" height="5" ></td>
    </tr>
    <!-- Ende Header -->

    <!-- Start Email -->
    <tr>
        <td>
            <table width="700"  align="center" border="0" cellspacing="0" cellpadding="0" bgcolor="#ffffff" style="background-color:#ffffff;">
                <tr>
                    <td style="background-color: #eaeaea;" height="20" ></td>
                </tr>
                <tr>
                    <td valign="top">
                        <table width="700" border="0" cellspacing="0" cellpadding="0">
                            <tr>
                                <td  colspan="3" style="background-color: #f07d00; font-size: 16px; padding: 6px 15px; font-family: Arial,Tahoma, Helvetica, sans-serif; color:#ffffff; text-align:left;">
                                    <*TYPE.*> Nr. <*RG_NR.*>
                                </td>
                            </tr>
                            <tr>
                                <td colspan="3" height="10" ></td>
                            </tr>
                            <tr>
                                <td  colspan="3" style="padding: 0 15px; background-color: #ffffff; font-size: 13px; font-family: Arial,Tahoma, Helvetica, sans-serif; color:#333333; font-weight:normal; text-align:left;">
                                    <br>
                                    <*MAINTEXT.*>
                                   <br><br>
                                </td>
                            </tr>
                        </table>
                    </td>
                </tr>
                <tr>
                    <td colspan="3" height="10" style="border-bottom: 3px solid #f07d00"></td>
                </tr>
            </table>
        </td>
    </tr>
    <!-- Ende Email -->

    <!-- Start Teiler -->
    <tr>
        <td style="background-color: #eaeaea;" height="20" ></td>
    </tr>
    <!-- Ende Teiler -->

    <!-- Start PCCO-info -->
    <tr>
        <td align="center" valign="top" >
            <table width="700"  align="center" border="0" cellspacing="0" cellpadding="0" bgcolor="#ffffff" style="background-color: #ffffff;">
                <tr>
                    <td valign="top">
                        <table width="700"  align="left" border="0" cellspacing="0" cellpadding="0" bgcolor="#ffffff" style="background-color:#ffffff;">

                            <tr>
                                <td valign="top">
                                    <table width="700" border="0" cellspacing="0" cellpadding="0">
                                        <tr>
                                            <td  colspan="3" style="background-color: #f07d00; font-size: 15px; padding: 6px 15px; font-family: Arial,Tahoma, Helvetica, sans-serif; color:#ffffff;text-align:center;">
                                                Impressum
                                            </td>
                                        </tr>
                                        <tr>
                                            <td colspan="3" height="10" ></td>
                                        </tr>
                                        <tr>
											<!-- ### BITTE ANPASSEN ### -->
                                            <td  class="footer" valign="top" colspan="3" width="350" style="color: #25316a; padding: 0 15px; background-color: #ffffff; font-size: 12px; line-height: 16px; font-family: Arial,Tahoma, Helvetica, sans-serif; text-align:center;">
                                                <p style="margin: 0; line-height: 22px;">PC CADDIE AG,<br>
                                                Bachtelweg 3 | 6048 Horw</p>
												<p style="margin: 0; line-height: 22px;">Tel.: +41 41 511 06 00 | Mail: info@pccaddie.com | <a style="text-decoration: none; color: #25316a" href="https://www.pccaddie.de/">www.pccaddie.de</a></p>
                                                <p style="margin: 0; line-height: 22px;">Verwaltungsrat: Benedikt Schmedding (Präsident)<br>
												Marc Spangenberger<br>
												UID CHE-105.347.983 HR/MWST | USt-IdNr. DE 813580086</p>
												<!-- ### BITTE ANPASSEN ### -->
                                            </td>
                                        </tr>
                                    </table>
                                </td>
                            </tr>
                            <tr>
                                <td height="20" ></td>
                            </tr>
                        </table>
                    </td>
                </tr>
            </table>
        </td>
    </tr>
    <!-- Ende PCCO-info -->

    <!-- Start Teiler -->
    <tr>
        <td style="background-color: #eaeaea;" height="20" ></td>
    </tr>
    <!-- Ende Teiler -->

</table>
</body>
</html>
Customise logo
In the HTML, the position for the logo and the imprint is marked with <!– ### BITTE ANPASSEN ### –> before and after the text.
The customer's logo is usually saved in the Club Manager in the file manager at the bottom left:

Keep the mouse on the image name until the word url appears and then click. The following window opens with the address:

Copy this and replace the text highlighted in red with the new address:

ATTENTION: Please make sure that the address ends with png! svg e.g. distorts the logo for the recipient!
Change imprint
Scroll down in the HTML to the next <!– ### BITTE ANPASSEN ### –> Again, overwrite the text marked in red with the customer's details

In the HTML file <br> is used for a line break. Please insert this command if the imprint requires additional lines.
How to determine the colour code
With this colour code selector https://www.site24x7.com/de/tools/farbcode-wahler.html the customer's colour code can be defined very easily. Simply printscreen the customer's logo and insert the image in the colour code selector in the field provided. Then click on the desired colour and the colour code will appear on the right or at the bottom:

Adjust colour code
The colour code must be adjusted four times; for both bars and both lines. To do this, please search for the code #0061ae and replace it with the customer's colour code:
here just below the logo:

and further down a little above the imprint:

Adjust the font colour of the imprint
The font colour for the text in the legal notice can be changed at the top of the HTML. This is blue in the template:

For the black font colour, the colour code marked in red can be replaced with #333333
Appendix

- (1) Attachment: File path of the attachment. For automatically generated attachments <FILE01.> (e.g. invoice dispatch)
- (2) Name: Name of the attachment when it is sent. Can also contain fields.invoice <RG_NR.> (<NACHNAME, VORNAME.>)
- (3) Save: Save attachment or delete immediately after sending?
Options

- (1) Master template. The HTML can be accessed from the default here.
- (2) Should be set if something is to be attached.
- (3) Start e-mail dispatch on screen printing. Only remove if, for example, an invoice is to be printed & emailed.
- (4) Display and edit the finished email in the editor before sending. May interfere with mass mailing, for example.
- (5) Send delay: Send mail on a specific date
Predefined templates
Default (empty template)
Only this template is stored by default. It is used automatically when a new email is created from the mail window using the new email button in the mail window. Configure this template as required with the greeting formula and the sender.
Please do not delete this template!
Invoice (invoices/online invoice dispatch)
You can find basic knowledge about invoices here: Create invoices
Test mail and invoice layout
If you select Basic settings tick the box next to Test mail setting: Test on and have entered an e-mail address which is to receive the test mail with an invoice PDF, you now switch to a personal account (possibly yourself?) in a contribution area, e.g. CLUB.

Prepare an article for invoice printing (you can cancel the invoice after the test as usual and delete the article). and delete the article). Then continue on the right with Print.
We then look at the text for invoice with Edit what is still missing in the invoice layout:

- This command is really important. A so-called PGE file of the invoice is stored here, with which the stationery is also printed. If you still print your invoices on stationery pre-printed by the printing company, you should have PC CADDIE create a PGE file for you. You can also create the file create the file yourself
- Without this command, it is not possible to create the invoice by e-mail:!: It does not matter where the command is located in the invoice layout, the main thing is that it is included!
The command <BANKVERBINDUNG> prints the IBAN unrecognisable with xxxxxxx when sending the invoice by e-mail, in order to prevent future cybercrime.
If everything fits, please save the layout with a suitable name, e.g. Invoice by e-mail
Test it now!
Print the invoice

If the test worked, you now have the following under Personal e-mail in your outbox list, and the test email is also in the inbox of the email address that you specified in the Test to you entered under Test to.
Don't forget to cancel the invoice in your test person's account! 
Single invoice dispatch
If you tick the box next to Test on have removed the tick, you can simply send invoices individually by e-mail directly from the customer accounts with the appropriate invoice layout. If no email address is stored for a customer in the personal data, PC CADDIE will open a query and ask you for the email address when printing the invoice.
If you then decide to print out the invoice and send it by post, please switch to an invoice layout without the command <SENDMAIL:INVOICE>
Send invoice in series
- Firstly, start sending invoices by e-mail! This gives you all the automatic options and the process is simple!
- Then the invoices are printed for dispatch by post.
You start serial invoice printing as usual via Turnover/Invoices. Make sure that the invoice layout Invoice by mail is set, with the command <SENDMAIL:INVOICE>.
You do not need a special person filter. When invoices are sent by e-mail, invoices are only created automatically (with invoice number) for those persons for whom an e-mail address is stored.
All other amounts prepared in the accounts are then also available for printing on paper. You do not need a special person filter here either, you should only change the invoice layout to a layout without the command <SENDMAIL:INVOICE>.
Before sending, you will be asked whether you want to send all mails at once or confirm them individually:

With no for all and Cancel you can cancel the dispatch again at this point.
Mail outgoing list

- E-mail in preparation
- E-mail deleted
- E-mail sent
- Attachment
Configuration in the person mask
In the person mask under the tab Bank/Payment tab, you define the e-mail address to which the invoice is to be sent.

If you use the module Sending invoices by e-mail and use it, you can use the dispatch tick the box as PDF to this e-mail address: and in the line e-mail line, enter the e-mail address to which the invoice should then be sent by e-mail. This e-mail address can be added to the e-mail addresses in the tabs Address and 2. address and is used exclusively for sending invoices by e-mail.
The first time you activate the e-mail by invoice, the general enquiry is displayed.
Or can be called up at any time under: Settings - Programme settings - General settings - Sales tab

This wizard helps you to copy the e-mail addresses correctly into the Payment tab.
The e-mail addresses are selected as follows:
1st e-mail filled - 2nd e-mail empty > 1st e-mail goes to invoice by e-mail
1st e-mail filled but with ! in front - 2nd e-mail empty → dispatch by post - invoice by e-mail remains empty
1st email empty - 2nd email filled → 2nd email goes to invoice by mail
1st e-mail empty - 2nd e-mail filled but with ! before → dispatch by post - invoice by e-mail remains empty
Exclamation mark (!) remains and continues to apply only for the newsletter dispatch (Supermailer)
Examples
Mail merge by email - with or without attachment
The email module can also be used to send serial letters or invitations by email.
These mails can be sent with any attachments. However, a Word document cannot be linked with a personalised salutation.
If the attachment requires mail merge fields, this is possible if the document is created in advance using the graphics editor.
Create the corresponding mail template and name it:

Attachments are best linked in the text. To do this, the document must be saved in the Club Manager in the file manager:

Click in the large window, select the document and save it. Then park the mouse on the title of the document until this URL display appears:

Click with the left mouse button and confirm this window with OK. This saves the link in the clipboard.

Now open the mail template and link the document with a word as follows:

The link is created using two colons, which are placed directly next to the word without spacing. Then paste the copied link without spacing via Ctrl/Control + V or with the right mouse button. It does not matter whether the link is inserted directly in the text or as an attachment at the bottom.
In our example, we do not need an attachment created by PC CADDIE (this is only the case for invoices and reminders). It is therefore important that the following tick is removed:

We only need the addresses for sending from the personal data. To do this, we create a template under Contacts / Mail merge without text but with the note that the mail (this is what the SENDMAIL command is for) will be sent to the selected persons with the corresponding template (we name this with the designation after the colon).

Then select the desired person filter and print the mail merge to the screen.
Multiple SMTP accounts
You can also use several SMTP accounts in PC CADDIE, depending on the template.
Under the menu item System - Contacts - Mail and SMTP settings you will find the setting options. Via the button New button to create a second SMTP account:

Make the settings for the two SMTP accounts accordingly:


These two filters (domain) are set accordingly in the mail template:

OR

Payment reminders or reminders by e-mail
With a special parameter, it is possible to attach the original invoice to a payment reminder or overdue notice. In order for the invoice to be attached to the payment reminder, the following command is required in the layout.
For the payment reminder without specifying the reminder level: <RECHNUNGEN:NOLEVEL>

For reminders with indication of the dunning level: <RECHNUNGEN>

The commands are integrated into the text:

The names of the attachments in the mail template can be stored in this way:

- Payment reminder or reminder
- Original invoice
Our support team will be happy to help you activate this function.
- Keine Schlagworte vergeben
PC CADDIE AG
Bachtelweg 3
6048 Horw/Luzern
Schweiz
Kontakt
![]() Fon +49 2642 9854110
Fon +49 2642 9854110
Fax +49 2642 9854199
![]() Fon +41 41 5110600
Fon +41 41 5110600
Fax +41 41 5110699
![]() Fon +43 13 55667788
Fon +43 13 55667788
Fax +43 13 55667799
Mail support@pccaddie.com
Web www.pccaddie.com
Support Online-Module
PC CADDIE://online
GmbH & Co. KG
Fon: +49 2642 9854120
Fax: +49 2642 9854169
Mail support@pccaddie-online.de
Web www.pccaddie-online.de
Tägliche Supportzeiten:
April-Oktober
09.00 - 20.00 Uhr
November-März
09.00 - 18.00 Uhr